Practice the First Five Calligraphy Strokes
Practice the first five basic calligraphy strokes using a brush pen or marker and paper, repeating drills to build steady pressure, control, and neat letterforms.


Step-by-step guide to Practice the First Five Calligraphy Strokes
Step 1
Place your paper on a flat table and set your brush pen marker pencil ruler and scrap paper within reach.
Step 2
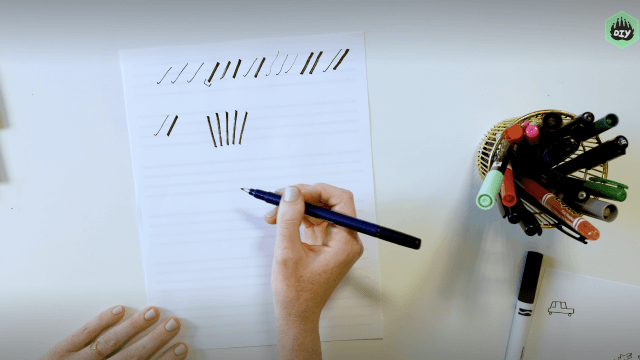
Use the pencil and ruler to draw three light horizontal guide lines across your paper about a finger width apart.
Step 3
On the scrap paper make twenty quick wrist circles or scribbles to warm up your hand.
Step 4
Hold your brush pen at a 45-degree angle and rest your hand lightly on the table for steady control.
Step 5
On the top guide line draw ten thin upstrokes using very light pressure from bottom to top.
Step 6
On the next guide line draw ten thick downstrokes using heavier pressure from top to bottom.
Step 7
On the next line practice ten underturn strokes starting with light pressure then increasing slightly as you curve under.
Step 8
Draw ten overturn strokes starting with heavier pressure then easing to light pressure as you move upward.
Step 9
Practice ten compound curve or oval strokes that go thin up thick through the middle and thin again at the end.
Step 10
Use the strokes you practiced to write three simple letters like l o and u three times each on fresh paper focusing on smooth connections.
Step 11
Take a photo of your best practice sheet and share your finished calligraphy drills on DIY.org
Help!?
What can we use instead of a brush pen, marker, or ruler if we don't have them?
If you don't have a brush pen, use a soft paintbrush with water-based ink or a chisel-tip marker for similar thick/thin effects, and substitute a straight book edge or the long side of a cereal box for the ruler while keeping the pencil guide lines light.
My strokes look uneven or shaky—what step might be causing this and how can we fix it?
If upstrokes are too thick or downstrokes shaky, do extra wrist-circle warm-ups on scrap paper, make sure you're holding the brush pen at a 45-degree angle and resting your hand lightly on the table, and test pressure on the scrap before drawing on the top guide line and the next lines.
How can we change the activity for younger or older kids?
For younger children, draw wider guide lines with the pencil and ruler, use a washable felt-tip marker instead of a brush pen, and reduce repetitions to five per stroke, while older kids can tighten the guide spacing, increase repetitions to ten or twenty, and practice connecting strokes into words on fresh paper.
How can we extend or personalize the calligraphy practice once we've finished the drills and letters?
To enhance the activity, experiment with multiple colored brush pens when practicing the five strokes, add decorative compound-curve flourishes to your l, o, and u on fresh paper, and mount your best practice sheet as a handmade card before photographing it to share on DIY.org.
Watch videos on how to Practice the First Five Calligraphy Strokes
5 Unique Ways to Practice Lettering the Basic Strokes for Calligraphy Beginners
4 Videos

5 Unique Ways to Practice Lettering the Basic Strokes for Calligraphy Beginners
Learn Calligraphy in 5(ish) Minutes With Just a PENCIL!
Italic Calligraphy Tutorial : 01. the Basic, from Tools to Strokes (Beginner Friendly)
Basic Calligraphy Strokes (Beginner Calligraphy 101) | The Happy Ever Crafter
Facts about brush calligraphy and hand lettering
🖋️ The first five basic strokes (like upstroke, downstroke, overturn, underturn, and compound curve) are the building blocks for many brush-lettered alphabets.
🐉 Chinese calligraphy teaches essential strokes with the 'Eight Principles of Yong' — one character contains eight stroke types used for practice.
🖌️ Brush pens combine a flexible tip with an ink reservoir so beginners can practice pressure control without messy ink and brushes.
💪 Practicing simple stroke drills 10–20 minutes a day builds muscle memory and noticeably steadier control in just a few weeks.
🎯 Calligraphy contrast comes from pressure: downstrokes are heavier/thicker, upstrokes are lighter/thinner — that contrast makes letters pop.
How do you practice the first five calligraphy strokes?
What materials do I need for practicing basic calligraphy strokes?
What ages is practicing the first five calligraphy strokes suitable for?
What are the benefits of practicing these calligraphy strokes?
