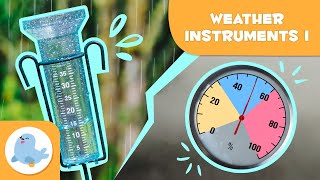
Measure humidity
Build a simple hair hygrometer using a human hair, cardboard, string, and a pointer to measure humidity changes and record observations.


Step-by-step guide to build a simple hair hygrometer
Humidity | Science for Kids
Step 1
Gather all your materials and bring them to a clean flat table.
Step 2
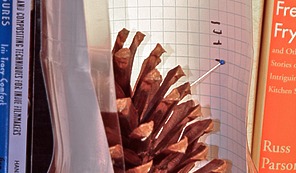
Use the ruler and marker to draw a straight vertical line with tick marks on the cardboard to make a measurement scale.
Step 3
Cut a small arrow-shaped pointer from extra cardboard using the scissors.
Step 4
Push the pushpin into the top center of the cardboard so the pin head sticks out and can act as a pivot.
Step 5
Tape one end of a single human hair to the top edge of the cardboard so the hair lies straight and flat.
Step 6
Tie a short length of string to the free end of the hair so the string hangs down from the hair.
Step 7
Tape the other end of the string to the back of the cardboard pointer so the pointer will move when the hair changes length.
Step 8
Hang the pointer on the pushpin pivot so it can swing freely against the scale.
Step 9
Attach a small paperclip to the bottom of the pointer to give it a little weight and keep the hair taut.
Step 10
Let the pointer settle still and then use the marker to mark its starting position on the scale and label it "baseline".
Step 11
Hold a damp cloth near (but not touching) the hair for 10 seconds to raise the local humidity.
Step 12
Watch the pointer for 30 seconds and see if it moves up or down.
Step 13
Mark the pointer's new position on the scale and label it "moist".
Step 14
Let the hair dry for about 5 minutes then bring a dry cloth close or blow gently on the hair and mark the pointer's new position as "dry".
Step 15
Share a photo and your humidity observations of your finished hair hygrometer on DIY.org.
Help!?
Can I substitute the human hair with something else if I don't have any?
Yes—use a clean natural hair taken from a hairbrush or a single animal hair (e.g., horse or pet hair) taped to the top edge in step 5, because synthetic thread usually won't change length with humidity.
Why isn't my pointer moving when I hold the damp cloth near the hair?
Make sure the hair is taped flat at the top (step 5), the string is tied and taped to the pointer (step 6), the paperclip is attached to keep the hair taut (step 12), loosen the pushpin so the pointer can swing (step 4), and bring the damp cloth closer without touching the hair for the full 10 seconds.
How can I adapt this activity for different age groups?
For younger kids have an adult pre-cut the cardboard and push in the pin while the child tapes the hair and watches movement, for ages 8–11 let them draw the scale and record baseline/moist/dry positions themselves, and for teens have them calibrate the scale against a real hygrometer and collect data over several trials.
How can we extend or personalize the hair hygrometer after finishing it?
Make multiple pointers with different hairs or fibers on the same cardboard to compare responses, add finer tick marks or calibrated humidity labels, decorate the board, and create a time-lapse photo sequence to share your observations on DIY.org.
Watch videos on how to measure humidity with a hair hygrometer
Weather School 4 Kids: Humidity
4 Videos

Weather School 4 Kids: Humidity

Make a Hygrometer to Measure Humidity - STEM activity
RAIN GAUGES and HYGROMETERS 💧🌧️ Weather Instruments for Kids🌡 Episode 1
Weather: Measuring Water in the Air - Humidity
Facts about weather science for kids
💧 Human hair can change length by up to about 3% with humidity, which is why it works as a natural humidity sensor.
🧭 Hair hygrometers were widely used in the 18th and 19th centuries before electronic hygrometers became common.
🌦️ Relative humidity is the percent of water vapor in the air compared to the maximum amount the air can hold at that temperature.
🔬 Hair absorbs moisture because of keratin proteins, causing strands to swell and bend as humidity changes.
🧵 A single hair is surprisingly strong and can hold tiny weights — tension changes from swelling are enough to move a pointer.
How do you build a simple hair hygrometer and use it to measure humidity?
What materials do I need to build a hair hygrometer?
What ages is the hair hygrometer activity suitable for?
What are the benefits of building a hair hygrometer?
