Make sculpture tools
Make simple, safe sculpture tools from household and recycled materials, then test them on clay to learn carving, shaping, and creating textures.


Step-by-step guide to make sculpture tools from household and recycled materials
Sculpture Learning: How to make child head sculpture
Step 1
Clear a small table and cover it with newspaper or a towel to protect the surface.
Step 2
Ask an adult to check your plan and help with cutting and gluing when needed.
Step 3
Take a fist sized piece of clay and roll it in your hands for one minute to warm it up.
Step 4
Press or roll the warmed clay into a flat slab about one centimeter thick using your palm or a craft stick.
Step 5
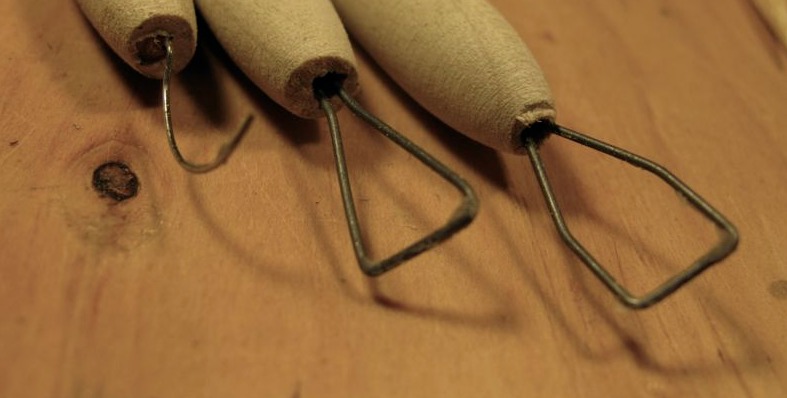
Make a scraper by pressing a piece of sandpaper onto the end of a craft stick and securing it with tape or glue.
Step 6
Make a comb tool by cutting small notches along one long edge of a cardboard strip with safety scissors.
Step 7
Make a stamp tool by attaching a bottle cap to the end of a craft stick using tape or glue.
Step 8
Make a loop cutter by bending a pipe cleaner into a small U or loop and twisting the ends to hold the shape.
Step 9
Line up your new tools beside the clay slab so each one is easy to reach.
Step 10
Use the scraper tool to shave thin layers from the slab to change the shape and smooth the surface.
Step 11
Drag the cardboard comb across the clay to create repeated lines and textures.
Step 12
Press the bottle cap stamp into the clay to make round patterns and repeat to build a design.
Step 13
Use the loop cutter to slice a rounded groove or to remove a small chunk of clay to shape curves.
Step 14
Use a toothpick to add tiny details like dots lines or small indents in your sculpture.
Step 15
Share your finished sculpture and the tools you made on DIY.org.
Help!?
What can I use instead of sandpaper, craft sticks, or pipe cleaners if I don't have them?
If you don't have sandpaper or craft sticks, press rough cardboard or an emery board onto a wooden spoon and secure with tape for a scraper, use a coin or cork instead of a bottle cap for a stamp, and twist a paperclip or floral wire into a loop in place of a pipe cleaner.
My clay is cracking or my tools won't stay attached — how do I fix that?
If the clay cracks while you roll it into a 1 cm slab, knead and warm it longer or add a few drops of water, and if tape or glue won't hold the sandpaper or bottle cap to a craft stick, wrap the tape tightly or ask an adult to use stronger glue or help secure them.
How should I change the activity for different ages or abilities?
For toddlers, have an adult do cutting and gluing and let them press the bottle cap and comb into an already-flattened slab, for 5–8 year olds let them cut notches in cardboard with safety scissors and make the loop cutter, and for 9+ year olds encourage making a precise 1 cm slab, detailed toothpick work, and experimenting with more complex textures.
What are some ways to extend or personalize this sculpture tools activity?
To extend the project, press leaves or fabric into the 1 cm slab with the comb and stamp, carve a name or pattern with the toothpick before drying or baking polymer clay, paint or seal the finished sculpture, and photograph your tools and piece to share on DIY.org.
Watch videos on how to make sculpture tools from household and recycled materials
How To Make Kinetic Sculptures | Children's Museum of Sonoma County | Art Activity for Kids
3 Videos
How To Make Kinetic Sculptures | Children's Museum of Sonoma County | Art Activity for Kids
How To Sculpt Monsters | Sculpting Lessons for Kids
How to Make a Sensory Sculpture | Tate Kids
Facts about sculpting and clay work for kids
🗿 One of the oldest known sculptures (a tiny figurine) dates back over 35,000 years — people have been making sculpture for a very long time!
🔥 Air-dry clay hardens by drying at room temperature, while kiln-fired clay becomes permanently strong after being heated to very high temperatures.
♻️ Found-object sculpture (using recycled or everyday items) was championed by artists like Pablo Picasso and Marcel Duchamp.
🍴 Simple kitchen and household items — forks, spoons, toothbrushes, combs — make awesome texture tools for clay.
🛡️ Making tools from cardboard, wooden sticks, and soft plastics keeps sculpting safe for kids while still letting them carve and shape confidently.
How do I make simple, safe sculpture tools from household items and test them on clay?
What materials do I need to make sculpture tools from household and recycled materials?
What ages is this activity suitable for?
What safety tips and creative variations should I know when making sculpture tools?
