Make land art
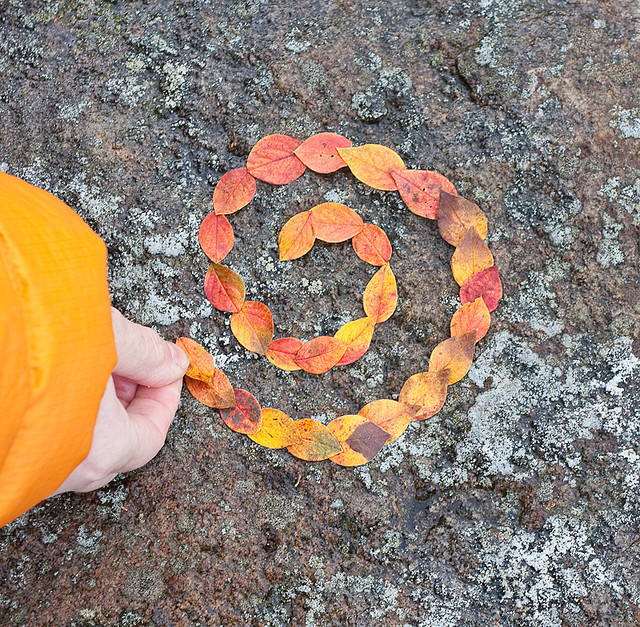
Create a temporary outdoor artwork using leaves, stones, sticks, and flowers; arrange patterns, explore symmetry, and photograph your land art before nature reclaims it.


Step-by-step guide to make land art
Woodland Garden makeover: diy natural playground for kids, montessori vibes
Step 1
Ask an adult to help and stay nearby.
Step 2
Choose a safe flat outdoor spot with enough space for your design.
Step 3
Gather leaves; stones; sticks; and flowers or petals in your bag or basket.
Step 4
Clear small debris from the chosen area to create a clean canvas.
Step 5
Decide on a simple design idea such as a circle spiral or mirrored pattern.
Step 6
Choose and place a focal center piece like a big stone or bright flower in the middle.
Step 7
Arrange a first ring or row of stones or sticks around the center.
Step 8
Add a second ring or row of leaves or petals around the first ring.
Step 9
Mirror one side of your artwork onto the other side to create symmetry.
Step 10
Continue adding rings or patterns using different materials to build texture and color.
Step 11
Step back a few paces to view your artwork and check its balance.
Step 12
Make small adjustments to improve spacing and symmetry.
Step 13
Have an adult help you photograph your land art from above to capture the whole design.
Step 14
Gently return any living flowers or delicate plants to nearby soil so nature can heal.
Step 15
Share your finished creation on DIY.org.
Help!?
What can we use if we can’t find flowers or big stones for the focal center?
If you can’t find a big stone or bright flower for the focal center, use a pinecone, acorn cluster, brightly colored ribbon, or a small toy from your bag as the focal center piece.
My design keeps losing its symmetry or pieces blow away—what should we try?
If pieces shift or symmetry looks off, anchor lightweight leaves and petals under heavier stones or sticks, make small adjustments while you step back to check balance, and have an adult hold the camera overhead when photographing to capture the whole design.
How can we change the activity for younger or older kids?
For younger children, simplify to one ring or a single spiral using just leaves and stones with close adult supervision, while older kids can build multiple rings, mirror complex patterns, and photograph the finished work for DIY.org.
How can we extend or personalize our land art once the basic rings are done?
To extend and personalize the project, make color-coded rings with petals and leaves, add textured layers of sticks and stones for contrast, write a short nature story about your design, and ask an adult to photograph it from above before gently returning any living plants to the soil.
Watch videos on how to make land art
46 Best DIY Backyard Ideas For Kids
4 Videos
46 Best DIY Backyard Ideas For Kids
Landform Diorama Project
Landforms Of The Earth- LandForms Project For Science Exhibition-LandForm Model For School Project
How to Draw a Simple, Fun Landscape - Elementary Art Lesson
Facts about nature-based art for kids
🗓️ The Land Art movement began in the late 1960s when artists started making big outdoor works outside galleries.
🎨 Andy Goldsworthy is famous for creating delicate outdoor sculptures from found leaves, stones, and sticks — and photographing them before they disappear.
🌿 Leaves can start to decompose in just a few days, so leaf-based land art is often very short-lived.
🪨 Stone spirals, circles, or cairns can last for months or even years depending on weather and location.
🔁 Many land artists use symmetry and repeating patterns because those designs echo patterns we already see in nature.
How do I make land art with my child?
What materials do I need to make land art?
What ages is land art suitable for?
What are the benefits of making land art with children?
