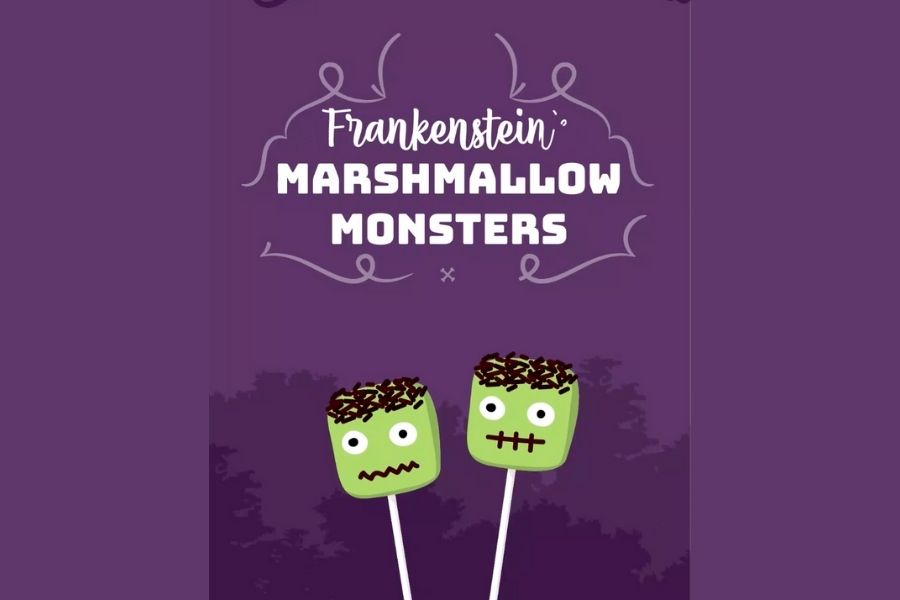
Make Frankenstein's Marshmallow Monsters
Build Frankenstein marshmallow monsters using marshmallows, toothpicks, icing, and candy decorations to learn structure, creativity, and practice safe food handling with adult help.


Step-by-step guide to Make Frankenstein's Marshmallow Monsters
Step 1
Wash your hands well with soap and water for at least 20 seconds.
Step 2
Arrange your marshmallows toothpicks icing candies plate and napkin on the plate so everything is easy to reach.
Step 3
Choose one marshmallow to be the head and one or two marshmallows to be the body.
Step 4
Push a toothpick halfway into the bottom of the head marshmallow to make a connector.
Step 5
Gently press a body marshmallow onto the exposed end of the toothpick so the head and body join.
Step 6
Insert toothpicks into the sides and bottom of the body marshmallow where you want arms and legs.
Step 7
Press smaller marshmallows onto the ends of those toothpicks to make hands and feet.
Step 8
Squeeze small dots of icing onto the head where you want eyes nose mouth and bolts.
Step 9
Press candy decorations onto each icing dot to create eyes nose mouth and hair.
Step 10
Stick two small candies to the sides of the head with icing to act as Frankenstein bolts.
Step 11
Use a thin line of icing to draw a stitched scar or hairline on the head.
Step 12
Set your monster on the plate and wait a few minutes for the icing to firm up.
Step 13
Wipe your hands and clean your workspace with the napkin and put away unused food items.
Step 14
Ask an adult to help you take a photo and share your finished Frankenstein marshmallow monster on DIY.org
Help!?
If I don't have toothpicks, what can we use instead?
Use pretzel sticks or trimmed plastic straws as connectors and press them halfway into the marshmallow just like the toothpick in step 4.
My marshmallow head keeps falling off—how can I fix it?
If the head or limbs slip, push the toothpick deeper into the head marshmallow (step 4) and let the assembled monster rest on the plate for a few minutes so the icing can firm up (step 13).
How can we adapt the activity for different age groups?
For younger children skip sharp toothpicks and let them press candies onto icing under supervision, while older kids can stack two-body marshmallows, draw detailed stitched scars with a thin line of icing (step 12), and use adult help for cutting or handling toothpicks.
How can we make the monsters more creative or last longer?
Personalize and extend the activity by tinting the icing green for skin, using varied candies for eyes, bolts and hair, arranging a monster family on the plate, and asking an adult to photograph your finished marshmallow monsters as in the final step.
Watch videos on how to Make Frankenstein's Marshmallow Monsters
Halloween Marshmallow Frankenstein Pops!🎃 #halloween #shortsfeed #marshmallow
3 Videos
Halloween Marshmallow Frankenstein Pops!🎃 #halloween #shortsfeed #marshmallow
🎃 Cute Halloween Origami Monsters - How to Fold Frankenstein Origami!
How to Create Monster Marshmallows w/ Brec & Coy | Halloween Hacks | Nick
Facts about edible crafts and food safety for kids
🧟♂️ Frankenstein's monster first appeared in Mary Shelley's 1818 novel "Frankenstein; or, The Modern Prometheus."
🍡 Marshmallows were originally made from the sap of the marshmallow plant (Althaea officinalis) in ancient Egypt.
🦷 Toothpicks are an ancient tool — archaeologists have found people using them for cleaning and crafting for thousands of years.
🍰 Royal icing dries hard and acts like edible glue, which makes it great for building stable candy structures with supervision.
🧼 Always wash hands and have an adult supervise when kids use toothpicks or small candies, since small pieces can be choking hazards.
How do I make Frankenstein's Marshmallow Monsters?
What materials do I need for Frankenstein's Marshmallow Monsters?
What ages is this activity suitable for?
What are the benefits and safety tips for making Frankenstein's Marshmallow Monsters?
