Make fractions with food
Use everyday food like fruit, crackers, or sandwich slices to build and compare fractions by dividing, labeling, and recording equal parts.
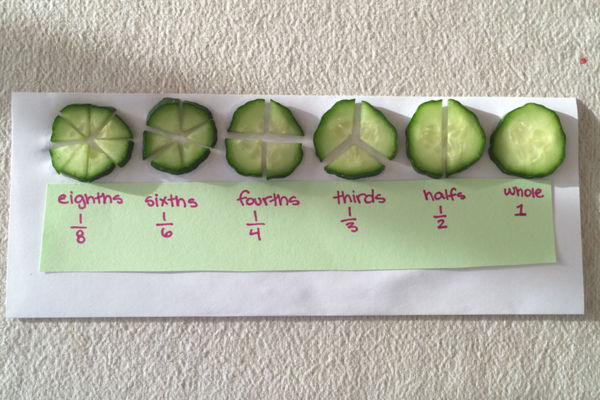
About this activity
Use everyday food like fruit, crackers, or sandwich slices to build and compare fractions by dividing, labeling, and recording equal parts.
What you need
Step by step
- 1
Step 1
Gather all the materials and bring them to a clean table.
- 2
Step 2
Wash your hands well with soap and water.
- 3
Step 3
Rinse any fruit you will cut under running water.
- 4
Step 4
Pick one food item to use first and put it on a plate.
- 5
Step 5
Decide which fraction you want to make such as 1/2 1/3 or 1/4 and say your choice out loud.
- 6
Step 6
Ask an adult to cut your chosen food into that many equal parts.
- 7
Step 7
Write the fraction in numerator slash denominator form on a small piece of paper.
- 8
Step 8
Place the paper fraction next to the group of pieces so it matches the food parts.
- 9
Step 9
Pick a second food item and put it on another plate.
- 10
Step 10
Ask an adult to cut the second food into a different number of equal parts.
- 11
Step 11
Line up one piece from the first food next to pieces from the second food to compare sizes and count how many small pieces equal one larger piece.
- 12
Step 12
Write down which fraction is larger or how many small pieces make one larger piece.
- 13
Step 13
Draw both fraction groups on your paper and color them to match the real food.
- 14
Step 14
Share your finished fraction creation on DIY.org
Fun facts
How do I make fractions with food so my child can divide, label, and record equal parts?
Start by choosing foods that divide evenly—apples, sandwiches, crackers or sliced bread. Have the child physically split an item into halves, thirds, quarters, etc., then label each piece (1/2, 1/4). Record results on paper: draw shapes and write fractions. Compare by lining up equal-size parts to see which fraction is larger. Ask questions about equivalence (two quarters = one half) and try combining parts to reinforce concepts.
What materials do I need to make fractions with food?
You'll need a selection of everyday foods—apples, bananas, orange slices, crackers, cheese slices, sandwiches or pizza—plus plates or cutters to divide items. Add child-safe knives or plastic cutters (adult supervision required), a cutting board, paper and pencil for recording, fraction labels or stickers, napkins and wipes. Optional: small plates or muffin tins to sort parts and a ruler or measuring cup for precise fraction demonstrations.
What ages is making food-based fractions suitable for?
Suitable for ages 4–10, adapting complexity: preschoolers (4–5) explore halves and quarters using large pieces, with adults doing the cutting; early elementary (6–8) can divide into thirds and fourths, label parts, and compare sizes; older kids (9–10+) practice equivalent fractions, add/subtract simple fractions, and record results. Always supervise young children with knives and match activities to attention span and fine-motor skill.
What are the benefits and safety tips for teaching fractions with food?
Benefits: hands-on food fraction activities build number sense, visual fraction understanding, fine motor skills, and everyday math connections like cooking and sharing. They encourage vocabulary (numerator/denominator) and problem-solving. Safety/variation tips: supervise cutting, choose allergen-free foods, and offer non-food manipulatives like paper circles or LEGO to practice. For a challenge, use recipes to double/halve portions or show equivalent fractions with different foods.
Watch & Learn
Need help?
What can we use if we don't have the exact foods, plates, or an adult to cut the pieces as the instructions ask?
If you don't have fresh fruit, plates, or an adult to cut, use pre-sliced cheese or crackers on a paper plate and write the fraction on the small piece of paper just like the instructions direct.
What should we do if the adult's cuts aren't equal and the pieces don't match when we try to compare sizes?
If pieces aren't equal after the step 'Ask an adult to cut...', draw guidelines on the food or use a ruler or cookie-cutter templates so the parts are the same size before you place the paper fraction next to them.
How can we change the activity to suit a toddler versus an older child?
For toddlers keep it simple by using whole grapes or banana halves and focus on saying the fraction aloud and placing the paper fraction next to pieces, while older kids can cut foods into 5–8 parts, write which fraction is larger, and draw more detailed colored fraction diagrams as the instructions suggest.
How can we make the activity more fun or personal after drawing and coloring the fraction groups?
To enhance the activity, let the child create a 'fraction snack' by combining specific numbers of pieces from each food, label each ingredient with a paper fraction, photograph the layout, and then share the finished fraction creation on DIY.org as the final step.