Make DIY Gifts: Gift Packs
Create and assemble personalized DIY gift packs using recycled boxes, tissue, handmade tags, small treats, and decorated wraps while practicing measuring and creativity.


Step-by-step guide to make DIY gift packs
Step 1
Gather all the Materials Needed and set them on a clear workspace so everything is easy to reach.
Step 2
Choose one recycled box to turn into your gift pack.
Step 3
Use the ruler to measure the inside length and width of the box.
Step 4
Lay a sheet of tissue paper flat and mark the measurements on it with your pencil.
Step 5
Cut the tissue paper along your marks with scissors.
Step 6
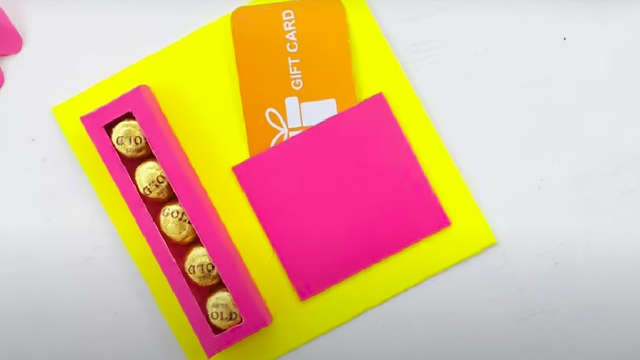
Place the cut tissue paper neatly inside the box to form a soft bed.
Step 7
Arrange the small treats inside the tissue paper so they look nice and balanced.
Step 8
Close the box flaps and use glue or tape to secure them if needed.
Step 9
Decorate the outside of the box using colouring materials stickers or washi tape to make it special.
Step 10
Cut a tag shape from the cardstock to make a handmade gift tag.
Step 11
Use the hole punch or sharp pencil to make a hole near the top of the tag.
Step 12
Write a short personalized message on the tag for the gift recipient.
Step 13
Thread the string or ribbon through the tag hole and tie the string to the box in a bow to finish your pack.
Step 14
Take a photo of your finished DIY gift pack and share your creation on DIY.org
Help!?
What can we use instead of tissue paper, cardstock, or a hole punch if we don't have them?
If you don't have tissue paper use a clean paper napkin or thin fabric, for cardstock cut sturdy cardboard from a cereal box, and poke the tag hole with the sharp pencil instead of a hole punch.
What should I do if the tissue paper doesn't fit or the treats move around when I close the box?
If the tissue paper is too small or treats shift, re-measure the box interior with the ruler, cut a slightly larger sheet so it forms a snug bed, and use a bit of tape under the treats or glue the tissue paper edges down before closing the flaps.
How can I adapt this gift-pack activity for younger kids or older kids?
For younger kids, pre-measure and pre-cut the tissue paper and cardstock and let them arrange treats and decorate with stickers, while older kids can do the measuring with the ruler, cut and punch their own tags, and create more elaborate decorations with washi tape or drawn designs.
How can we make the gift pack more special or use this activity to create several different gifts?
Make themed packs by choosing coordinating tissue paper, treats, and stickers, add a scented sachet or a small handmade coupon inside the tissue bed, and customize the cardstock tag with a photo or hand-drawn design before tying the string or ribbon.
Watch videos on how to make DIY gift packs
DIY Gift Box 🎁 | Easy Paper Craft | How to Make a Gift Box at Home
4 Videos

DIY Gift Box 🎁 | Easy Paper Craft | How to Make a Gift Box at Home
How to Make a mini I LOVE You Gift Box ❤️ Easy DIY Paper Craft
How to Make a Mini Gift Bag - Easy DIY Holiday Crafts
6 Quick and Easy Paper Bags | DIY | Art and Craft | Gift Bags
Facts about recycled crafts and gift-making for kids
🎁 Gift wrapping has long traditions — in Japan, furoshiki cloth has been used for centuries to wrap presents and belongings.
♻️ Upcycling gives old boxes and scraps a second life by turning them into new, useful, or decorative items instead of tossing them.
✂️ Kid-friendly gift packs usually use simple materials like cardboard, tissue paper, twine, and handmade tags that are easy to decorate.
📏 Measuring boxes, cutting tissue, and arranging items are fun ways kids practice real-world math and spatial thinking.
🎀 A small handmade tag or treat can make a gift feel extra special — personal touches are remembered more than price tags.
How do I make DIY gift packs using recycled boxes step-by-step?
What materials do I need to create personalized DIY gift packs?
What ages are DIY gift pack activities suitable for?
What are the benefits and safety tips for kids making DIY gift packs?
