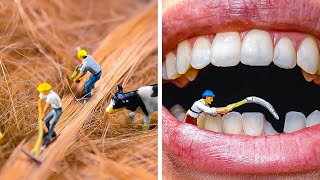
Make an impossible photograph
Make an impossible photograph by arranging toys and props with forced perspective, then photograph them from specific angles to create optical illusion effects.


Step-by-step guide to make an impossible photograph
Photography Tips For Kids
Step 1
Pick two toys to be your "giant" and your "tiny" characters and imagine a fun scene for them.
Step 2
Hang the plain sheet or lay the large paper to make a clean background behind your play area.
Step 3
Choose a spot for your camera and mark that spot on the floor with tape or a small object.
Step 4
Place your camera on the marked spot so it will stay in the same place for every photo.
Step 5
Put the giant toy very close to the camera so it fills a big part of the view.
Step 6
Put the tiny toy far away near the background and try to keep it on the same straight line as the giant toy.
Step 7
Stack boxes or blocks under toys to match their heights so they look like they belong in the same scene.
Step 8
Look at the camera screen and slowly slide the tiny toy forward or backward until it appears the right size next to the giant toy.
Step 9
Move a lamp or use a piece of paper to soften bright light and make the shadows look natural.
Step 10
Take several photos from the marked camera spot without moving the camera to try different poses and angles.
Step 11
Choose your favorite impossible photograph and share it on DIY.org
Help!?
What can I use instead of a plain sheet, large paper, or a camera if I don't have them?
Use a plain wall, a taped-together roll of printer paper or a bed sheet as the background, and use a smartphone as your camera placed and stabilized on the marked spot with tape or a small object.
My toys don't line up and the effect looks wrong; what should I check?
Make sure the camera never moves from the marked spot, place the giant toy very close to the camera and the tiny toy far away on the same straight line toward the background, and use stacked boxes to match heights while you slowly slide the tiny toy to the right size.
How can I adapt this activity for younger kids or older kids?
For younger kids have an adult hang the plain sheet, mark the camera spot, stack boxes and help slide the tiny toy while the child chooses toys, and for older kids encourage experimenting with lamp lighting and piece-of-paper diffusion plus different angles and multiple shots.
How can we make the impossible photograph more creative or challenging?
Personalize the scene by drawing on the large paper background, dressing toys with small props on stacked blocks, shape the light using a lamp and piece of paper for dramatic shadows, take several photos from the marked camera spot, and share your favorite on DIY.org.
Watch videos on how to make an impossible photograph
Miniature World Photography Ideas You Can Easily Recreate 🌍✨
4 Videos
Miniature World Photography Ideas You Can Easily Recreate 🌍✨
10 photography tricks to do at home

22 CREATIVE PHOTOGRAPHY TRICKS TO IMPRESS YOUR FRIENDS
12 AMAZING PHOTOGRAPHY TRICKS YOU HAVE TO TRY
Facts about forced perspective photography for kids
📷 Forced perspective was used on The Lord of the Rings sets to make hobbits look smaller without relying on CGI.
🔬 Tilt-shift (also called miniature faking) can make full-size scenes appear like tiny toy models by blurring parts of the image.
🧸 Toy photography is a popular hobby where people stage action figures and mini-dioramas to tell stories online.
🎯 For a forced-perspective photo to work, the camera, subject, and background must line up precisely — even a small move can break the illusion.
🧠 Optical illusions trick our brains because we rely on cues like size, overlap and focus to judge depth — photographers use that to create impossible photos.
How do I make an impossible photograph using forced perspective?
What materials do I need to make an impossible photograph with toys?
What ages is making forced-perspective toy photography suitable for?
What are the benefits of making impossible photographs with kids?
