Make a weather vane
Build a simple backyard weather vane using cardboard, a straw, a pencil, and a pin. Test wind direction and record observations safely outdoors.


Step-by-step guide to make a weather vane
Creating a Homemade Weather Vane: Exploring Wind Direction
Step 1
Gather all the materials listed and put them on a clean table.
Step 2
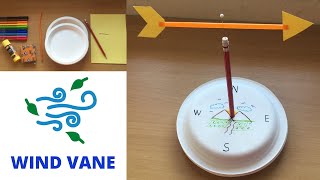
Use the ruler and marker to draw a long arrow shape on the cardboard with a wide tail.
Step 3
Cut out the arrow shape from the cardboard using scissors.
Step 4
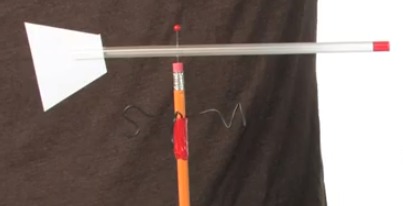
Use the pin to poke a small hole in the center of the cardboard where the straw will go.
Step 5
Slide the straw gently through the hole so the cardboard sits balanced in the middle of the straw.
Step 6
Tape the cardboard to the straw on both sides so the arrow stays centered and balanced.
Step 7
Push the pin through the middle of the straw from the top and into the pencil eraser until the straw can spin freely.
Step 8
Press the pencil point-first into a lump of modeling clay so the pencil stands upright and the straw sits on top able to rotate.
Step 9
Carry your weather vane outdoors to an open place away from buildings and trees.
Step 10
Wait one minute without touching the vane so it can stop moving and settle.
Step 11
Look at which direction the arrow points and pick a nearby landmark to describe that direction.
Step 12
Write your observation in your notebook noting the landmark and the time you checked.
Step 13
Share a photo and a short note about your finished weather vane and what you observed on DIY.org.
Help!?
What can we use if we don't have a plastic drinking straw, a straight pin, or modeling clay?
If you don’t have a plastic straw use a wooden skewer or sturdy paper straw for sliding the cardboard (step 4), replace the straight pin with a sewing pin or a straightened paperclip as the axle (step 6), and press a cork or play‑dough into the ground as the base instead of modeling clay (step 7).
Why won't the cardboard arrow spin freely, and how can we fix it?
If the arrow won’t spin freely make sure the cardboard is balanced in the middle of the straw (step 5), loosen the pin a tiny amount or widen the hole in the straw so the pin can turn without rubbing (step 6), and retape the arrow evenly on both sides (step 5) to keep it centered.
How can I adapt this weather vane activity for younger or older children?
For younger kids have an adult cut the arrow and let them tape and decorate the cardboard (steps 2–5), while older children can measure and record wind direction with a compass, log repeated observations in the notebook (step 10), and compare times before posting on DIY.org (step 11).
How can we improve or personalize our weather vane to learn more or make it last longer?
Personalize and strengthen the vane by laminating or covering the cardboard arrow with clear tape for weather protection, add a small compass to the modeling clay base so you can record true direction when you carry it outdoors (steps 7–9), and take photos over several days to compare observations in your notebook (step 10) before sharing on DIY.org (step 11).
Watch videos on how to make a weather vane
HOW TO MAKE A WIND VANE | JamHomeScience Experiment
4 Videos

HOW TO MAKE A WIND VANE | JamHomeScience Experiment
HOW TO MAKE A WIND VANE | Wind vane - School Project | Step by step instructions on making wind vane
Weather 101: Build your own wind vane!

How To Make A Wind Vane! | NBC Connecticut Kids Connection
Facts about meteorology and weather instruments
🌬️ The fastest recorded wind gust on Earth was 253 mph (407 km/h) during Tropical Cyclone Olivia in 1996.
🐓 Roosters are a classic weather vane design — people have put decorative figures on vanes for centuries to show wind direction.
📐 A weather vane points into the wind: the arrow or head faces the direction the wind is coming from while the tail catches the breeze.
♻️ Cardboard is kid-friendly, easy to cut and decorate, and can often be recycled after your project.
🧪 Scientists use anemometers to measure wind speed, but a simple vane is a perfect tool for learning wind direction outdoors.
How do I make a simple backyard weather vane?
What materials do I need to build a weather vane?
What ages is this weather vane activity suitable for?
What safety tips and benefits come from making a weather vane?
