Make a toy from junk
Build a rolling toy car using recycled cardboard, bottle caps, paper straws, and tape, then decorate and test how far it travels.


Step-by-step guide to make a rolling toy car from recycled materials
Turn Trash into Toys - 4 Amazing DIY Projects for Kids!
Step 1
Gather all the materials on a clear workspace.
Step 2
Use the ruler and pencil to draw a rectangle about 15 cm long and 7 cm wide on the cardboard.
Step 3
Cut out the rectangle with scissors.
Step 4
Use the ruler to mark two points about 2 cm from each short end and centered across the width for the axles.
Step 5
Make a hole at each marked point by poking through the cardboard with the tip of the scissors or pencil (get help from an adult if needed).
Step 6
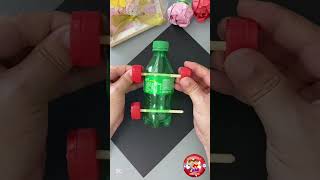
Cut each paper straw so it is 1–2 cm longer than the cardboard width.
Step 7
Push one straw through the front pair of holes and the other straw through the back pair so the straw ends stick out on both sides.
Step 8
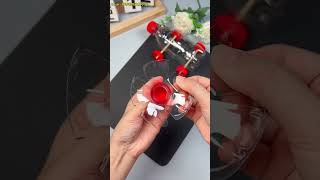
Make a small center hole in each bottle cap by pressing a pencil tip or scissors tip into the middle (ask an adult to help).
Step 9
Push a bottle cap onto each straw end so you have four wheels.
Step 10
Wrap a small piece of tape around each straw end next to the bottle cap so the wheels stay on.
Step 11
Decorate the car body with colouring materials to give it color and personality.
Step 12
Place your car at a clear starting line on a flat floor or table.
Step 13
Give the car a gentle push to make it roll forward.
Step 14
Use the ruler to measure how far the car traveled and write down the distance.
Step 15
Take a photo of your finished rolling toy and share your creation on DIY.org.
Help!?
What can we use if we don't have paper straws or plastic bottle caps?
If you don't have paper straws, use wooden skewers or thin dowels cut 1–2 cm longer than the cardboard width and if you lack bottle caps, use small spools, large beads, or glued cardboard circles pushed onto the axles and taped to stay on.
Why won't the car roll straight or far?
If the car won't roll straight or far, check that the holes you made in step 4 aren't too tight and gently widen them, ensure the straws pushed through in step 6 can spin freely by removing excess tape from the straw ends in step 11, and verify each bottle cap wheel from step 8 is pushed on evenly and not rubbing the cardboard.
How can I adapt this activity for different ages?
For preschoolers, pre-cut the cardboard rectangle in step 2 and pre-poke the axle holes in step 4 so they can focus on pushing on wheels and decorating in step 12, while older kids can precisely measure and vary axle spacing in step 2, test different wheel materials from step 8, and record distances with the ruler in step 15 to compare designs.
How can we make the toy go farther or customize its look?
To make it go farther or personalize it, tape a balloon to the cardboard body before step 14 for a balloon-powered push, swap bottle cap wheels in step 8 for larger or lighter wheels and add small weights to the center of the body to change rolling distance, then decorate in step 12 and photograph for DIY.org.
Watch videos on how to make a rolling toy car from recycled materials
DIY Bottle Car for Kids - Easy Recycled Craft That Moves!
4 Videos
DIY Bottle Car for Kids - Easy Recycled Craft That Moves!
"Recycle & Create: DIY Toy Car from Plastic Bottles!" kidiesTime7 How to make Kids Car Fun & Learn

HOW TO MAKE A PAPER ROBOT EASY | Make a Useful Toy Out of Waste Cardboard and Paper
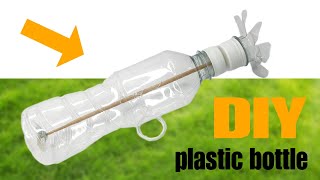
How to make a simple toy from two Plastic Bottles
Facts about recycled crafts for kids
🚗 Toy cars are ancient — archaeologists have found miniature chariots and toy wheels thousands of years old.
♻️ Upcycling cardboard, bottle caps, and straws into toys turns trash into treasure and reduces waste.
🛞 The wheel and axle is one of the oldest simple machines and helps reduce friction so toys roll farther.
📏 Tiny changes like straightening axles or lightening the body can make a homemade car travel much farther.
🧪 Testing one variable at a time (wheel size, weight, axle material) turns building into a fun science experiment.
How do I build a rolling toy car from recycled materials?
What materials do I need to make a recycled rolling toy car?
What ages is this recycled toy car activity suitable for?
What are the benefits and fun variations of building a recycled rolling toy car?
