Make a topographic map
Make a topographic map by layering colored paper or clay, draw contour lines, label elevations, and compare your map to a nearby landscape.


Step-by-step guide to make a topographic map
Topographic Maps - How To Read and Use Elevation Maps
Step 1
Choose a nearby landscape to map such as a backyard hill playground mound or park slope.
Step 2
Walk close to that spot and make a quick sketch showing the outline the highest point and any flat areas.
Step 3
Choose a map scale and a contour interval for your model (for example one layer = one meter).
Step 4
Decide whether to build the model with colored paper or with modeling clay.
Step 5
Prepare your cardboard base by cutting it to a size that fits your map area.
Step 6
Cut or shape the largest outer layer from your chosen material to match the outer boundary on your sketch.
Step 7
Make several smaller layers each a little smaller than the last and use different colors for each elevation step.
Step 8
Stack the layers centered on the base and glue them down to build the 3D topographic model.
Step 9
On a separate top-down paper draw trace the outline of each layer as a contour line with your marker.
Step 10
Label each contour line with its elevation using your chosen scale and add a legend and a north arrow.
Step 11
Go outside and compare your map to the real landscape then adjust any labels or shapes that don’t match.
Step 12
Share a photo and a short description of your finished topographic map on DIY.org
Help!?
What can we use instead of modeling clay or colored paper if those are hard to find?
If modeling clay or colored paper are unavailable, substitute stacked painted printer paper or torn cardboard layers and attach them to the cardboard base with glue or tape.
My layers keep sliding or don't line up—what should I do?
To keep layers centered and secure when you stack the layers centered on the base and glue them down, add a small dab of craft glue or double-sided tape between each layer and temporarily hold with clips while drying, and trim uneven edges using a craft knife following your sketch outlines.
How can I adapt this activity for younger or older children?
For younger kids, simplify by using playdough to make only three big layers and pre-cut the cardboard base, while older kids can use a smaller contour interval, precise scale, and label each contour line with elevations and a legend.
How can we make the finished topographic map more detailed or personal?
Add texture and realism by gluing sand or small twigs to specific layers, painting each contour color, drawing trails and landmarks on your top-down paper, and include the photo and description you’ll share on DIY.org.
Watch videos on how to make a topographic map
How to Read a Topo Map
4 Videos

How to Read a Topo Map
Introduction to Topographic Maps
Topographic Maps, Contour Lines, and Contour Intervals
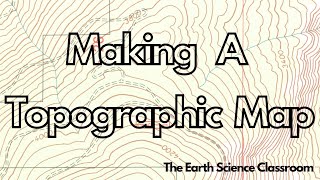
Drawing A Topographic Map
Facts about topographic maps and map reading
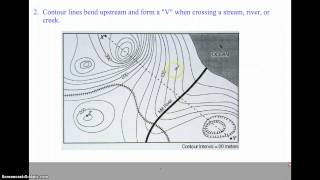
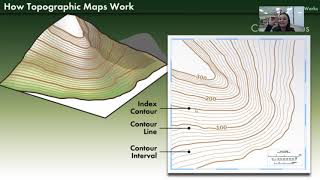
🗺️ Contour lines connect points of equal elevation — on a normal map they never cross or split.
🏔️ Close contour lines mean a steep slope, while widely spaced lines mean a gentle slope.
🎨 Layered paper or clay relief models (like a 'layer‑cake' map) are a hands‑on way to see elevation bands.
📏 The contour interval is the vertical distance between lines and can range from 1 meter to 100 meters depending on map scale.
🔍 A closed contour loop marks a hilltop; if the loop has little inward tick marks (hachures), it marks a depression.
How do I make a topographic map by layering paper or clay?
What materials do I need to build a layered topographic map?
What ages is making a layered topographic map suitable for?
What are the benefits and safe variations of this topographic map activity?
