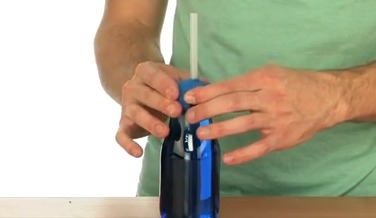
Make a thermometer
Build a simple liquid thermometer using water, rubbing alcohol, food coloring, a clear straw, and bottle with adult supervision; measure temperature changes.


Step-by-step guide to make a liquid thermometer
Temperature & Thermometers | Physics Animation
Step 1
Gather all your materials and put them on a flat table where you can work.
Step 2
Use the measuring cup or spoon to pour water into the bottle until it is about one quarter full.
Step 3
Pour rubbing alcohol into the bottle until the liquid level reaches about one half of the bottle.
Step 4
Add three drops of food coloring into the bottle so you can see the liquid clearly.
Step 5
Gently roll the bottle between your hands to mix the water alcohol and coloring together.
Step 6
Push the clear straw into the bottle so the bottom of the straw sits just above the bottle bottom in the liquid.
Step 7
Press modeling clay or playdough around the straw at the bottle neck to make an airtight seal.
Step 8
Cover the top of the straw with your finger so no air can get in or out.
Step 9
Tilt the bottle slowly until the colored liquid rises about 2 centimeters up the straw.
Step 10
Return the bottle upright while keeping your finger covering the top of the straw.
Step 11
Remove your finger slowly so the liquid column stays in the straw and the level settles.
Step 12
Hold a strip of paper against the bottle next to the straw so you can mark the level.
Step 13
Use the marker to draw a line at the liquid level and label it "room" for your starting temperature.
Step 14
Place the bottle in a cup of warm (not hot) water for two minutes and watch the colored liquid rise in the straw to show a temperature change.
Step 15
Share your finished thermometer and what happened when you warmed it on DIY.org.
Final steps
You're almost there! Complete all the steps, bring your creation to life, post it, and conquer the challenge!


Help!?
What can we use instead of rubbing alcohol if we can't find any?
If rubbing alcohol is hard to find, an adult can substitute isopropyl alcohol from a pharmacy or a high-proof clear drinking alcohol (e.g., vodka) for the step 'Pour rubbing alcohol into the bottle' because the alcohol is needed to make the colored liquid respond in the straw.
The colored liquid didn't rise when I warmed the bottle — what could be wrong?
If the liquid doesn't rise, check that the clear straw's bottom is sitting in the liquid as in step 5, make sure the modeling clay seal at the bottle neck (step 6) is airtight, and confirm you covered the top of the straw with your finger (step 8) while tilting so pressure changes move the liquid.
How can I adapt this activity for younger or older children?
For younger kids, have an adult pre-measure and pour the water and rubbing alcohol and let the child do the mixing, straw placement, and labeling (steps 2–4, 5, 13) under supervision, while older children can add a calibrated scale on the paper strip (step 13) and record centimeter changes after placing the bottle in warm water (step 15).
How can we extend or personalize our homemade thermometer after finishing it?
To extend the activity, decorate the bottle, add more labeled marks on the paper strip next to the straw (step 13) to create a multi-point scale, and test the thermometer in cups of different temperatures (step 15) to compare how far the colored liquid rises.
Watch videos on how to make a liquid thermometer
What is Temperature? | Simple Explanation for Kids and Beginners | International Schooling
Facts about temperature and thermometers
🧪 A mix of rubbing alcohol, a little water, and food coloring makes the column easy to see and keeps the liquid flowing smoothly.
🧰 A thinner tube (or straw) makes small temperature changes show as bigger movements — that’s why real thermometers use narrow capillary tubes.
🌡️ Alcohol-based thermometers can measure much colder temperatures than water because alcohol has a far lower freezing point.
🥶 Using alcohol helps your DIY thermometer work in the fridge or freezer without the liquid turning to ice.
🔬 When the liquid in your straw rises as it warms, that's thermal expansion — most liquids take up more space when heated.
How do I build a simple liquid thermometer with my child?
What materials do I need to make a liquid thermometer at home?
What ages is making a liquid thermometer suitable for?
Is making a liquid thermometer safe, and what are the learning benefits?


One subscription, many ways to play and learn.
Only $0 after trial. No credit card required


