Make a Scrapbook Journal
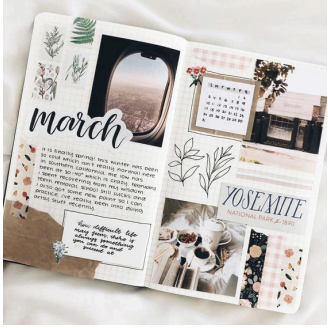
Make a personalized scrapbook journal using paper, photos, stickers, and glue; arrange memories, add captions, drawings, and decorations to tell your story.


Step-by-step guide to make a scrapbook journal
Step 1
Choose a theme or story for your scrapbook like family holidays school memories or pets.
Step 2
Clear a workspace and open your notebook to the first page.
Step 3
Gather your photos stickers and decorative paper into one pile so you can see everything.
Step 4
Pick one photo to start the first page.
Step 5
Position the photo on the page where you want it to go.
Step 6
Trim the photo with scissors if you want it smaller or a different shape.
Step 7
Apply glue to the back of the photo using the glue stick.
Step 8
Press the photo down on the page so it sticks flat and secure.
Step 9
Write a short caption under the photo with your pencil or marker to tell the story.
Step 10
Add stickers or pieces of decorative paper around the photo for extra color.
Step 11
Draw a doodle border or small illustration to match your memory.
Step 12
Repeat steps 4 to 11 for each page until your scrapbook has all the memories you want.
Step 13
Share your finished scrapbook on DIY.org
Final steps
You're almost there! Complete all the steps, bring your creation to life, post it, and conquer the challenge!

Help!?
What can I use if I don't have a glue stick or decorative paper for step 7 and step 10?
If you don't have a glue stick for step 7 use double-sided tape, glue dots, or a thin layer of white school glue, and replace decorative paper in step 10 with magazine cutouts, wrapping paper, washi tape, or fabric scraps.
My photo moved or curled after I glued it in step 7—how can I fix that?
If photos slide or curl after step 7, first position them with a small piece of removable tape as in step 5 before gluing, then press flat in step 8 and weight the page with a heavy book for 10–15 minutes to set them.
How can I adapt this scrapbook project for different ages while following steps like trimming, captioning, and decorating?
For toddlers skip trimming in step 6 and let them stick pre-cut photos and add stickers in step 10, for elementary kids encourage short captions in step 9 and simple doodles in step 11, and for older kids have them cut photos into shapes in step 6, write longer stories in step 9, and repeat steps 4–11 to build themed sections.
What are simple ways to enhance or personalize the finished scrapbook before sharing on DIY.org?
To personalize before sharing on DIY.org add glued pockets or envelopes on a page from step 10 for tickets, write dates and tiny stories under the captions in step 9, and attach a printed QR code to the inside cover linking to a short memory video.
Watch videos on how to make a scrapbook journal
Scrapbook Album for Kids - Tutorial
4 Videos
Scrapbook Album for Kids - Tutorial
Creative Memory Keeping Journal | First Day of School Spread

MEMORY SCRAPBOOK FOR KIDS - Perfect for childhood memories! DIY!
Transform Your Scrapbook with Pockets & Pages: A Scrapbooking Revolution
Facts about scrapbooking and memory keeping
✂️ Crafters use acid-free paper and adhesives so photos and pages don't yellow or deteriorate over time.
🖊️ Adding captions and short stories next to photos helps people remember details and feelings about events more clearly.
🎨 Collage techniques used in scrapbooks share roots with modern art — artists like Pablo Picasso and Georges Braque popularized collage in the early 1900s.
📸 Family albums and photo pages are some of the most popular types of scrapbooks, turning pictures into little time capsules.
🗂️ Scrapbooking goes way back — people kept "commonplace books" and scrapbooks for centuries to save recipes, letters, and clippings.
How do I make a scrapbook journal with my child?
What materials do I need for a scrapbook journal?
What ages is a scrapbook journal suitable for?
What are the benefits of making a scrapbook journal?


One subscription, many ways to play and learn.
Only $6.99 after trial. No credit card required