Make a lithography print
Make a simple lithography print by drawing on a smooth tile with wax crayon, inking the tile, and transferring the image onto paper.


Step-by-step guide to make a lithography print
Simple lithographic printing
Step 1
Gather all your materials and set them on a flat table.
Step 2
Clean the tile by wiping it with a damp cloth and then dry it with a paper towel.
Step 3
Put the tile on a protected flat workspace like a towel or cardboard.
Step 4
Draw a bold simple picture on the tile with wax crayons pressing firmly to lay down lots of wax.
Step 5
Dab the non-drawn areas of the tile with a barely damp sponge so the tile is slightly wet but not dripping.
Step 6
Squeeze a small blob of block printing ink onto a piece of scrap paper.
Step 7
Roll the brayer through the ink until the roller has a thin even coat.
Step 8
Roll the inked brayer gently over the tile so the ink sticks to the areas not covered by crayon.
Step 9
Lay a sheet of printing paper on top of the inked tile and smooth it flat with your hand.
Step 10
Rub the back of the paper evenly with a spoon or a baren for about 30 seconds to transfer the ink.
Step 11
Peel the paper off the tile slowly to reveal your print.
Step 12
Dab excess ink from the tile and the brayer with paper towels and a little vegetable oil.
Step 13
Wash the tile and the brayer with warm soapy water to remove remaining ink and rinse well.
Step 14
Let your print dry flat for at least one hour.
Step 15
Share your finished lithograph on DIY.org.
Help!?
I don't have a brayer or block printing ink—what can I use instead?
Use a small foam paint roller or silicone paint roller in place of the brayer, substitute a smooth plexiglass or vinyl floor tile for the ceramic tile, and test acrylic paint thinned slightly on scrap paper before following 'squeeze a small blob of block printing ink onto a piece of scrap paper' and rolling it through the ink.
My print has ink where the crayon should repel it or the image came out faint—what likely went wrong?
Either you didn't press firmly enough with wax crayons as in 'pressing firmly to lay down lots of wax', the tile was too wet from the 'dab the non-drawn areas... with a barely damp sponge' step so ink bled, or you didn't rub the back of the paper evenly for about 30 seconds with the spoon or baren, so try more wax, blot excess moisture, and apply steady pressure when transferring.
How can I adapt this lithography activity for different age groups?
For preschoolers simplify to drawing very bold shapes and have an adult handle inking, rolling and washing, school-age kids can follow all steps with supervision, and teens can experiment with multi-color layers by re-inking and doing additional passes.
What are some ways to extend or personalize the finished lithograph?
Create a series by re-inking the tile in different colors and printing multiple sheets, add texture to the tile before inking for patterned effects, or hand-color the dried print and frame it to share on DIY.org.
Watch videos on how to make a lithography print
How to make a lithographic print | National Museums Liverpool
4 Videos
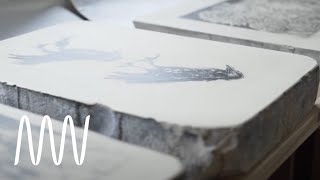
How to make a lithographic print | National Museums Liverpool
Print making drawing |step by step Print making ideas at home for KVS students |

Lesson 6 - Kitchen Lithography
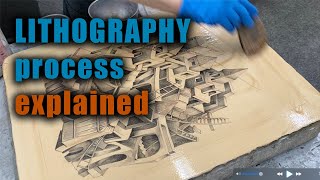
Lithography Process Explained: A Step-by-Step Tutorial
Facts about printmaking for kids
🪨 Lithography comes from Greek words meaning "stone writing" — early prints were made on limestone slabs.
🧑🔬 Alois Senefelder discovered lithography in 1796 while experimenting to cheaply publish his plays.
💧 The trick behind lithography is oil and water: ink clings to greasy drawings but is repelled by wet non-image areas.
🖍️ For kid-friendly litho projects, wax crayons act like the greasy materials artists use to draw the image on the tile.
🖨️ One prepared stone or tile can be used to pull many consistent prints — printmakers often make editions of dozens or more.
How do you make a simple lithography print on a smooth tile?
What materials do I need to make a tile lithography print?
What ages is this tile lithography activity suitable for?
What safety tips should I follow for tile lithography with kids?
