Make a fandom blog
Create a simple fandom blog to share favorite stories, characters, fan art, and reviews; learn writing, basic design, and online safety with parent help.

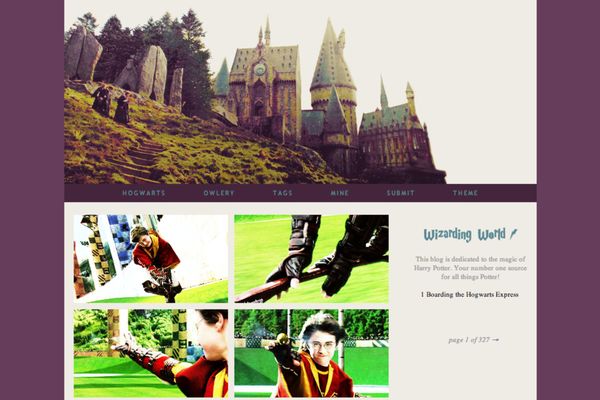

Step-by-step guide to make a fandom blog
How to Make a Wiki on Fandom | Tutorial
Step 1
Write the name of your favorite fandom at the top of your notebook.
Step 2
Make a list of three characters stories or books from this fandom that you love.
Step 3
Write a short review of one story or character using three to five sentences.
Step 4
Sketch a piece of fan art or choose a favorite image to show on your blog.
Step 5
Think of a fun blog name and write a one-sentence tagline that explains your blog.
Step 6
Ask an adult to help you create a blog account.
Step 7
With the adult set the blog privacy and safety settings before you post anything.
Step 8
Open a new blog post and copy your review into the post editor.
Step 9
Upload your fan art image or a photo of your drawing into the post.
Step 10
Choose one color and one simple layout for your blog to make it look fun.
Step 11
Preview the post to see how it looks on the blog.
Step 12
Ask the adult to help you fix any spelling or layout mistakes.
Step 13
With the adult publish your blog post so others can read it.
Step 14
Share your finished creation on DIY.org.
Help!?
What can we use if we don't have a notebook to write the fandom name, list, and review?
Use a sheet of printer paper, a spiral notepad, or a blank document or notes app on a tablet/computer and follow the same steps to write the fandom name at the top, list three characters/stories, and draft the review.
My fan art won't upload or the blog preview looks wrong—what should we try?
If the 'Upload your fan art image' step fails or the preview looks off, ask the adult to resize the image to a common format like JPG or PNG and under the site file-size limit, clear the browser cache or try a different browser, then re-upload and preview before publishing.
How can we change the activity for younger or older kids while still following steps like writing a review, sketching fan art, and setting privacy?
For ages 5–7 make the review one sentence and use coloring or stickers for the 'sketch a piece of fan art' step while the adult creates the blog account and sets privacy, for ages 8–11 keep the 3–5 sentence review and let the child pick the blog color/layout, and for 12+ expand the review length, add tags, and let the teen help configure more settings with adult supervision.
How can we extend or personalize the blog beyond the single post before sharing on DIY.org?
Create a recurring 'Review of the Week' series, design and upload a custom header image with your fan art, add an 'About' page using your one-sentence tagline, use different colors or layouts for each post, and tag posts before previewing and publishing to share on DIY.org.
Watch videos on how to make a fandom blog
Blogging for Kids | How to create a blog - Tips for effective writing and internet safety
4 Videos

Blogging for Kids | How to create a blog - Tips for effective writing and internet safety
How To Make Fandom Wiki Page (Step-by-Step Guide)
Alphabet Lore Characters and their favorite MOVIES
FNAF Characters and their favorite DISNEY MOVIES
Facts about blogging for kids
📝 The word "blog" comes from "weblog," a term first used in 1997.
🎨 Many professional artists and writers began by sharing fan art and fan fiction in online communities.
🔒 Most major social platforms set a minimum age of 13 to help protect kids' privacy (influenced by COPPA rules).
✨ Fan communities existed long before the internet—fans exchanged homemade fanzines, letters, and art by mail.
📸 Blog posts with images or fan art usually get more attention than text-only posts, so pictures help your voice be seen.
How do I create a fandom blog with my child?
What materials do I need to make a fandom blog?
What ages is this fandom blog activity suitable for?
How can I keep my child safe while creating a fandom blog?


