Let's Grow Plants!
Plant seeds in cups, learn to water and care for them, track growth measurements, and observe how light and soil affect plant development.


Step-by-step guide to grow plants from seeds
Step 1
Gather all your materials and clear a small workspace where you can keep your plants safe.
Step 2
Use the marker to write three labels on the cups Sunny_Normal Shade_Normal and Sunny_Changed.
Step 3
Put the tray or plate on your table to hold the cups and catch extra water.
Step 4
Fill each cup about three quarters full with potting soil using the spoon or your hands.
Step 5
Put one spoonful of sand or pebbles into the cup labeled Sunny_Changed and mix it into the top layer of soil with the spoon.
Step 6
Make a small hole about 1 centimeter deep in the center of each cup using your finger or the back of the spoon.
Step 7
Drop one or two seeds into the hole in each cup.
Step 8
Gently cover the seeds with soil so they are not exposed to light.
Step 9
Water each cup with two tablespoons of water so all cups get the same amount.
Step 10
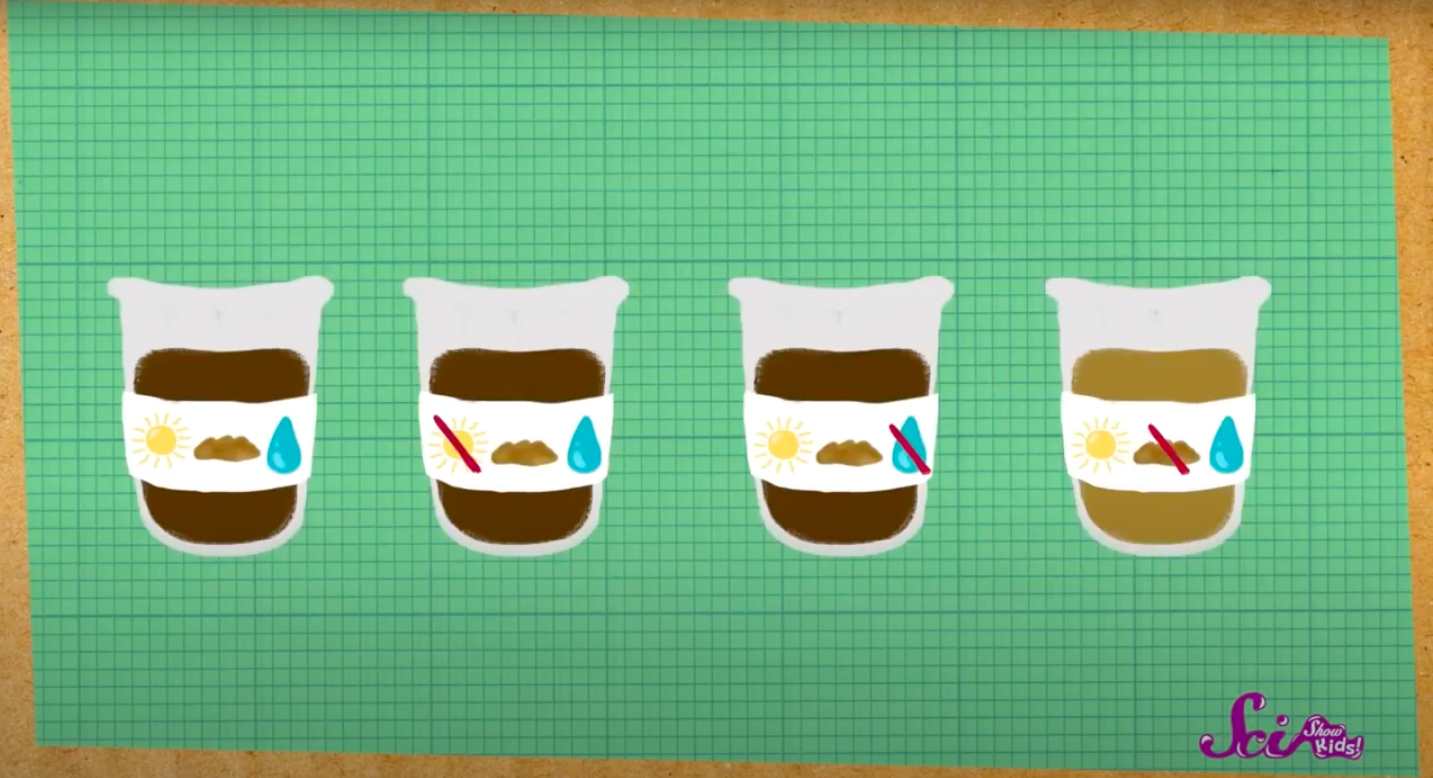
Put the cups labeled Sunny_Normal and Sunny_Changed on a sunny windowsill and put Shade_Normal in a darker spot away from direct sun.
Step 11
Use the ruler to measure any sprout height or note the soil level for each cup and write those numbers in your notebook.
Step 12
Decide how often you will check and water your plants (for example every two days) and write that schedule in your notebook.
Step 13
Share your finished creation and what you observed about light and soil on DIY.org.
Final steps
You're almost there! Complete all the steps, bring your creation to life, post it, and conquer the challenge!

Help!?
What can I use instead of potting soil or plastic cups if they are hard to find?
If you can't find potting soil, mix garden soil with a handful of shredded paper or compost for lighter texture, and use clean yogurt containers, jars, or tins labeled with the marker instead of disposable cups.
My seeds didn't sprout or the soil stayed too wet—what could be wrong and how do I fix it?
If seeds don't sprout or soil stays soggy, make sure you made a 1 centimeter hole and covered the seed, only used two tablespoons of water per cup, gently loosen the topsoil, and move cups to the sunny windowsill (Sunny_Normal/Sunny_Changed) while updating your watering schedule in the notebook.
How can I adapt this activity for younger or older children?
For younger kids, have an adult pre-fill and label the cups with the marker, use larger seeds and supervise the 1 cm hole and watering, while older children can vary the spoonful of sand in Sunny_Changed, take precise ruler measurements, and keep a detailed notebook.
How can we extend or personalize the experiment after planting?
You can personalize it by decorating the cups, adding more soil variations or a control cup without sand, measuring sprouts with the ruler over time, keeping photos and notes in the notebook, and sharing results for Sunny_Normal, Sunny_Changed, and Shade_Normal on DIY.org.
Watch videos on how to grow plants from seeds
How Plants Grow: A Fun And Educational Video For Kids
4 Videos
How Plants Grow: A Fun And Educational Video For Kids
7 Tips to Garden with Kids (Easy Gardening with Children)
How To Grow Plants Without Soil? | Hydroponic Farming At Home | The Dr Binocs Show | Peekaboo Kidz

How Plants Grow for Kids | Learn about photosynthesis and what plants need to grow strong
Facts about gardening for kids
☀️ Plants turn sunlight into food through photosynthesis, so even a little extra light can speed up seedling growth.
📏 Seedlings can grow several centimeters in just a week — tracking height helps you spot fast changes and patterns.
🪴 Soil matters: potting mix drains and feeds seedlings better than heavy garden dirt, so your cup garden will do best with light, airy soil.
🌱 Some seeds can stay dormant for centuries — the oldest successfully sprouted seed was nearly 2,000 years old!
💧 Young plants are mostly water (many plants are 80–90% water), so gentle, regular watering helps them thrive.
How do you do the Let's Grow Plants! activity?
What materials do I need for Let's Grow Plants!?
What ages is the Let's Grow Plants! activity suitable for?
What are the benefits, safety tips, and variations for Let's Grow Plants!?


One subscription, many ways to play and learn.
Only $6.99 after trial. No credit card required