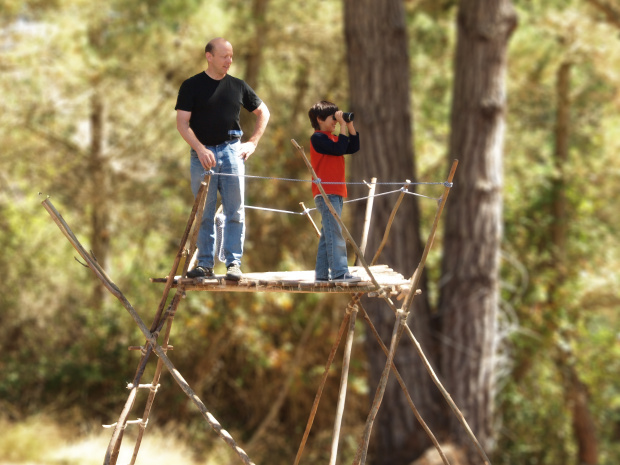
Lash a structure
Lash together wooden poles to build a small tripod or bridge using rope and simple lashings, learning knots, teamwork, and safe outdoor construction.


Step-by-step guide to lash wooden poles to build a small tripod or bridge
Best Way to Apply Cluster Lashes | Easy DIY Application for Beginners
Step 1
Find a flat safe outdoor spot to build your tripod.
Step 2
Put on your work gloves so your hands stay safe.
Step 3
Gather three strong poles of similar length and check they are not cracked.
Step 4
Lay the three poles on the ground with their top ends overlapping about 20–30 cm.
Step 5
Practice tying a clove hitch on one spare pole until it feels easy.
Step 6
Tie a clove hitch around one pole at the overlap to start the lashing.
Step 7
Wrap the rope tightly around all three poles 6–8 times moving down from the overlap.
Step 8
Make 3–4 frapping turns by running the rope between pairs of poles and pulling each turn tight.
Step 9
Finish the lashing by tying another clove hitch or a square knot to secure the rope.
Step 10
With a partner or adult lift the lashed ends and stand the tripod up so the feet touch the ground.
Step 11
Gently press the top and each leg to check stability.
Step 12
If any leg slips ask an adult to help retighten the lashing.
Step 13
Take a photo or video and share your finished tripod creation on DIY.org.
Help!?
What can we use if we don't have the strong rope or three poles called for in the instructions?
If you don't have the specified rope or three strong poles, use sturdy paracord or braided nylon rope for the lashing and substitute broom handles, straight tree branches of similar length, or PVC pipes of matching diameter, making sure to check each pole for cracks as the instructions require.
The tripod keeps slipping when we try to stand it up — what troubleshooting steps from the instructions should we try?
If the tripod slips, follow the instructions to add more wraps (aim for 6–8) and 3–4 frapping turns, pull each turn very tight, replace any cracked poles, and ask an adult to help retighten the lashing before lifting the lashed ends.
How can we adapt this lashing activity for younger kids or older kids?
For younger children, have an adult pre-lay the poles, help tie the initial clove hitch and do the heavy lifting while the child practices clove hitches on the spare pole, and for older kids let them measure equal pole lengths, complete the wraps and frapping turns themselves and experiment with taller tripods.
What are some ways to extend or personalize the finished tripod beyond the basic lashing?
You can personalize and extend the tripod by lashing a small platform or crossbeam between the legs for a shelf, adding guy lines to the top for extra stability, decorating the poles with paint or colored rope wraps, and then take a photo or video to share your creation on DIY.org as suggested.
Watch videos on how to lash wooden poles to build a small tripod or bridge
how to: lash clusters that last TWO weeks (diy) | Nylajai'ne
4 Videos

how to: lash clusters that last TWO weeks (diy) | Nylajai'ne
How to make layered grafted premade fan lashes?Eyelash Extension Tutorial (Volume Lashes) #lashes

Step by Step Beginner friendly Anime / Strip Lash Mapping & Tutorial using Pre Made Pyramid Spikes
Easy Cluster Lash Application for Beginners 💁♀️✨ | Step-by-Step Tutorial
Facts about outdoor lashing and knot tying
🪢 Square lashing is a classic rope technique used to join two poles at right angles—perfect for frames and bridges.
🌲 A three-legged tripod is naturally stable on uneven ground because three points always define a plane.
🤝 Pioneering projects are great for teamwork—kids practicing lashings learn communication, roles, and safety checks.
⚠️ Always test a lashed structure with gradual weight and a safety spotter; good lashings plus inspection prevent collapses.
🔗 Natural-fiber ropes grip wood well, but synthetic ropes (like nylon) resist rot and handle wet weather better.
How do you lash wooden poles to build a small tripod or bridge?
What materials do I need to lash a small tripod or bridge?
What ages is lashing wooden poles suitable for?
What safety tips and benefits are there for children learning to lash poles outdoors?
