Introduction to Crochet
Learn basic crochet stitches and patterns using a child safe hook and yarn to make a small coaster or simple granny square.


Step-by-step guide to Introduction to Crochet
Step 1
Gather all your materials and sit in a comfy well-lit spot so you can see your stitches.
Step 2
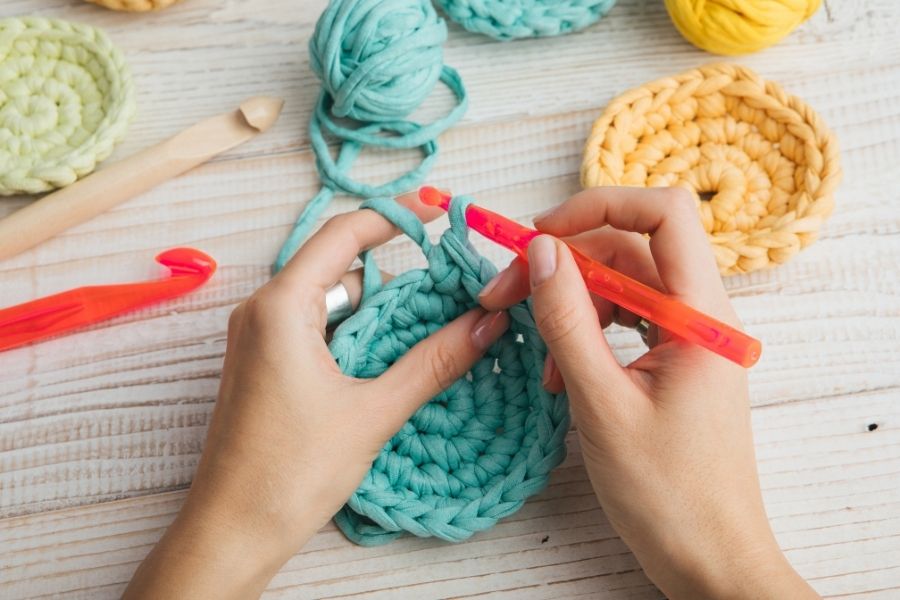
Hold the hook in your dominant hand and hold the yarn in your other hand with a loose loop over your index finger so it can glide easily.
Step 3
Make a slipknot on your hook by making a loop with the yarn placing the loop on the hook and pulling the yarn tail to tighten the knot gently.
Step 4
Make a foundation chain of 12 chains by yarn over and pulling through the loop on the hook repeatedly until you have 12 chains.
Step 5
Make a single crochet in each chain across the row: insert the hook into the next chain yarn over pull up a loop then yarn over and pull through both loops to finish each single crochet.
Step 6
Chain 1 and turn your work so you can begin the next row of single crochet stitches.
Step 7
Repeat Step 5 and Step 6 for three more rows (four rows total) or until your piece looks about 3 to 4 inches square for a coaster.
Step 8
If you want a granny square instead of a coaster start a new project by chaining 4 and slip stitching into the first chain to make a ring.
Step 9
Make the first round of the granny square by chaining 3 then making 3 double crochet clusters into the ring separated by chain 2 spaces until you have four clusters and join with a slip stitch.
Step 10
Fasten off by cutting the yarn leaving a tail and pulling the tail through the last loop to secure the end.
Step 11
Thread the tapestry needle with the yarn tail and weave the tail through the edges to hide it; repeat for any other loose ends.
Step 12
Take a photo of your finished coaster or granny square and share your creation on DIY.org.
Help!?
What can we use if we don't have a tapestry needle to weave in the ends from Step 11?
If you don't have a tapestry needle, use a blunt-ended yarn needle or simply use your crochet hook to pull the yarn tail through the edges as described in Step 11 to hide loose ends.
My foundation chain from Step 4 is tight and I can't insert my hook—what should I do?
If your foundation chain (Step 4) is too tight or your single crochets in Step 5 are hard to work into, switch to a larger hook, relax your grip so the yarn glides over your index finger more loosely, and recount to ensure you have 12 chains before continuing to Step 5 and Step 6.
How can I adapt the activity for younger or older children using the Steps 4–7 instructions?
For younger kids use bulky yarn and an 8 mm hook with a shorter foundation chain (around 6 chains) and only one or two rows from Steps 4–6, while older children can follow all steps and try the granny square method starting at Step 7 for a more advanced project.
How can we make the finished coaster or granny square more personalized or fancier after Step 11?
To personalize your coaster or granny square, change yarn colors by fastening off in Step 10 and joining a new color with a slip stitch between rows, add a decorative single crochet border around the finished piece after weaving in tails in Step 11, or make a matching set by repeating Steps 4–10 in different colors.
Watch videos on how to get started with crochet
How to Teach Children to Crochet - a Beginner Tutorial
4 Videos
How to Teach Children to Crochet - a Beginner Tutorial
CROCHET FOR BEGINNERS LESSON 1 / CROCHET FOR KIDS
CROCHET FOR BEGINNERS LESSON 1 / CROCHET FOR KIDS / Designed for teachers to use in the classroom!
CROCHET FOR BEGINNERS LESSON 2 / CROCHET FOR KIDS / Designed for teachers to use in the classroom!
Facts about crochet for kids
🧶 The word "crochet" comes from the French word for "small hook."
🪝 Crochet hooks come in many sizes — larger hooks and chunky yarn are perfect for kids learning quickly.
📚 Crochet patterns first became widely popular in 19th-century Europe when printed patterns spread.
🧵 A granny square is made in rounds and is a super-flexible motif for coasters, blankets, and more.
🧠 Crocheting helps develop fine motor skills, concentration, and pattern recognition — great for young makers.
How do I teach my child to crochet a simple coaster or granny square?
What materials do I need for a child's crochet project?
What ages is this crochet activity suitable for?
What safety tips should I follow when kids learn crochet?
