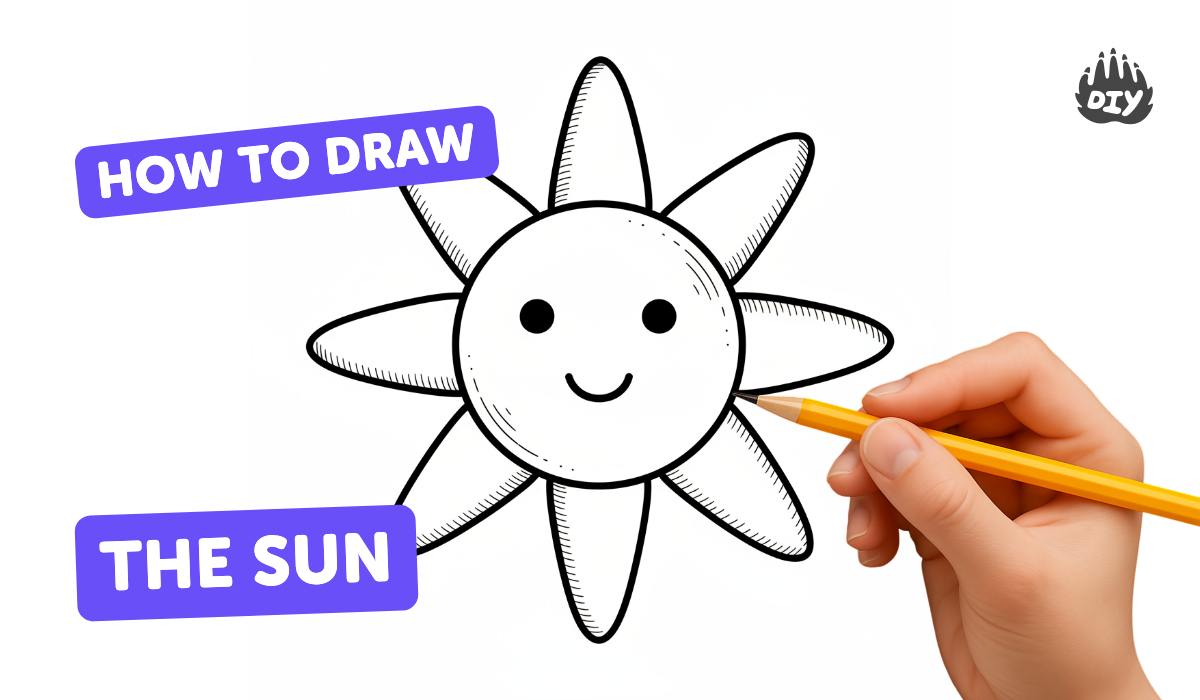
How to draw the sun - a free sun drawing guide
Draw a bright sun with rays, shading, and face using pencil, crayons, or paints. Practice shapes, shading, and symmetry, and color blending.

Drawing Apps
Photos of sun drawing examples


Step-by-step guide to draw the sun
How To Draw The Sun
Step 1
Gather your materials and clear a flat workspace so you can draw comfortably.
Step 2
Fold your paper in half one way and then the other and open it to reveal a cross of creases that marks the center.
Step 3
Use your pencil to draw a light circle at the crease intersection for the sun’s face.
Step 4
Make evenly spaced small dots around the circle to plan where each ray will go.
Step 5
Draw triangular rays from the circle to each dot keeping their lengths and shapes similar for a balanced look.
Step 6
Draw a slightly smaller inner circle inside the face area to guide where the eyes and mouth will sit.
Step 7
Sketch the sun’s face inside the inner circle with simple symmetrical eyes a nose and a smiling mouth.
Step 8
Lightly shade the face with your pencil using short soft strokes to create a smooth gradient.
Step 9
Choose two or three warm colors for the rays such as orange red and yellow.
Step 10
Color each ray starting with a darker color at the base and a lighter color toward the tip then blend the seam with a cotton swab or tissue.
Step 11
Color the sun’s face with a light yellow and add a few darker strokes near the edge to show roundness.
Step 12
Outline the sun and the facial features with the black marker or dark crayon to make them stand out.
Step 13
Gently erase any remaining pencil guidelines to tidy up your picture.
Step 14
Share your finished sun on DIY.org
Help!?
What can I use instead of a cotton swab or tissue to blend the colored seams if I don't have them?
If you don't have a cotton swab or tissue to blend the seam (step 10), use a clean fingertip or a small piece of folded paper towel to gently smudge the colors.
My sun's rays look uneven—how can I fix them so the sun looks balanced?
Use the paper's folded creases to confirm the center, re-place evenly spaced dots around the light pencil circle (step 4), and lightly measure each ray length with your pencil before drawing the triangular rays.
How can I adapt this activity for different ages or skill levels?
For younger children, pre-fold the paper and pre-draw the light circle and dots so they can color large rays with crayons, while older kids can follow steps 6–11 to sketch symmetrical facial features, shade the face, and blend colors for smoother gradients.
What are simple ways to enhance or personalize the finished sun?
After outlining and erasing guidelines (steps 12–13), personalize the sun by adding patterned rays or a watercolor background, glueing sequins or glitter along the edge, or cutting it out to make a hanging sun to share on DIY.org.
Watch videos on how to draw the sun
Learn to draw and color the Sun for kids | Basic Sun drawing step by step ♥♥♥
4 Videos

Learn to draw and color the Sun for kids | Basic Sun drawing step by step ♥♥♥
How to Draw the Sun 🌞 Draw and Color a Cute Sun 🌈 Drawings for Kids
SUN Drawing - Easy Kids Drawings
How to Draw the Sun - Easy drawing, painting and coloring for kids
Facts about drawing and shading for kids
☀️ The Sun looks yellow to us, but in space it actually appears white—Earth’s atmosphere changes its color at sunrise and sunset.
🎨 Color theory helps artists: mixing red + yellow makes orange, perfect for painting bright sun rays and smooth blends.
✏️ Pencils have grades like HB, 2B, and 4B—softer B pencils make darker shading great for the sun’s shadowed areas.
↔️ Symmetry makes faces look balanced—drawing matching eyes and cheeks helps kids practice mirrored features on a sun’s face.
🖍️ Crayons are wax-based and blend well by layering colors and gently smudging or rubbing with a finger or tissue.
How do I teach my child to draw a bright sun with rays, shading, and a face?
What materials do I need to draw a sun with rays, shading, and a face?
What ages is this sun-drawing activity suitable for?
What are the benefits of drawing a sun with shading, rays, and a face?
