How to draw pizza - a free pizza drawing guide
Draw a pizza step-by-step using basic shapes, pencils, and colors. Practice proportions, crust texture, and arranging toppings for a realistic illustration.

Drawing Apps
Photos of pizza drawing examples


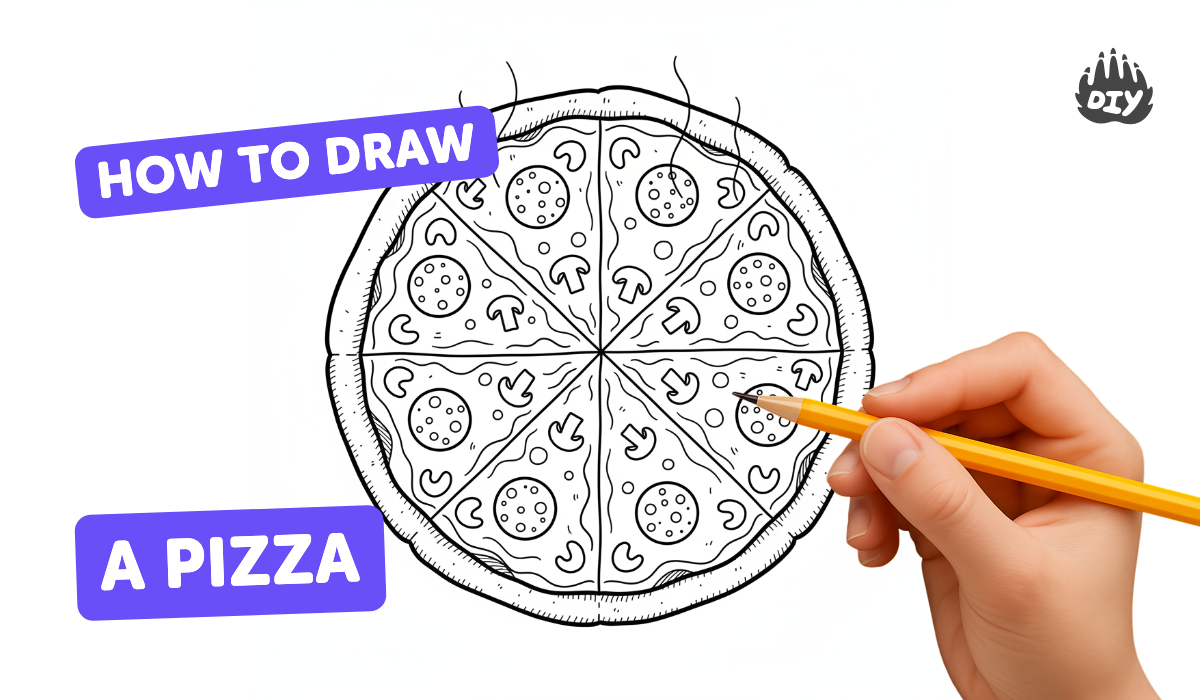
Step-by-step guide to draw a pizza
How To Draw A PIZZA🍕 - Easy Step by Step Drawing Tutorials for Kids by Chiki Doodle
Step 1
Place the cup or lid on the paper and trace around it with your pencil to make a big circle.
Step 2
Draw a slightly smaller circle inside the big circle to mark where the sauce and cheese will go.
Step 3
Draw a wavy ring between the two circles to create the pizza crust.
Step 4
Lightly draw two straight lines that cross in the middle to divide the pizza into slices.
Step 5
Add short curved lines along the wavy ring to show crust texture and bumps.
Step 6
Draw several medium circles inside the inner circle to make pepperoni pieces.
Step 7
Draw a few small umbrella shaped mushroom tops scattered on the pizza.
Step 8
Draw small ovals and tiny center dots to add olives around the toppings.
Step 9
Sketch short curved dashes from the inner circle outward to suggest melted cheese strands.
Step 10
Trace the pencil lines you like with a black marker to make the drawing pop.
Step 11
Erase any extra pencil marks so your pizza looks neat.
Step 12
Color your pizza using your colouring materials to bring the crust sauce cheese and toppings to life.
Step 13
Share your finished pizza drawing on DIY.org so everyone can see your tasty artwork.
Help!?
What can we use if we don't have a cup or lid or a black marker for tracing the pizza?
If you don't have a cup or lid to trace the big circle, use a plate, bowl, or CD for the outer and inner circles, and if you don't have a black marker use a thin felt-tip pen or a dark colored pencil to trace before colouring.
My wavy crust or slice lines look messy—how can I fix them?
If the wavy ring or crossing slice lines are uneven, fold the paper to find the center, realign the cup or lid before tracing, use a ruler for the straight slice lines, and wait for marker ink to dry before erasing pencil marks.
How can I change the activity for different ages?
For younger children pre-trace the two circles and let them add toppings with stickers or crayons, while older kids can use a compass instead of a cup, add shading to the cheese strands and detailed mushroom gills, or increase slices for more challenge.
How can we make the pizza drawing more creative or personal?
Personalize your pizza by adding torn yellow tissue for melted cheese and brown paper for crust texture, write a fun topping menu or your name on a drawn pizza box, then photograph and share the finished pizza drawing on DIY.org.
Watch videos on how to draw a pizza
How to Draw a Whole Pizza Step by Step for Kids
4 Videos

How to Draw a Whole Pizza Step by Step for Kids
Pizza drawing for kids: Fun and easy step-by-step guide
How to Draw a Pizza 🍕 | Easy Step-by-Step Drawing for Kids | Color's Artbox
Pizza drawing for kids: Fun and easy step-by-step guide
Facts about drawing for kids
🍕 Modern pizza as we know it started in Naples, Italy, in the 18th–19th century.
👑 Pizza Margherita was named after Queen Margherita of Savoy in 1889.
✏️ Artists often begin pizza drawings with a circle (or an ellipse for a tilted pie) to get the base shape right.
🧀 Mozzarella melts into long, gooey strands — a tasty detail to practice drawing for realism.
🎨 Small highlights and darker shadows make crust texture and melted cheese look three-dimensional on paper.
How do I teach my child to draw a pizza step-by-step?
What materials do I need to draw a pizza with my child?
What ages is drawing a pizza suitable for?
What are the benefits of drawing a pizza, and are there safety tips or fun variations?
