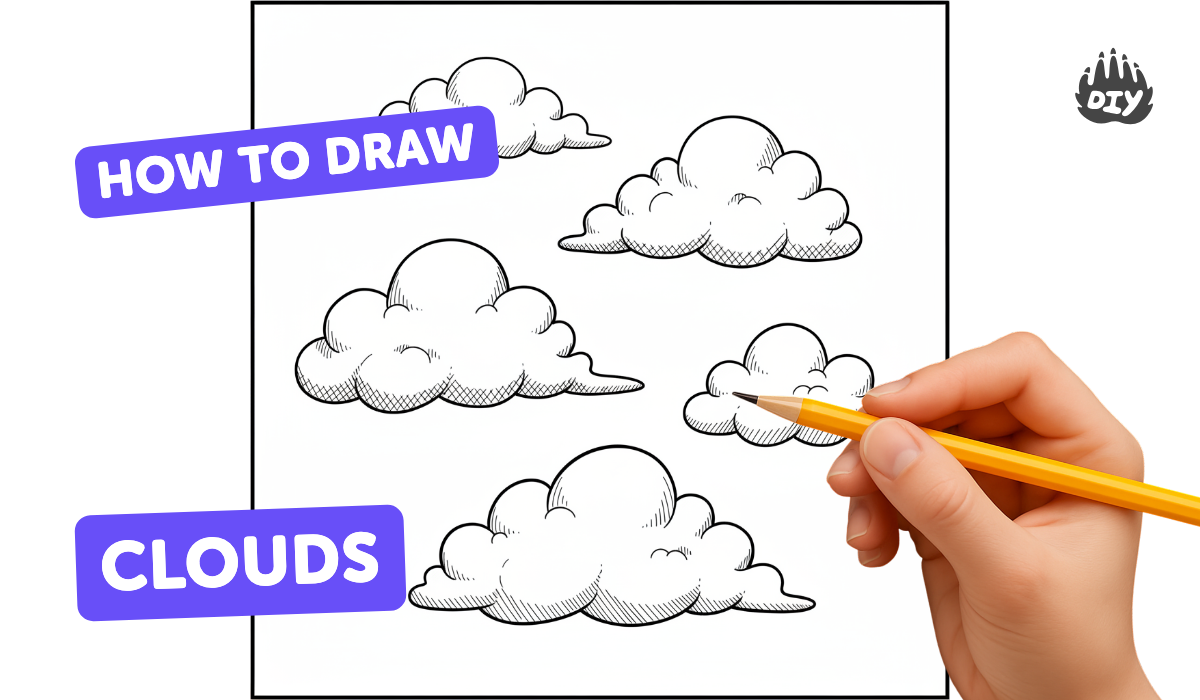
How to draw clouds - a free clouds drawing guide
Draw different cloud shapes using pencil and shading techniques. Practice observing sky reference, layering shapes, and creating depth with light and shadow.

Drawing Apps
Get inspired with these


Instructions
Cloud Drawing Easy And Simple | How To Draw Cloud Drawing For Kids |Easy Drawing Step By Step
Step 1
Look outside or open a photo of the sky and study the cloud shapes and where the light is coming from.
Step 2
Place your paper on a flat surface with your pencil and eraser ready to use.
Step 3
Lightly mark a tiny dot where the sun or main light source is in your reference.
Step 4
Using a light touch, sketch a few big rounded cloud blobs to show the main cloud masses.
Step 5
Draw smaller cloud bumps that overlap or tuck behind the big blobs to build layers.
Step 6
Inside each cloud, add soft curved contour lines to divide the cloud into puffy lumps.
Step 7
Shade the bottom areas of each cloud lightly with the side of your pencil to show shadow.
Step 8
Add midtones by darkening parts of the cloud where the shadow is stronger.
Step 9
Gently blend shaded areas with a tissue or blending stump to make the shadows smooth.
Step 10
Erase tiny spots on the tops of clouds to create bright highlights where the light hits.
Step 11
Darken a few lower edges and small inner creases to increase depth and contrast.
Step 12
Lightly shade the sky around the clouds to help the clouds stand out more.
Step 13
Share your finished cloud drawing on DIY.org
Help!?
What can I use if I don't have a blending stump or a soft pencil for step 8 and step 6?
If you don't have a blending stump or a soft pencil, gently smudge the shaded areas (step 8) with a folded tissue, a cotton swab, or your fingertip after shading with the side of a regular pencil (step 6).
My clouds look flat or too smudged after shading—how can I fix them while following steps 6–10?
If clouds look flat or smudged, work from light to dark (step 6–7), lift graphite to create highlights with a kneaded eraser (step 10), and protect finished areas with a clean scrap paper under your hand to avoid extra smudging.
How can I adapt this cloud-drawing activity for different ages while using the same steps?
For younger kids, focus on big rounded blobs and simple contours (step 4–5) using crayons or a soft pencil, while older kids can add midtones, detailed contour lines (step 5–7) and careful blending (step 8) to increase realism.
What are some easy ways to extend or personalize the finished cloud drawing after step 12 and before sharing on DIY.org?
To extend the project, add a light blue wash or soft pastels to the sky area (step 12), darken a few lower edges and inner creases for drama (step 11), and then photograph your finished piece to upload to DIY.org.
Related videos
How to Draw Clouds Step-by-Step! ☁️✏️ Easy Cloud Drawing Tutorial for Beginners
4 Videos
How to Draw Clouds Step-by-Step! ☁️✏️ Easy Cloud Drawing Tutorial for Beginners

How to draw a Cloud Step by Step | Cloud Drawing Lesson
🌩️ How to Draw a Simple Storm Cloud | Step-by-Step Lesson 🌧️
How to draw a Cute rainbow Cloud Easy for Kids and Toddlers
Fun Facts
☁️ Clouds look white because tiny water droplets scatter sunlight's colors almost equally, mixing to appear white.
🌧️ A typical cumulus cloud can weigh over a million kilograms (hundreds of thousands of kilograms of water!) yet still float.
🎨 Atmospheric perspective makes distant clouds appear lighter and bluer, a trick artists use to create depth.
✏️ Rubbing the side of a pencil and using a blending stump or tissue creates soft, fluffy cloud shading fast.
🧽 Kneaded erasers are magical — they lift graphite gently to carve bright highlights in cloud shapes.
How do I teach my child to draw clouds with pencil and shading?
What materials do I need to draw different cloud shapes and practice shading?
What ages is cloud-drawing practice suitable for?
What are the benefits of drawing clouds and how can I vary the activity?
