How to draw a tongue - a free tongue drawing guide
Learn to draw a realistic tongue step by step, using simple shapes, shading, and color blending to practice observation and drawing skills.

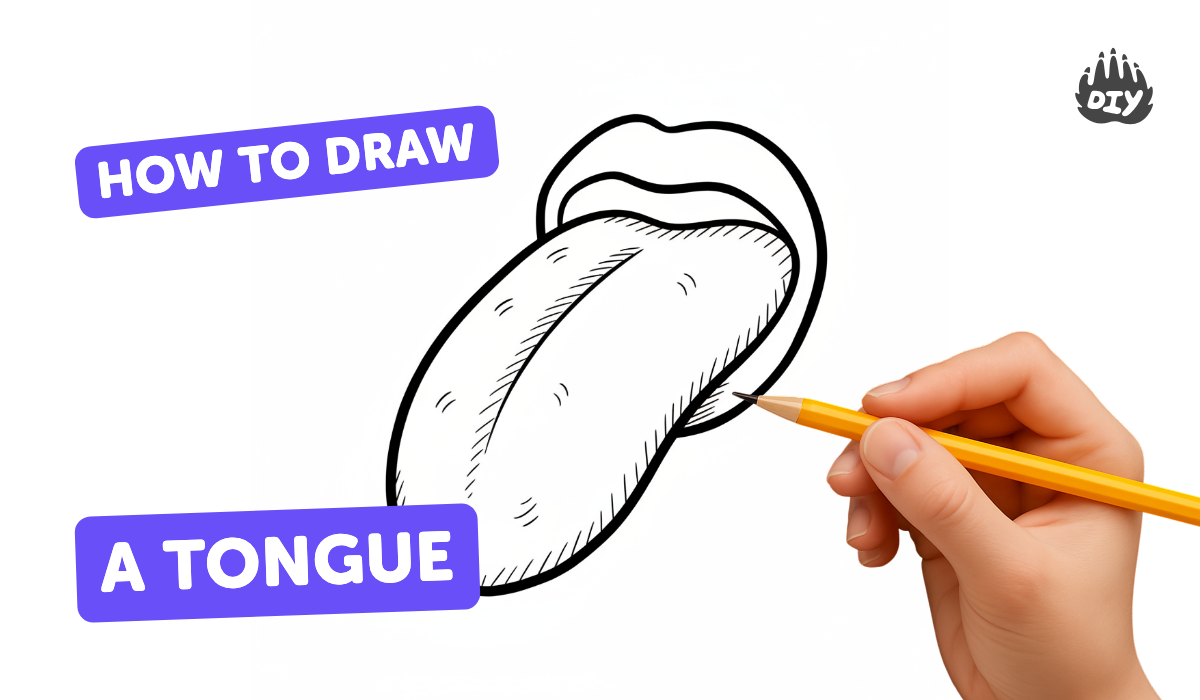
Step-by-step guide to draw a realistic tongue
How To Draw A Cartoon Frog
Step 1
Choose a reference picture or look in a mirror to study the tongue's shape and shiny spots.
Step 2
Lightly draw a long rounded oval to map the main tongue shape.
Step 3
Add a gentle curved line at the back of the oval to show where the tongue meets the mouth.
Step 4
Draw a soft curved line down the center to mark the tongue's middle groove.
Step 5
Lightly refine the outer edges so the tip and sides look smooth.
Step 6
Erase any extra dark guide lines so the drawing stays neat and light.
Step 7
Use your pencil to add light shading along the sides and back to give the tongue volume.
Step 8
Darken the area under the center groove and at the base to create deeper shadows.
Step 9
Gently blend the pencil shading with a cotton swab or blending stump to smooth tones.
Step 10
Lay down a light layer of pink with your colouring materials over the whole tongue.
Step 11
Add darker pinks or reds to the shaded areas and along the groove to build depth.
Step 12
Use your eraser or a white pencil to lift tiny highlights for wet shiny spots.
Step 13
Share your finished tongue drawing on DIY.org.
Help!?
What can I use if I don't have a cotton swab or blending stump for smoothing the shading?
Use a clean fingertip, a small piece of tissue, or a folded paper towel to gently blend the pencil shading as an alternative to the cotton swab or blending stump mentioned in the instructions.
My center groove looks too dark and obvious—how do I fix it without ruining the drawing?
Lighten the groove by softly dabbing a kneaded or regular eraser to lift graphite and then blend the surrounding shaded sides with a cotton swab, blending stump, or fingertip to even the tones as the steps recommend.
How should I change the steps for younger kids or make it more challenging for older kids?
For younger children, have them trace or draw a simple long rounded oval and one gentle center line and color with crayons instead of doing light pencil shading, while older kids can refine outer edges, add papillae texture, and layer pinks and reds with colored pencils to build depth.
How can we extend or personalize the tongue drawing after finishing the basic steps?
Personalize the drawing by adding a mouth, teeth, or background from your reference, intensify shiny spots with a white pencil or gel pen as the instructions suggest, and photograph the finished tongue to share on DIY.org.
Watch videos on how to draw a realistic tongue
How To Sketch Cartoon Characters
4 Videos
How To Sketch Cartoon Characters
How To Draw A Cartoon Rhino
How to Draw Cartoon Peacock Cute step by step
How To Draw A Funny Cartoon Pencil - Easy step-by-step art lesson for kids and adults!
Facts about drawing anatomy for kids
👅 The human tongue is a muscular organ made of intrinsic and extrinsic muscles that let it bend, stretch, and change shape.
🔬 The tongue’s surface is covered in tiny bumps called papillae that hold taste buds and give the tongue its textured appearance—great to suggest with shading.
💧 Wet surfaces like a tongue have bright specular highlights; adding a small white spot makes them instantly look glossy and realistic.
✏️ Leonardo da Vinci championed drawing from life—careful observation and measuring are key skills for realistic drawing.
🖌️ Smooth, realistic color blends come from layering midtones, shadows, and highlights rather than using one flat color.
How do I teach my child to draw a realistic tongue step by step?
What materials do I need to draw a realistic tongue with my child?
What ages is this tongue-drawing activity suitable for?
What are the benefits of drawing a realistic tongue for children?
