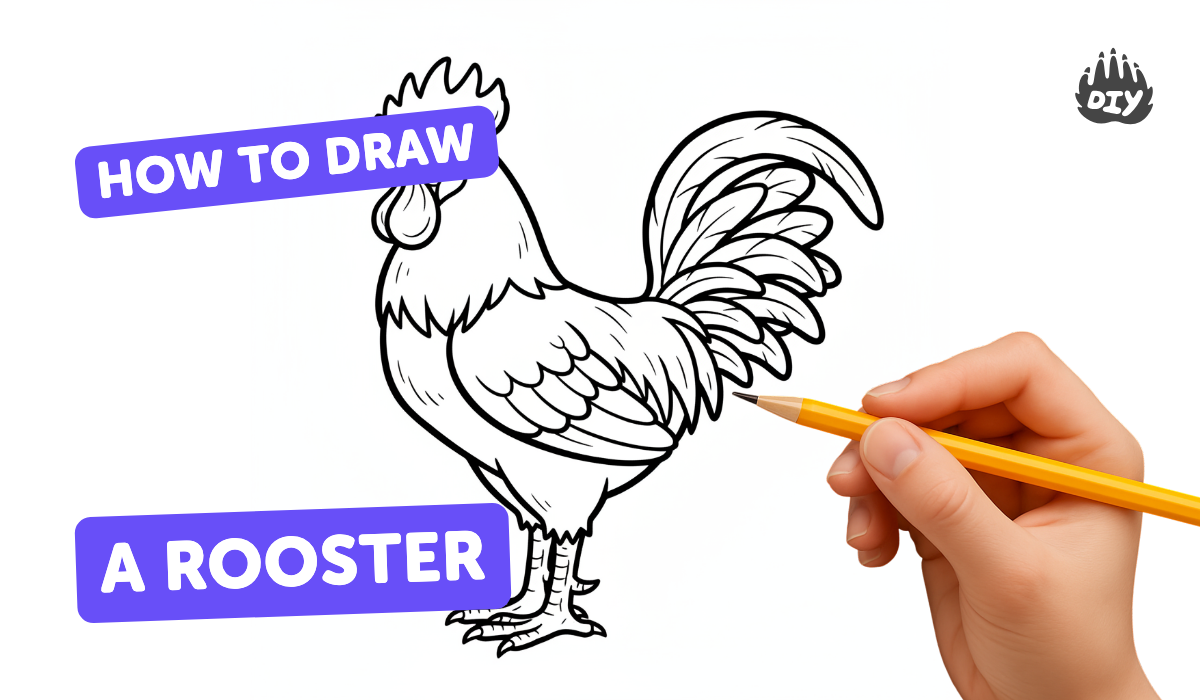
How to draw a rooster - a free rooster drawing guide
Draw a rooster by sketching basic shapes, adding feathers, comb, beak, and tail, then outline and color to complete a realistic bird drawing.

Drawing Apps
Photos of rooster drawing examples


Step-by-step guide to draw a rooster
How to Draw a Rooster - Easy Drawing Tutorial for Kids & Beginners I Easy Rooster Drawing
Step 1
Lightly sketch the rooster's basic shapes by drawing a large tilted oval for the body and a smaller circle touching it for the head connected with a short curved neck.
Step 2
Add a fan of three to five long curved feather shapes at the back of the oval to make the tail.
Step 3
Draw a rounded teardrop shape on the side of the body to show the wing.
Step 4
Add the head features by drawing a bumpy comb on top the head a triangular beak at the front and a teardrop wattle under the beak.
Step 5
Draw a small circle for the eye and add a tiny dot inside for the pupil.
Step 6
Add short curved lines across the wing and body and longer curves on the tail to show feather texture.
Step 7
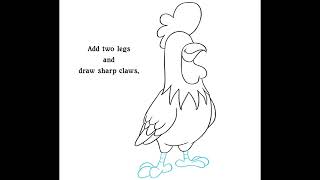
Draw two straight or slightly bent lines down from the body to make the legs.
Step 8
Draw three forward toes and one back toe at the end of each leg to make the feet.
Step 9
Trace over the final lines with a black marker or pen to create a clean outline.
Step 10
Gently erase the light pencil guide lines so only the clean inked drawing remains.
Step 11
Color your rooster using bright shades for the body comb beak legs and tail to finish your picture.
Step 12
Share your finished creation on DIY.org.
Help!?
What can we use if we don't have a black marker or pen to trace the final lines?
If you don't have a black marker or pen to trace the final lines, use a dark-colored fine-tip felt marker, a thin permanent marker, or a sharpened colored pencil pressed firmly and let it dry before gently erasing the light pencil guide lines.
My rooster's head or neck looks awkward—how can I fix the shapes before inking?
If the head circle doesn't sit against the tilted oval or the neck looks awkward, redraw the short curved neck connecting the two shapes lightly in pencil, erase extra overlapping lines, and check proportions before tracing with your marker.
How can I adapt this drawing for different ages or skill levels?
For preschoolers, pre-draw the tilted oval and head circle for them to trace and color the comb and beak, while older kids can add detailed feather texture lines across the wing and tail, practice shading the body, and refine the three-forward, one-back toes before inking.
What are simple ways to enhance or personalize the rooster drawing after finishing the basic steps?
To personalize the rooster, add patterned stripes or dots on the tail feathers with colored pencils, paint a farm background, glue on small paper feathers for texture, and photograph the inked and colored picture to share on DIY.org.
Watch videos on how to draw a rooster
How to Draw a Rooster Step by Step 🐓 Drawing for Kids | Nursery Rhymes For Babies #drawing #howto
4 Videos
How to Draw a Rooster Step by Step 🐓 Drawing for Kids | Nursery Rhymes For Babies #drawing #howto
How to Draw a Rooster | Easy Step by Step Drawing Tutorial
How to Draw a Rooster - Easy and Fun Drawing for Kids #roosterdrawing
How to Draw a Rooster Step by Step | Easy Chicken Drawing for Beginners - Part 1
Facts about bird drawing
🐓 Roosters are male chickens and often have bigger combs and more colorful tail feathers than hens—great reference for dramatic shapes!
🎨 The bright comb and wattles can help you choose bold color accents when shading a rooster drawing.
🪶 Feathers come in different shapes—fluffy down, smooth contour feathers, and long flight feathers—use varied strokes to show texture.
🌈 Some rooster colors are created by pigment, while others are structural (tiny feather structures) that make them shimmer in light.
📸 Roosters have been painted and featured in folk art worldwide, so studying photos and artworks helps with realistic poses.
How do you draw a rooster step by step?
What materials do I need to draw a rooster with my child?
What ages is this rooster drawing activity suitable for?
What are the benefits of drawing a rooster with my child?
