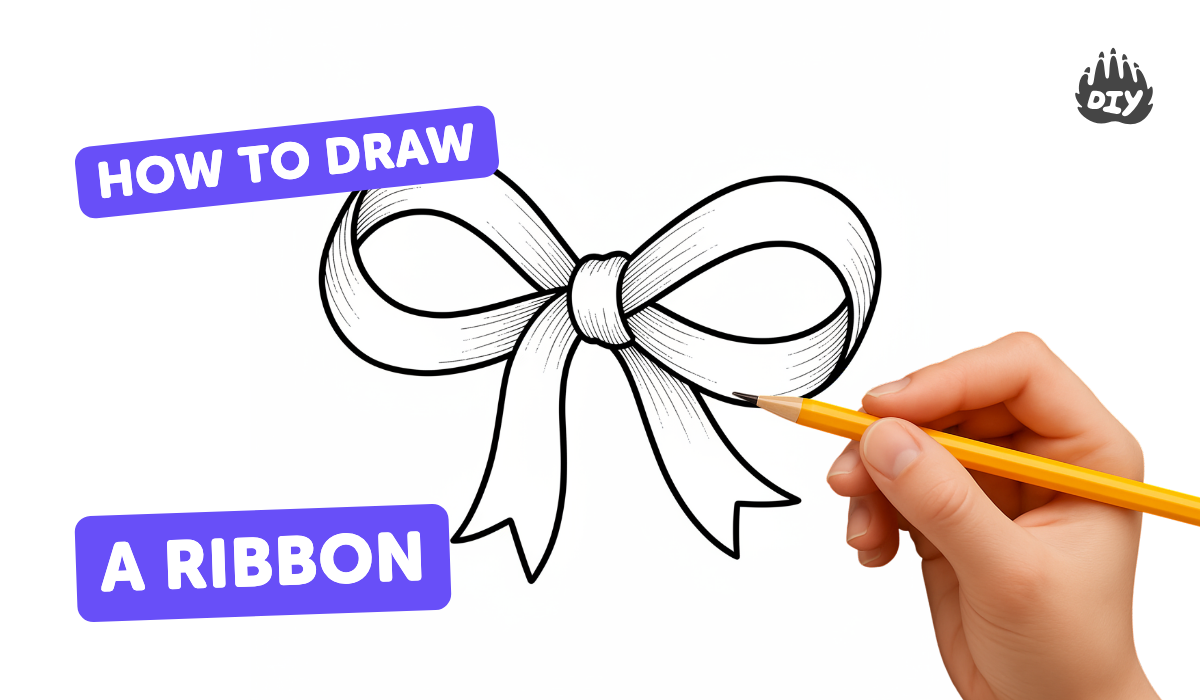
How to draw a ribbon - a free ribbon drawing guide
Draw a realistic ribbon step by step using simple shapes, folds, and shading techniques. Practice neat lines, symmetry, and light direction observations.

Drawing Apps
Photos of ribbon drawing examples


Step-by-step guide to draw a realistic ribbon
How To Draw Ribbon Step by Step 🎀🎀 | Ribbon Drawing, Painting, Coloring for Kids And Toddler 🎀
Step 1
Lightly draw a small arrow at the edge of your paper to show the direction of the light source.
Step 2
Lightly sketch a small rounded oval in the center of your paper for the ribbon knot.
Step 3
From the left side of the knot draw a large curved teardrop shape for the left loop.
Step 4
From the right side of the knot draw a matching curved teardrop shape for the right loop.
Step 5
Draw a long pointed tail down from the left bottom of the knot with a slight curve.
Step 6
Draw a matching long pointed tail down from the right bottom of the knot with a slight curve.
Step 7
Inside each loop and tail draw a thin parallel line to show the inner edge or fold of the ribbon.
Step 8
Add short curved crease lines where the ribbon bends near the knot and at the start of each tail.
Step 9
Trace over the final outer lines and the fold lines with a fine-tip pen or a darker pencil to make them clean.
Step 10
Erase extra light sketch marks so only the clean ribbon lines remain.
Step 11
Shade the sides of each loop and tail that are opposite your light arrow using gentle strokes that get slightly darker near folds.
Step 12
Use a blending tool to soften the shaded areas into smooth gradients.
Step 13
Gently erase a narrow strip on the areas facing the light to create thin bright highlights.
Step 14
Share your finished ribbon drawing on DIY.org.
Help!?
If I don't have a fine-tip pen or a blending tool, what can I substitute so my ribbon still looks clean and smooth?
Trace final outer lines and fold lines with a sharp HB or 2B pencil instead of a fine-tip pen, and use a folded tissue, cotton swab, or your fingertip to softly blend the shaded areas in place of a blending tool.
My left and right loops don't match and my shading looks blotchy—how can I fix those common mistakes?
Lightly erase and re-sketch one loop to mirror the other using the rounded oval knot as the center reference, keep shading strokes gentle and in the same direction away from your light arrow, and blend in small areas gradually to avoid blotches.
How can I adapt the steps for different ages so the activity is fun but not too hard or too easy?
For preschoolers provide pre-drawn loop-and-tail outlines on thick paper and chunky crayons, for elementary kids follow the light arrow, oval knot, loops and tails steps with pencil tracing, and for teens add detailed folds, careful shading with a blending tool, and narrow erased highlights as described in the final steps.
What are simple ways to extend or personalize the finished ribbon drawing before sharing it on DIY.org?
Add color with colored pencils or a light watercolor wash, draw a small pattern or gift tag on a tail, sharpen highlights with a white gel pen or kneaded eraser as in the 'gently erase a narrow strip' step, and photograph on a plain background for uploading to DIY.org.
Watch videos on how to draw a realistic ribbon
How to Draw a Ribbon - Step by Step Bow Drawing for Kids #iheartcraftythings #howtodraw
4 Videos
How to Draw a Ribbon - Step by Step Bow Drawing for Kids #iheartcraftythings #howtodraw
How To Draw Ribbon Step by Step 🎀🎀 | Ribbon Drawing, Painting, Coloring for Kids And Toddler 🎀🎀
How To Draw A Mother's Day Ribbon

Ribbon Drawing | How to Draw a Beautiful Ribbon - Step-by-Step Tutorial | Inspire Art Linkings
Facts about drawing and shading techniques
🎀 Ribbons aren’t just for presents — they’re used worldwide in award ribbons, medals, and decorative sashes.
✍️ Cross-hatching builds darker shading by layering intersecting lines instead of solid blocks of tone.
🌓 Chiaroscuro is the art idea of using strong light-and-dark contrast to make flat shapes look three-dimensional.
🔁 Symmetry (mirrored shapes) helps a ribbon look neat and balanced — our eyes quickly spot matching sides.
👀 Shade the underside of a ribbon fold darker and add a thin highlight on the top edge to make it look like it’s lifting off the page.
How do I teach my child to draw a realistic ribbon step by step?
What materials do we need to draw a realistic ribbon at home?
What ages is drawing a realistic ribbon suitable for?
What are the benefits of drawing ribbons and easy variations to try?
