How to draw a poppy flower - a free poppy flower drawing guide
Draw a realistic poppy flower using pencil and watercolor, learning petal shapes, shading, and color blending to create a vivid botanical illustration.

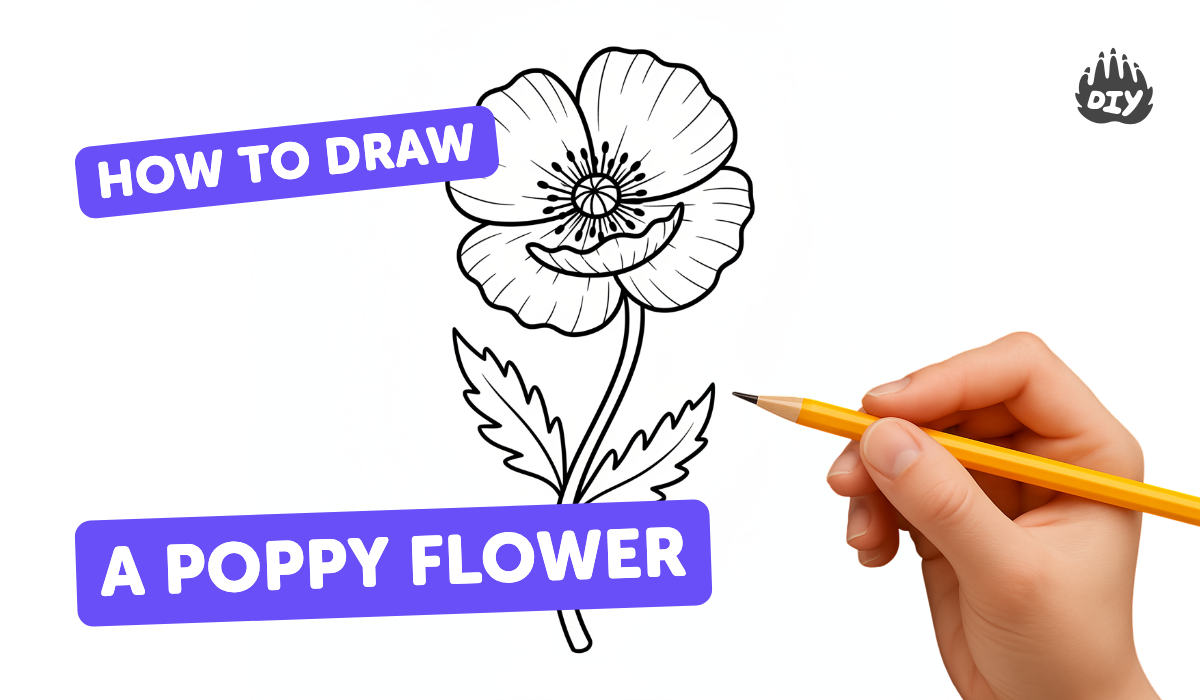
Step-by-step guide to draw a poppy flower
How To Draw A Kid Planting A Flower
Step 1
Arrange all your materials neatly on a clear table so everything is easy to reach.
Step 2
Find a photo or look at a real poppy and study the petal shapes and the dark center.
Step 3
Lightly sketch a small circle for the flower center and a short stem with your pencil.
Step 4
Lightly draw four overlapping ruffled petal shapes around the center using loose lines.
Step 5
Add faint pencil veins on each petal with gentle strokes to show the folds.
Step 6
Erase any extra construction lines so the petal shapes look clean and simple.
Step 7
Fill a cup with clean water and place it beside your palette.
Step 8
Put a small puddle of red paint on your palette for mixing.
Step 9
Add a little water to the red on the palette to mix a light red wash.
Step 10
Wet one petal area on the paper lightly with clean water using your brush.
Step 11
Paint that petal with the light red wash starting at the center and dragging outward and repeat for each petal.
Step 12
Load your brush with a stronger red and touch the petal bases and folds to darken shadows and gently blend outward.
Step 13
Paint the flower center dark brown or black and add tiny textured dots with the tip of your brush.
Step 14
Paint the stem and any leaves with green and add a darker stroke on one side for shading.
Step 15
Share your finished poppy on DIY.org
Help!?
What can we use instead of a paint palette, water cup, or red watercolor if we don't have them?
If you don't have a palette or watercolor paint, use a clean ceramic plate or plastic lid to 'Put a small puddle of red paint on your palette for mixing', a spare jar for 'Fill a cup with clean water', and washable tempera or diluted acrylic to make the 'light red wash'.
My petals are bleeding and look muddy—what should I do during the wetting and painting steps?
If paint bleeds when you 'Wet one petal area on the paper' or when you add the stronger red, blot excess water with a tissue, work one petal at a time, and lift excess color with a clean damp brush before it dries to keep the petals clean and ruffled.
How can I adapt the steps for younger children or older kids?
For preschoolers simplify by letting them use a chunky brush and washable paint to follow a very light 'Lightly sketch' guide and paint large petals, while older kids can complete all steps adding faint pencil veins and the stronger red at petal bases to practice shading and texture.
How can we make the poppy painting more creative or display-worthy?
To enhance the project, paint a soft background wash before you 'Paint the stem and any leaves', try different red mixes for multiple flowers, add tiny splattered pollen dots around the 'dark brown or black' center, and frame or 'Share your finished poppy on DIY.org'.
Watch videos on how to draw a poppy flower
How To Draw A Flower (Tulip)- Preschool
4 Videos
How To Draw A Flower (Tulip)- Preschool
How To Draw Spring Blossoms - Preschool

How to Draw Poppy Corn Easy | Shopkins
How to Draw Poppy | Rainbow High Fashion Doll
Photos of poppy flower drawings


Facts about botanical illustration and watercolor techniques
🌺 Many poppy species have four thin, crepe-like petals — a simple shape that’s great for practicing petal outlines and folds.
✏️ Pencil grades go from 9H (very hard, light) to 9B (very soft, dark); artists often use 2B–6B for smooth petal shading.
🎨 Watercolor becomes more transparent the more you dilute it — layering light washes builds bright, believable flower colors.
🔬 Botanical illustrators focus on both beauty and scientific accuracy; some botanical paintings are used to identify plants.
🌎 The California poppy is California’s state flower, while the opium poppy (Papaver somniferum) has been cultivated for thousands of years.
How do I draw a realistic poppy flower with pencil and watercolor?
What materials do I need to draw a watercolor poppy?
What ages is drawing a realistic poppy suitable for?
What are the benefits of drawing and painting poppies with kids?
