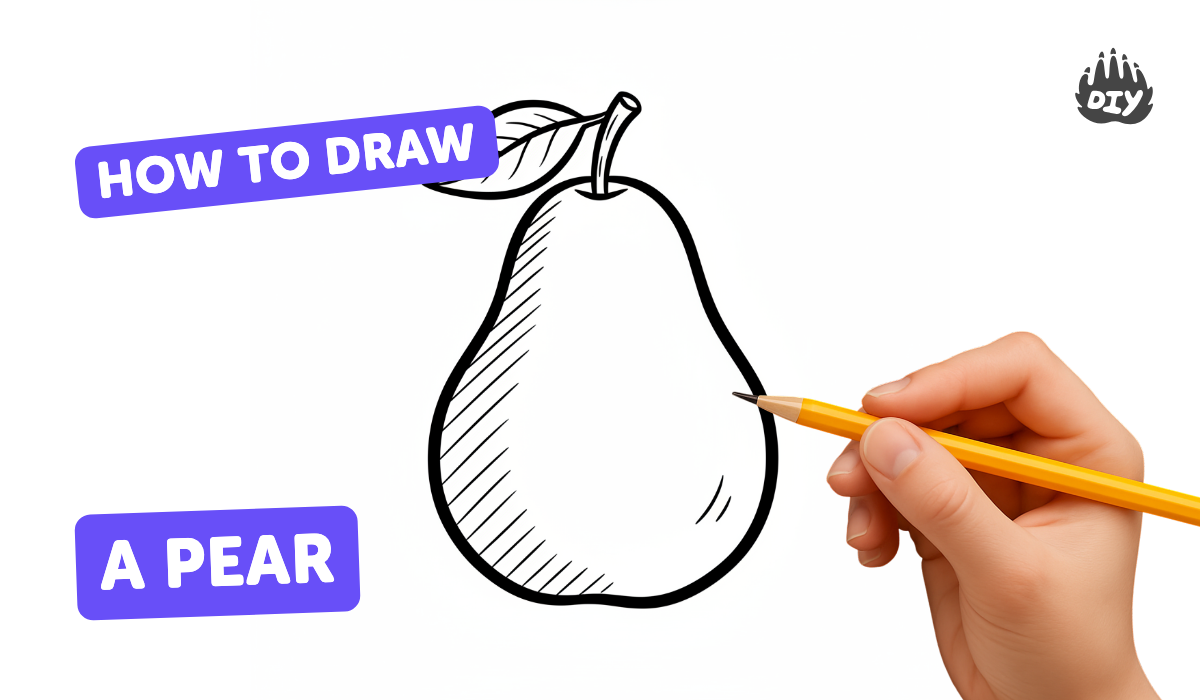
How to draw a pear - a free pear drawing guide
Draw a pear step by step using simple shapes, outlines, and shading. Practice observation, proportion, and blending to create a realistic fruit drawing.

Drawing Apps
Photos of pear drawing examples


Step-by-step guide to draw a pear
How To Draw A Funny Cartoon Pear
Step 1
Look at a real pear or a photo for one minute and notice where the light hits and the pear's overall shape.
Step 2
Lightly draw a vertical guideline in the middle of your paper to help place the pear.
Step 3
Sketch a large slightly lopsided teardrop shape for the pear using light pencil strokes.
Step 4
Add a short curved stem at the top with light pencil lines.
Step 5
Draw a faint curved contour line down one side to mark the pear's round bulge.
Step 6
Erase any part of the guideline that crosses the pear using gentle eraser touches.
Step 7
Darken and refine the outer edge of the pear to make a clean final outline.
Step 8
Shade the side of the pear that is away from the light using soft gentle pencil strokes.
Step 9
Use your cotton swab or tissue to blend the shaded area into a smooth gradient.
Step 10
Draw a soft cast shadow beneath the pear to make it look like it is sitting on a surface.
Step 11
Add small speckles on the pear's skin with tiny pencil dots to give it texture.
Step 12
Lift a small highlight with the eraser on the brightest spot to show the light reflection.
Step 13
Share your finished pear drawing on DIY.org
Help!?
What can we use instead of the cotton swab, tissue, or kneaded eraser called for in the instructions?
If you don't have a cotton swab or tissue to blend the shaded area, use a clean fingertip, a soft scrap of paper, or a folded paper towel, and if you lack a kneaded eraser to lift the highlight, press a clean white eraser gently or leave a tiny unshaded spot when shading.
My pear looks flat after shading—what step did I miss and how do I fix it?
Darken the side of the pear that is away from the light with soft pencil strokes, blend that area with your cotton swab or tissue into a smooth gradient, and then lift a small highlight with the eraser on the brightest spot to create depth.
How can I adapt this pear-drawing activity for younger children or older kids?
For preschoolers, have them trace a printed pear photo and add simple speckles with a pencil, while older kids can refine the faint curved contour line, experiment with cross-hatching for skin texture, and carefully lift a highlight with the eraser for realism.
What are some ways to extend or personalize the finished pear drawing?
Try adding colored pencil layers over your shaded pear, design a patterned background that affects the soft cast shadow beneath the pear, add more detailed stem texture and speckles, then photograph the finished drawing to share on DIY.org.
Watch videos on how to draw a pear
How To Draw A Banana - Preschool
4 Videos
How To Draw A Banana - Preschool
How to Draw a Pear 🍐Cute Food Pun Art
How To Draw Funny Grapes - Preschool

How To Sketch Fruit
Facts about observational drawing
🍐 There are over 3,000 varieties of pears grown worldwide — plenty of shapes to practice drawing!
✏️ Professional artists often start with simple shapes (circles, ovals, triangles) to build complex drawings.
🖤 Shading techniques like hatching, cross-hatching, and smooth blending make flat drawings look round and juicy.
🎨 Pears appear a lot in still life art because their smooth curves and shiny skins are great for practicing light and texture.
🔎 The brightest spot (the highlight) and the darkest shadow tell your eye a pear's form — watch them closely when you shade.
How do I teach a child to draw a pear step by step?
What materials do I need to draw a pear with my child?
What ages is pear drawing suitable for?
What are the benefits of having a child draw a pear?
