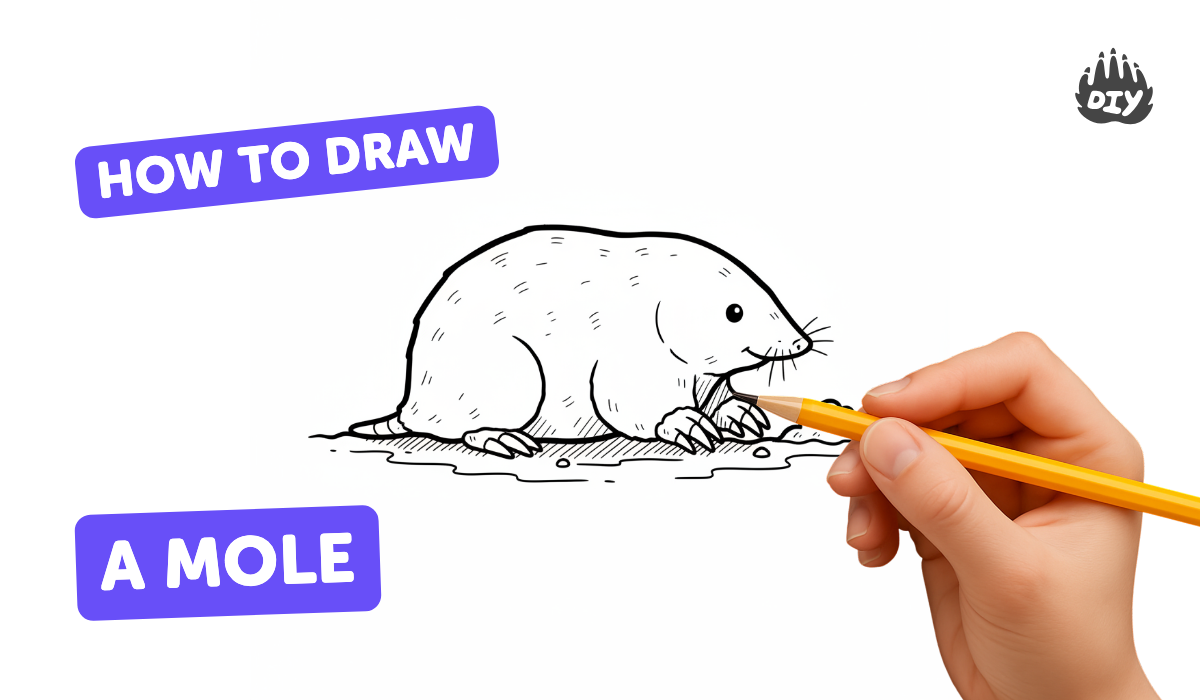
How to draw a mole - a free mole drawing guide
Draw a realistic burrowing mole step-by-step using simple shapes, shading, and texture. Practice observation, proportions, and basic animal drawing techniques.

Drawing Apps
Photos of mole drawing examples


Step-by-step guide to draw a mole
How To Draw A Cartoon Raccoon
Step 1
Gather your materials and place them where you can reach them easily.
Step 2
Look closely at your reference photo and notice the big simple shapes you see like the oval body and round head.
Step 3
Lightly sketch a large horizontal oval for the body and a smaller overlapping oval for the head.
Step 4
Draw a short rounded cone for the snout and add a tiny circle at the tip for the nose.
Step 5
Sketch the front paws as wide paddle shapes in front of the body to show digging claws.
Step 6
Add small rounded hind legs and a tiny stubby tail at the back of the body.
Step 7
Place a tiny dot for the eye and a very small hidden ear near the top of the head.
Step 8
Smoothly redraw the outer contour to connect all shapes into a single animal outline and erase the extra construction lines.
Step 9
Add fur texture with short curved strokes that follow the body’s shape.
Step 10
Shade the darkest areas like under the body behind the legs and under the snout using light layers of pencil.
Step 11
Gently blend the shaded areas with your blending stump or cotton swab to soften the fur shadows.
Step 12
Use your eraser to lift tiny highlights on the nose and along fur ridges and clean any stray marks.
Step 13
Take a picture of your finished mole and share your creation on DIY.org.
Help!?
I don't have a blending stump — what can I use instead to soften the fur shadows?
Use a cotton swab (as the instructions mention), a piece of tissue, your fingertip, or a soft brush to gently blend the shaded areas under the body, behind the legs, and under the snout.
My mole's head and body don't look connected — how can I fix the outline?
Check that your large horizontal oval for the body overlaps the smaller head oval, then smoothly redraw the outer contour to connect all shapes into a single animal outline and erase the extra construction lines before adding texture.
How can I adapt this drawing activity for different age groups?
For younger kids, pre-draw big ovals on larger paper and have them trace and add simple paddle paws, while older kids can focus on short curved fur strokes, layered pencil shading with a blending stump, and lifting highlights with an eraser for realism.
How can we extend or personalize the mole drawing once it's finished?
Add a dirt tunnel or background, try colored pencils or charcoal for different fur textures, give the mole a patterned patch or name tag, then take a picture of your finished mole and share it on DIY.org as instructed.
Watch videos on how to draw a mole
How To Draw A Funny Monster - Preschool
4 Videos
How To Draw A Funny Monster - Preschool

How To Draw A Cartoon School
How To Draw A Cartoon Frog
How To Draw A Scorpion (for kids)
Facts about animal drawing for kids
🐾 Moles live almost entirely underground and have tiny, fur-covered eyes adapted for life in tunnels.
🕳️ A mole's front paws are wide and paddle-like—perfect reference for drawing strong digging limbs and accurate proportions.
✏️ Many artists begin animal drawings with simple shapes (circles and ovals) to map proportions before adding details.
🌓 Placing a single light source and using gradual shading makes a round mole body look three-dimensional on paper.
🌟 The star-nosed mole has 22 fleshy tentacles on its nose—an unusual feature that's great for practicing tiny textures.
How to draw a realistic burrowing mole step-by-step?
What materials do I need to draw a realistic mole?
What ages is mole drawing suitable for?
What are the benefits of drawing a realistic mole?
