How to draw a cherry blossom tree - a free cherry blossom tree drawing guide
Draw a cherry blossom tree step-by-step using simple shapes, add branches and clusters of petals, then color and shade to practice observation and composition.

Drawing Apps
Photos of cherry blossom tree examples


Step-by-step guide to draw a cherry blossom tree
How To Draw A Cherry Blossom Spring Tree
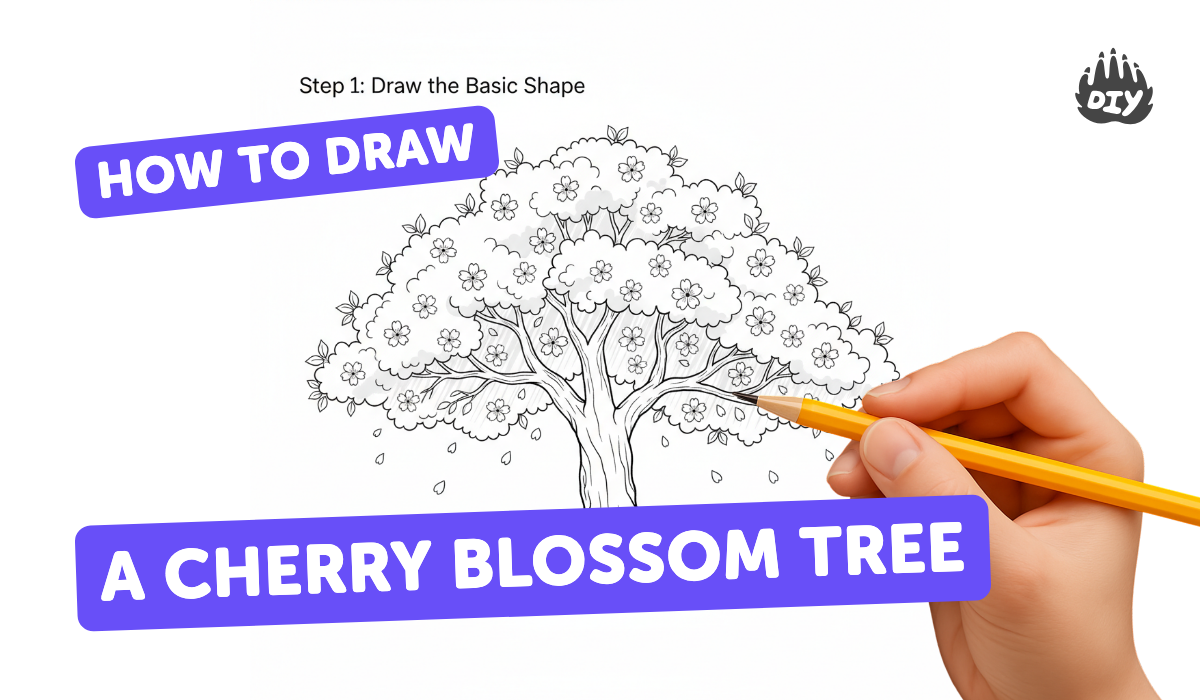
Step 1
Lightly draw a vertical line in the middle of the paper to mark the center of the tree trunk.
Step 2
Sketch the trunk by drawing a thick slightly curved shape around the vertical line.
Step 3
Draw three to five large main branches extending from the top of the trunk in different directions.
Step 4
Add smaller thinner branches branching off each main branch.
Step 5
Lightly draw cloud-like rounded shapes at the ends of the branches to show where blossoms will cluster.
Step 6
Inside each cloud shape draw many five-petal cherry blossoms by sketching small rounded petals around a tiny center.
Step 7
Erase any extra guideline lines so the trunk branches and blossoms look clean.
Step 8
Trace the final trunk branches and blossom outlines with a fine-tip marker or darker pencil.
Step 9
Color the trunk and branches brown using light strokes and add short lines for simple bark texture.
Step 10
Color the blossoms using different pink tones and add tiny yellow dots in the centers of the flowers.
Step 11
Add light shading under blossom clusters and along one side of the trunk to show where the light hits.
Step 12
Share your finished cherry blossom tree on DIY.org
Help!?
What can I use if I don't have a fine-tip marker or multiple pink tones for coloring the blossoms?
Trace the final trunk and branches with a darker pencil or ballpoint pen instead of a fine-tip marker, and color the trunk and blossoms with crayons, regular markers, or watercolors using light and heavier strokes to simulate different brown and pink tones and add tiny yellow dots for centers.
My branches or blossom clusters look messy after erasing—how can I keep the trunk, branches, and blossoms looking clean?
Sketch all guidelines very lightly with pencil, let any marker ink dry completely before erasing, and use a soft eraser to gently remove extra guideline lines so the trunk, branches, and blossoms look clean.
How can I adapt this cherry blossom tree activity for different ages or skill levels?
For younger children simplify by drawing one to three thick main branches and large cloud-like blossom shapes they can fill with big five-petal flowers or stickers, while older kids can add many thinner branch offshoots, short bark texture lines, varied pink shading, tiny yellow centers, and light shading under clusters for realism.
What are some ways to extend or personalize the finished cherry blossom tree?
Enhance the piece by adding falling petals, a soft watercolor wash background, gluing small tissue-paper pieces onto the cloud-like rounded blossom clusters for 3D texture, and signing your name before sharing the finished cherry blossom tree on DIY.org.
Watch videos on how to draw a cherry blossom tree
How to Draw Cherry Blossoms for Kids 🌸💻 | Easy Digital Cherry Blossoms for Beginners
4 Videos
How to Draw Cherry Blossoms for Kids 🌸💻 | Easy Digital Cherry Blossoms for Beginners
Learn How to Draw Cherry Blossoms step-by-step in just 8 simple steps! 🎨

How to draw a cherry blossom tree easy step by step

How To Draw CHERRY BLOSSOM TREE (step by step) Tutorial - Soft Pastel Drawing
Facts about drawing and sketching for kids
🌸 Cherry blossoms (sakura) come in many shades from white to deep pink.
⏳ Most cherry blossoms only stay in full bloom for about one to two weeks each spring.
🌍 Japan tracks the "cherry blossom front" each year to predict when trees will bloom across regions.
🎨 Famous ukiyo-e artists like Hokusai and Hiroshige often featured cherry trees in their spring landscapes.
🌱 Cherry blossom trees belong to the Prunus family, which also includes plums, peaches, and almonds.
How do I teach my child to draw a cherry blossom tree step-by-step?
What materials do I need to draw a cherry blossom tree with my child?
What ages is drawing a cherry blossom tree suitable for?
What are the benefits of drawing a cherry blossom tree with my child?
