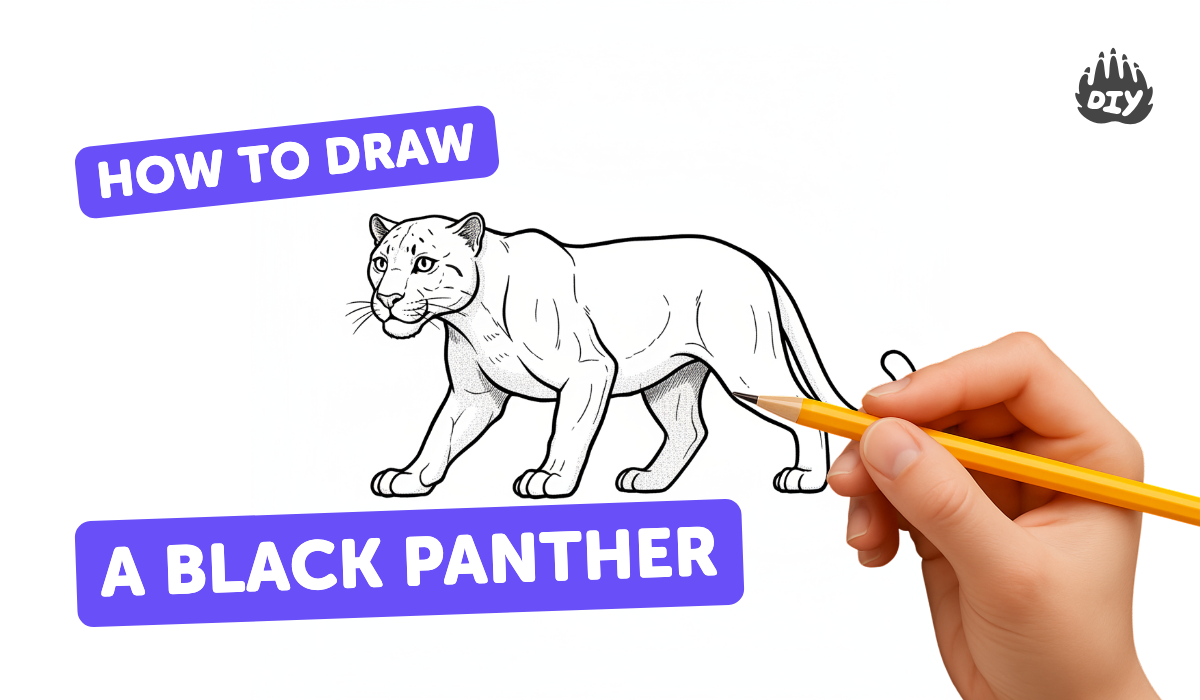
How to draw a black panther - a free black panther drawing guide
Draw a black panther step by step using pencils, markers, and shading to build fur texture and realistic facial features. Practice proportions and pose.

Drawing Apps
Photos of black panther drawing examples


Step-by-step guide to draw a black panther
How To Draw Black Panther
Step 1
Decide whether your panther will be standing sitting or crouching.
Step 2
Lightly draw basic shapes: a circle for the head an oval for the body and a curved line for the spine.
Step 3
Add a vertical and horizontal guideline inside the head circle to place the eyes nose and mouth.
Step 4
Sketch the limbs tail and joint ovals using simple lines to show leg positions.
Step 5
Draw the snout ears and jaw shapes over the head circle.
Step 6
Smoothly connect the basic shapes to create a clean outline for the panther’s body and head.
Step 7
Erase extra construction lines inside the outline to tidy your drawing.
Step 8
Lightly draw the eyes nose and mouth details following the facial guidelines.
Step 9
Add short pencil strokes following the curve of the body to create fur texture.
Step 10
Darken the deepest shadow areas with a softer pencil to build value.
Step 11
Gently blend shaded areas with a blending stump or tissue to soften transitions.
Step 12
Use the black marker to fill the deepest fur regions while leaving tiny highlight spots unmarked.
Step 13
Use a fine-tip pen to add whiskers and small face accents.
Step 14
Share your finished black panther drawing on DIY.org.
Help!?
What can I use if I don't have a blending stump or a black marker?
Use a rolled-up tissue or cotton swab to 'Gently blend shaded areas' and substitute a dark graphite pencil or India ink pen for the 'Use the black marker to fill the deepest fur regions'.
My panther looks wrong after connecting shapes; how do I fix proportions and avoid losing highlights?
If proportions are off after you 'Smoothly connect the basic shapes', keep the light 'Lightly draw basic shapes' construction lines to adjust the head or body ovals before you 'Erase extra construction lines', and protect tiny highlights by leaving small spots unmarked when you 'Use the black marker to fill the deepest fur regions'.
How can I adapt this drawing activity for different ages?
For younger kids simplify by having them focus on the 'circle for the head' and 'oval for the body' and color in the outline, while older kids can add 'short pencil strokes' for fur texture, 'darken the deepest shadow areas' with softer pencils, and use the fine-tip pen for detailed whiskers.
How can we make the drawing more creative or display-worthy?
Enhance the piece by sketching a moonlit jungle background before or after you 'Smoothly connect the basic shapes', add subtle colored-pencil highlights over the black marker zones, and give your panther a name to include when you 'Share your finished black panther drawing on DIY.org'.
Watch videos on how to draw a black panther
How to Draw Black Panther! Easy Step‑by‑Step Drawing for Kids | Kay Kay's Art Studio
4 Videos
How to Draw Black Panther! Easy Step‑by‑Step Drawing for Kids | Kay Kay's Art Studio
How to Draw Black Panther | Step by Step Art Lesson for Beginners
How to Draw a Black Panther Easy | Cute Cartoon Animal
How to Draw BLACK PANTHER (Black Panther 2018) | Narrated Easy Step-by-Step Tutorial
Facts about animal drawing and shading
🐆 Black panthers aren't a separate species — they're melanistic leopards or jaguars with extra dark pigment.
🎨 Artists create realistic fur by using short directional strokes, cross-hatching, and layered shading to suggest texture.
✏️ When sketching a big cat's face, place the eyes roughly one eye-width apart and keep them forward-facing for depth.
🌙 Even very dark (melanistic) panthers often show faint rosette or spot patterns in bright light.
📐 Start with a light gesture line for the spine and simple shapes for the head and body to lock in pose and proportion.
How do I draw a realistic black panther step by step with pencils and markers?
What materials do I need to draw a black panther?
What ages is this black panther drawing suitable for?
What are the benefits and variations of drawing a black panther?
