How to draw a bass - a free bass drawing guide
Learn to draw a bass fish step by step using simple shapes, pencil, eraser, and colors, practicing proportions, fins, scales, and shading techniques.

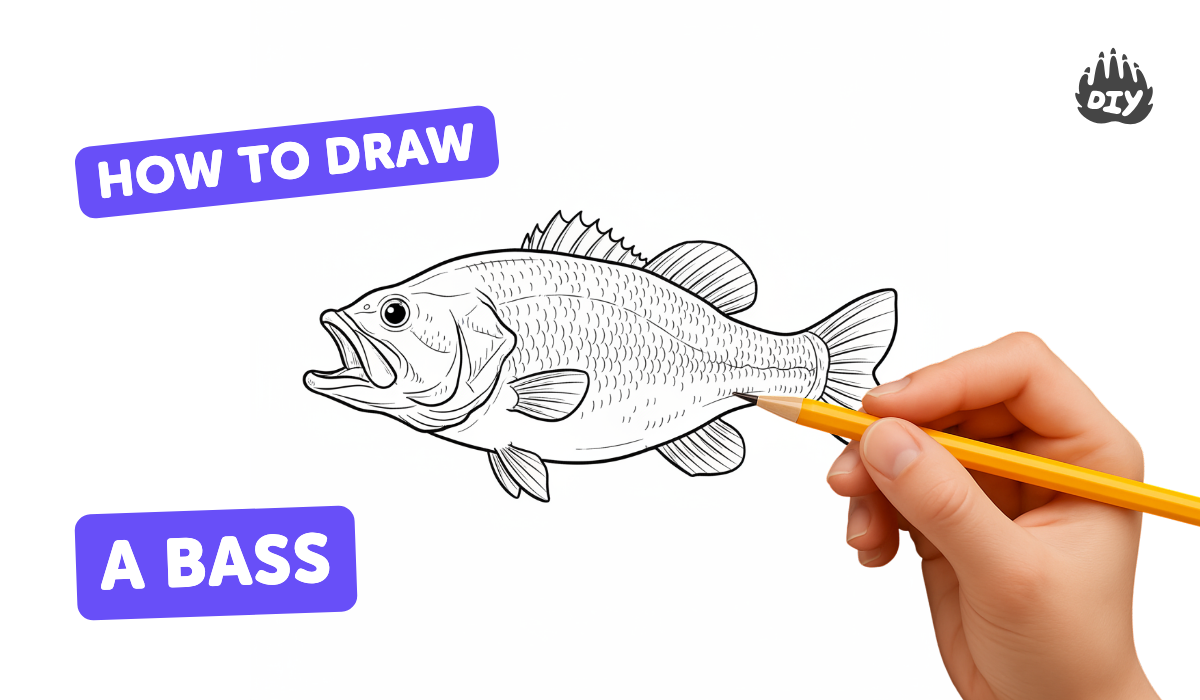
Step-by-step guide to draw a bass fish
How to Draw Bass Guitar
Step 1
Draw a light horizontal guideline across the page to mark the fish's centerline.
Step 2
Sketch a long oval around the guideline to make the bass's main body shape.
Step 3
At the right end of the oval draw a forked tail by sketching two curved triangles that meet.
Step 4
At the left end draw a rounded snout and a slightly jutting lower jaw for the mouth.
Step 5
Near the snout draw a small circle for the eye and shade a smaller circle inside it to make the pupil.
Step 6
Draw a curved line behind the eye to show the gill cover.
Step 7
On the top front of the body draw the spiny dorsal fin as a row of short pointed triangles.
Step 8
Draw the soft dorsal fin behind the spiny one as a smooth curved shape along the back.
Step 9
Draw the pectoral fin on the side near the gill as a rounded triangle.
Step 10
Draw a small rounded triangle under the belly near the front for the pelvic fin.
Step 11
Draw another small rounded triangle under the belly near the tail for the anal fin.
Step 12
Add rows of small curved lines or half-circles along the body to suggest scales.
Step 13
Lightly erase any extra guidelines to clean up your drawing.
Step 14
Use your coloring materials to color the back darker and the belly lighter and add light pencil shading under the fins for depth.
Step 15
Take a photo of your finished bass and share your creation on DIY.org.
Help!?
What can we use if we don't have the suggested coloring materials or a camera to share the finished bass on DIY.org?
Use crayons, markers, or watercolor paints to color the back darker and the belly lighter and add light pencil or watered-down marker shading under the fins, and use a smartphone, tablet, or a scanner to take the photo for sharing on DIY.org.
My forked tail and spiny dorsal fin look wrong—how can I fix those parts?
For the tail, redraw at the right end of the oval as two curved triangles that meet with slightly curved inner edges, and for the spiny dorsal redo the top front as a row of short pointed triangles, then erase extra guideline lines and add light pencil shading at the base of each fin for depth.
How can I adapt this bass-drawing activity for different age groups?
For younger children simplify by drawing a single large oval, a rounded snout, and big rounded fins only, while older children can follow all steps including the row of small curved lines for scales, the spiny and soft dorsal fins, and detailed light pencil shading under the fins before photographing and sharing.
What are some ways to enhance or personalize the bass after finishing the basic drawing?
Add extra details like layered scale patterns with rows of small curved lines, highlights with a white gel pen, a habitat background (water plants or lure), or color blends on the back and belly using colored pencils or watercolor, then photograph the finished bass to share on DIY.org.
Watch videos on how to draw a bass fish
Guitar Drawing: Easy Step-by-Step Guide for Kids
4 Videos

Guitar Drawing: Easy Step-by-Step Guide for Kids

How to Draw a Guitar | Easy Guitar Outline Drawing Step by Step Sketch for Beginner
How to Draw a Guitar For Kids Step by Step and Coloring | Guitar Drawing #music #drawingforkids

How to Draw Guitar || Simple Drawing Step by Step for Beginners || Kids Drawing idea
Facts about animal drawing for kids
🎣 Largemouth bass are one of the most popular freshwater game fish and are known for strong jumps when hooked.
🐟 A bass's body is covered in overlapping scales—artists often draw just a few suggestive rows instead of every single scale.
✏️ Many fish drawings start with simple shapes: an oval for the body, a circle for the head, and a triangle for the tail.
📏 Proportion tip: a bass's head is roughly one-third of its total body length, which helps keep your sketch realistic.
🎨 Shading trick: darken under the belly and behind fins to make the fish look shiny and three-dimensional like real scales.
How do I teach my child to draw a bass fish step by step?
What materials do we need to draw a bass fish with my child?
What ages is learning to draw a bass fish suitable for?
What are the benefits of teaching kids to draw a bass fish?
