How to draw a baseball player - a free baseball player drawing guide
Draw a baseball player step by step using simple shapes, add uniform details, pose, shading, and color to practice proportions and observation skills.

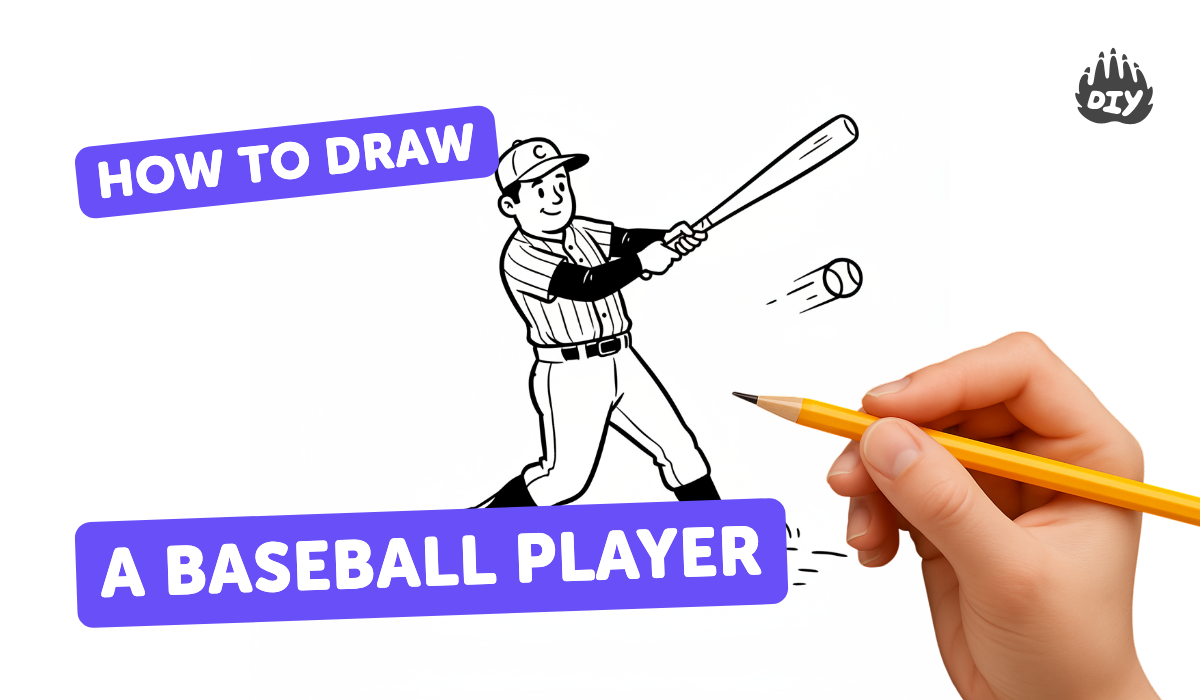
Step-by-step guide to draw a baseball player
How To Draw A Baseball Player
Step 1
Decide whether your player will be a batter a pitcher or a fielder and imagine what action they are doing.
Step 2
Lightly draw a vertical centerline down your page and a light horizontal line where the top of the head will sit to help with proportions.
Step 3
Draw a simple oval on the top of the centerline to make the head.
Step 4
Draw a larger rounded oval below the head to make the torso.
Step 5
Draw a small oval under the torso to mark the hips.
Step 6
Sketch stick arms and legs using straight lines and put small circles at the shoulders elbows hips and knees for joints.
Step 7
Add simple shapes for the hands and feet and draw a bat or a glove shape in the hand depending on the pose you chose.
Step 8
Draw a baseball cap on the head using a curved brim and a round top.
Step 9
Add jersey details like the collar sleeve lines and a big number on the chest.
Step 10
Draw the pants with a belt line across the hips.
Step 11
Draw cleats on the feet using chunky shoe shapes and short spikes lines.
Step 12
Trace over your final outline with a darker pencil or marker to make the drawing crisp.
Step 13
Erase the light guide lines so only your clean drawing remains.
Step 14
Choose a light direction and add shading to folds under the chin under the cap and on one side of the body then colour your player with your colouring materials.
Step 15
Share your finished baseball player on DIY.org
Help!?
What can I use if I don't have a marker or colouring materials?
If you don't have a marker, trace your final outline with a darker graphite pencil or ballpoint pen, and if you lack colouring materials use crayons, colored pencils, watercolors, or torn-paper collage to colour your player.
My player's arms or bat look stiff—how can I fix the pose?
If the arms look stiff or the bat/glove feels wrong, reposition the small shoulder, elbow and knee circles from the instructions and redraw the stick arms with slightly curved gesture lines before adding the bat or glove shape.
How can I change the activity for younger or older kids?
For younger children, simplify by using the stick arms and legs, chunky shoe shapes and thick crayons, while older kids can use the centerline and head-top guide for more accurate proportions, add detailed jersey folds, cleat spikes and shading.
What are easy ways to enhance or personalise the finished drawing?
To extend the activity, add a team logo and big number on the chest, draw a baseball-field background and motion lines, deepen shading from your chosen light direction, and photograph the result to share on DIY.org.
Watch videos on how to draw a baseball player
How to Draw a Baseball Player Step by Step
4 Videos

How to Draw a Baseball Player Step by Step
How to Draw Aaron Judge for Kids - New York Yankees MLB Baseball Player
How to Draw Juan Soto for Kids - New York Yankees MLB Baseball Player
How to Draw Bryce Harper for Kids EASY - Philadelphia Phillies
Facts about figure drawing for kids
⚾ The distance from the pitcher's mound to home plate is 60 feet 6 inches — a fun scale to imagine in a baseball scene!
🧢 Baseball caps became a standard part of team uniforms in the mid-19th century and are great for practicing shading on a face.
🧤 Players wear the glove on their non-throwing hand, so when you draw a catcher or fielder, put the glove on their catching side.
📏 The average Major League Baseball player is about 6 ft 1 in (1.85 m) tall — a handy reference when thinking about proportions.
🎨 Artists often use the '7.5 heads tall' rule for adult figures — try stacking head-sized guides to keep your player in proportion.
How do I draw a baseball player step by step?
What materials do I need to draw a baseball player?
What ages is this drawing activity suitable for?
What are the benefits of drawing a baseball player?
