Fix a vacuum cleaner
With adult supervision, inspect and unclog the hose, clean or replace the filter, untangle the brush roller, and test the vacuum safely.


Step-by-step guide to fix a vacuum cleaner
Science Project For Powerful Vacuum Cleaner School Project || How To Make Vacuum Cleaner At Home
Step 1
Unplug the vacuum and switch it off at the wall outlet.
Step 2
Put on your gloves so your hands stay clean and safe.
Step 3
Empty the dust bin or remove the vacuum bag into the trash bag.
Step 4
Detach the hose from the vacuum by pressing the release clip or unscrewing the connection.
Step 5
Shine the flashlight through the hose and look inside for any blockages.
Step 6
Use the long stick or pipe cleaner to push or pull any clog out of the hose into the trash bag.
Step 7
Remove the filter from its compartment by opening the filter cover or unscrewing the panel.
Step 8
Ask an adult to help you check the filter label to see if it is washable.
Step 9
If the filter is washable rinse it gently under running water and lay it flat to dry completely on a towel.
Step 10
If the filter is not washable put the old filter in the trash bag and insert the replacement filter.
Step 11
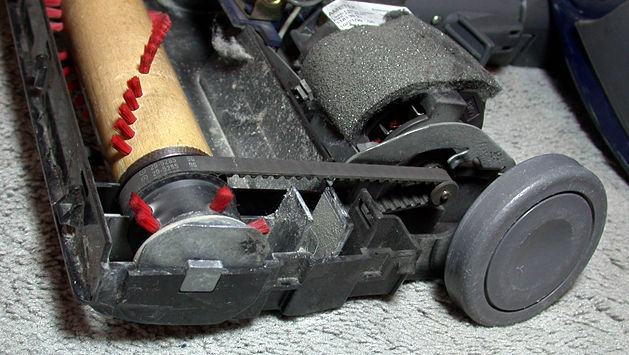
Turn the vacuum so you can reach the brush roller and use scissors to cut and pull away tangled hair and threads.
Step 12
Put the dry or new filter back into the vacuum and close the filter compartment.
Step 13
Reconnect the hose and snap or screw any covers back into place.
Step 14
Ask an adult to plug in and switch on the vacuum and watch while they test it briefly to make sure it runs normally.
Step 15
Share your finished vacuum-fixing success on DIY.org.
Help!?
What can I use instead of the gloves, flashlight, or long stick/pipe cleaner if I don't have them?
Use disposable kitchen or garden gloves in place of work gloves, your phone's flashlight to shine through the hose (step 5), and a flexible straightened wire clothes hanger wrapped in tape or a long zip-tie instead of the pipe cleaner to push clogs out (step 6).
If the vacuum still doesn't run normally after reconnecting, what should I check or try next?
Confirm the dust bin was emptied (step 3), make sure a washable filter is completely dry or a replacement filter was inserted (steps 8–11), re-check the hose and brush roller with the flashlight and stick/scissors for any remaining clogs (steps 5–6, 12), and ask an adult to inspect the motor if it still runs weakly (step 13).
How can I adapt the activity for younger children versus older kids?
For younger children have them do safe jobs like handing you the gloves, holding the trash bag while you empty the dust bin, and taking before/after photos for DIY.org (step 3 and final step), while older kids can detach the hose, remove and clean or replace the filter, cut hair from the brush roller, and reconnect parts before an adult tests it (steps 4, 7–12, 13).
How can we extend or personalize this vacuum-fixing activity after it's done?
Make it a maintenance project by creating a labeled checklist with dates for emptying the dust bin, checking the hose with a flashlight, washing or replacing the filter, cleaning the brush roller (steps 3, 5, 8–12), take photos to post on DIY.org, and decorate a small tool bag to store the gloves, flashlight, stick, and scissors.
Watch videos on how to fix a vacuum cleaner
Robotic Vacuums Have a BIG Problem! Here's How to Fix It!
4 Videos
Robotic Vacuums Have a BIG Problem! Here's How to Fix It!

How Does A Robot Vacuum Work? | Fun Facts For Kids | Technology Facts For Kids | Tech Facts

Machines for Kids with Blippi | Learn About Vacuum Trucks
How to make vacuum cleaner for car at home || Powerful vacuum cleaner for science project
Facts about small appliance maintenance for kids
🧰 Most weak-suction problems come from simple clogs in the hose or brush roll — they're often fixed with a tool and some patience.
🧼 HEPA filters can trap at least 99.97% of particles 0.3 micrometers wide, which helps keep dust and pollen out of the air.
🔄 Brush rollers can get tangled with hair and string, and clearing that tangling usually gets them spinning freely again.
💡 James Dyson invented the first widely used bagless cyclone vacuum, which reduced reliance on disposable bags and changed vacuum design.
⚡ Vacuum performance is described by measures like airwatts or pascals — but even a powerful motor needs clean filters and an unclogged hose to work well.
How do I safely involve my child in fixing a vacuum cleaner?
What materials do we need to unclog and clean a vacuum with a child?
What ages are suitable for this hands-on vacuum repair activity?
What safety precautions and benefits come from fixing a vacuum with a child?
