Draw Various Textures
Draw a texture chart showing wood, fur, stone, metal, and fabric using pencils and crayons, practicing lines, shading, and rubbing techniques carefully.

Step-by-step guide to draw various textures
Step 1
Gather all your materials and place them on a clean flat table.
Step 2
Put your paper landscape and lightly draw five equal boxes side by side with your pencil.
Step 3
Write the word Wood above the first box Fur above the second box Stone above the third box Metal above the fourth box and Fabric above the fifth box.
Step 4
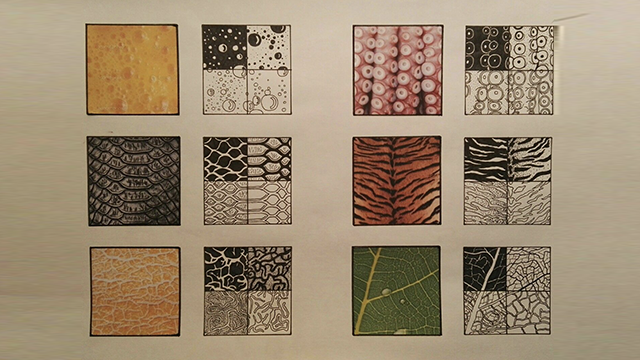
In the Wood box use your pencil to draw long curved lines and a few knots to make wood grain.
Step 5
In the Fur box make lots of short quick pencil strokes that all point in the same direction to show fur.
Step 6
In the Stone box draw small irregular shapes and use pencil shading to make some parts darker and some lighter to show roughness.
Step 7
In the Metal box use smooth even pencil shading and leave one small area white to act as a shiny highlight.
Step 8
For the Fabric box place a piece of fabric or another textured object under the paper and gently rub with the side of a crayon or pencil to capture the weave.
Step 9
Color each texture box with crayons using light layers and darker areas where you want more depth.
Step 10
Add a title at the top of your chart and write your name in a corner.
Step 11
Share your finished texture chart on DIY.org.
Final steps
You're almost there! Complete all the steps, bring your creation to life, post it, and conquer the challenge!


Help!?
What can we use if we don't have a piece of fabric or crayons for the Fabric box rubbing and coloring?
If you don't have fabric for the Fabric box, place textured items like bubble wrap, a leaf, aluminum foil, an egg carton, or corrugated cardboard under the paper and gently rub with the side of a crayon or a soft pencil, and if you lack crayons use colored pencils, graphite, or charcoal sticks for the color layers.
My Metal box doesn't look shiny and the Stone box looks flat—how can I fix those textures?
For Metal, leave or erase one small area white as the shiny highlight and use smooth even pencil shading elsewhere, while for Stone darken some irregular shapes with heavier pencil strokes and smudge lightly with your finger or a tissue to increase contrast and roughness.
How can I adapt the activity for a 4-year-old and for a 10-year-old?
For a 4‑year‑old, pre-draw larger boxes, label them, give chunky crayons, and guide big directional Fur strokes and simple Fabric rubbings, while for a 10‑year‑old keep the five equal boxes and add challenges like extra textures (glass or sand), finer cross-hatching for Stone, and blending techniques for Metal.
What are some ways to extend or personalize the finished texture chart beyond the basic steps?
Extend your chart by adding more labeled boxes (glass, sand), gluing small fabric swatches next to the Fabric box, pressing aluminum foil for extra Metal highlights, photographing your chart and sharing the techniques on DIY.org, or combining several charts into a texture book.
Watch videos on how to draw various textures
Learn To Draw Texture! | Jump into Drawing for Kids
4 Videos
Learn To Draw Texture! | Jump into Drawing for Kids
How to Draw Different Textures - Virtual Art Class - Grade 3 Episode 04
Texture Drawing | Simple Art Activity for Kids
Lesson Preview: Drawing Different Textures | KS2 Art
Facts about drawing and shading techniques
✏️ 'Pencil lead' is actually graphite — different grades (like 4H to 6B) give lighter or darker shading.
🖍️ Crayola sold its first box of crayons in 1903; crayons' waxy surface is great for bold texture and rubbing effects.
🪙 Frottage (rubbing) was popularized by artist Max Ernst in the 1920s as a way to discover unexpected textures.
🐾 Short, directional pencil strokes layered in the hair's growth direction make fur look soft and realistic.
🪵 Wood grain shows a tree's growth rings — tighter rings usually mean slower growth and can guide your wood texture lines.
How do I help my child draw a texture chart showing wood, fur, stone, metal, and fabric?
What materials do I need for a texture chart with pencils and crayons?
What ages is the Draw Various Textures activity suitable for?
What are the benefits and safety tips for a texture-chart drawing activity?


One subscription, many ways to play and learn.
Only $6.99 after trial. No credit card required