Draw someone's nose
Draw someone's nose: observe their profile, sketch its shape with pencil and eraser, then add shading to show depth and character.

Drawing Apps
Step-by-step guide to Draw someone's nose
Step 1
Place your mirror or photo upright where you can clearly see a side profile.
Step 2
Put your paper and pencil on a flat surface in front of you.
Step 3
Sit comfortably in your chair.
Step 4
Turn toward the mirror or photo so the side profile fills your view.
Step 5
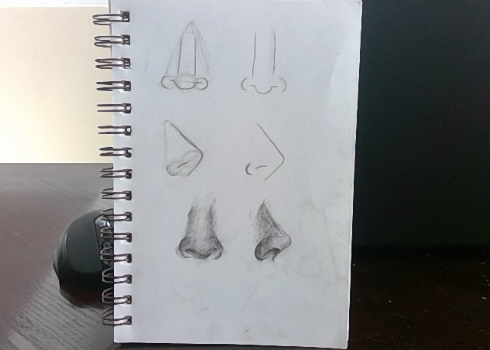
Observe the nose carefully to notice the bridge the tip and the bottom of the nostril.
Step 6
Lightly draw a simple side-head silhouette to mark where the nose should sit.
Step 7
Using very light pencil strokes sketch the bridge shape.
Step 8
Using very light pencil strokes sketch the tip and the nostril shape.
Step 9
Check your sketch against the reference to see if the size and position look right.
Step 10
Erase any stray lines to clean up the nose outline.
Step 11
Shade the shadowed areas with soft pencil strokes where the light is weakest.
Step 12
Blend the shaded areas gently with a tissue or blending stump to make smooth transitions.
Step 13
Add small darker accents with a sharper pencil where the deepest shadows are.
Step 14
Gently lift tiny highlights on the bridge and tip using the eraser.
Step 15
Share your finished nose drawing on DIY.org
Help!?
What can I use if I don't have a blending stump or a mirror?
Prop a smartphone, tablet, or printed photo upright for the side profile and blend the shaded areas with a folded tissue, cotton swab, or your fingertip instead of a blending stump.
My drawn nose looks too big or off-center—how do I fix the proportions?
Use the step to lightly draw a simple side-head silhouette to reestablish where the nose should sit, check your sketch against the mirror or photo to compare size and position, then erase stray lines and adjust the bridge, tip, and nostril shapes until they match the reference.
How can I adapt this activity for younger children or older kids?
For younger children simplify by tracing the side-head silhouette and using markers to block in the bridge, tip, and nostril, while older kids can use softer pencils for shading, a blending stump for smooth transitions, and a sharper pencil plus eraser to add tiny darker accents and highlights.
What are some ways to extend or personalize the finished nose drawing before sharing on DIY.org?
Practice drawing different nose types and lighting by changing the mirror/photo angle, extend the sketch into a full side portrait starting from your side-head silhouette, or add colored pencil accents and a time-lapse photo of your process to personalize the final piece.
Watch videos on how to Draw someone's nose
How to Draw: Nose (Easy Beginner Tutorial)
4 Videos

How to Draw: Nose (Easy Beginner Tutorial)
How to draw a nose for beginners | Easy nose drawing step by step | Realistic Nose Drawing Tutorial

How to Draw A Nose Step By Step
How to Draw Nose from front View: Easy Step-by-Step Tutorial
Facts about portrait drawing for kids
👃 The nose combines bone (bridge) and flexible cartilage (tip), which is why noses come in so many shapes!
✏️ Artists often block in a nose using simple shapes—triangles, cylinders, and curves—before adding details.
💡 Shading creates the illusion of depth: highlights, midtones, and shadows turn a flat sketch into a 3D nose.
📐 A handy portrait tip: the bottom of the nose often sits about halfway between the eyes and the chin.
🧑🎨 Great drawers like Leonardo da Vinci studied facial anatomy so noses in portraits looked realistic and full of character.
How do you draw someone's nose step by step?
What materials do I need to draw someone's nose?
What ages is this nose-drawing activity suitable for?
What are the benefits of practicing nose drawing with children?
