Draw some rocks
Draw a collection of rocks using simple shapes, shading, and texture techniques to practice observation, light direction, and creating realistic stone sketches.

Drawing Apps
Step-by-step guide to draw some rocks
Step 1
Lay out your paper pencil eraser sharpener and colored pencils or crayons on a clean workspace.
Step 2
Put the small rock or photo in front of you so you can look at its shapes and shadows.
Step 3
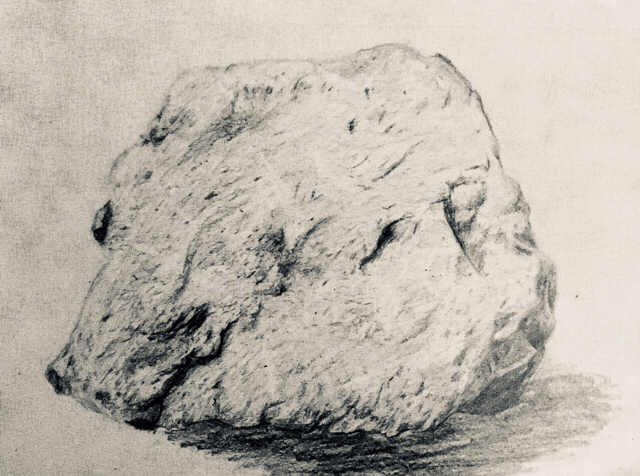
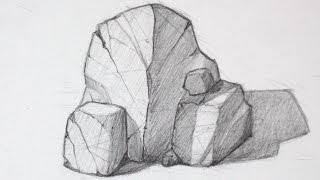
Lightly draw a simple outline of your rock using one basic shape like an oval circle or rounded triangle.
Step 4
Draw a small arrow on your paper to show where the light is coming from.
Step 5
Add a curved contour line or two on the rock to show its rounded planes.
Step 6
Shade the side of the rock that faces away from the arrow using the side of your pencil to make a dark area.
Step 7
Make lighter strokes in the middle areas of the rock to create midtones between dark and light.
Step 8
Gently blend the shaded areas with a tissue or cotton swab to smooth the transitions.
Step 9
Use the eraser to lift tiny highlights where the light hits the rock to make it look shiny or rough.
Step 10
Add texture by drawing small dots short lines and tiny cracks with quick pencil marks.
Step 11
Draw a soft cast shadow under the rock on the side opposite the light to ground it on the page.
Step 12
Color your rock with colored pencils or crayons keeping darker colors where you shaded and lighter colors near the highlights.
Step 13
Take a photo of your finished rock drawing and share it on DIY.org.
Help!?
What can we use if we don't have the small rock, colored pencils, or a tissue?
If you don't have a small rock use a printed photo or a phone picture as your reference, swap colored pencils for crayons or washable markers for coloring, and use a clean fingertip, soft cloth, or cotton ball instead of a tissue or cotton swab for blending.
My rock drawing looks flat or the shading is messy — what should I check in the steps?
Check that you shaded the side away from the arrow with the side of your pencil for a solid dark area, made lighter strokes for midtones in the middle, and gently blended those areas with a tissue or cotton swab before lifting highlights with the eraser.
How can I change this activity for different ages?
For younger kids simplify to drawing one big oval and coloring it with crayons without blending, while older kids can add extra curved contour lines, detailed texture marks, stronger cast shadows, and layered colored-pencil shading as in the steps.
How can we make the rock drawing more creative or advanced after finishing the basic steps?
Extend the activity by redrawing the same rock under different light directions (draw a new arrow and adjust shading), adding a colored background or glued sand for texture, and then photograph each version to share on DIY.org.
Watch videos on how to draw some rocks
How to draw ROCKS the easy way! - A beginner tutorial
4 Videos
How to draw ROCKS the easy way! - A beginner tutorial
How to Draw Rocks Step by Step #drawingtutorial
How to Draw Rocks Easy
How to Draw Rocks - Basic Shapes
Facts about drawing and sketching for kids
🪨 Rocks come in three main types — igneous, sedimentary, and metamorphic — so your sketchbook can become a mini rock museum!
🎨 Chiaroscuro is an art technique meaning "light-dark" that helps turn flat shapes into realistic, 3D-looking stones.
✏️ Pencil grades run from 9H (very hard, very light) to 9B (very soft, very dark) — B pencils are great for rich rock shadows.
🌞 Light direction is a superpower for drawing: change the light and a stone's highlights and shadows will swap sides and mood.
🔍 Careful observation reveals tiny textures like cracks and grain — artists often study an object closely to capture believable detail.
How do I teach my child to draw a realistic collection of rocks step by step?
What materials do I need to draw realistic stone sketches with my child?
What ages is rock-drawing practice suitable for?
What are the benefits of drawing rocks and are there safe variations for kids?
