Draw Realistically with DIY Star Zooquarium
Build a small DIY Star Zooquarium diorama, then practice realistic drawing of animals and sea creatures using shading, proportions, and careful observation.

Drawing Apps
Step-by-step guide to Draw Realistically with DIY Star Zooquarium
Step 1
Gather all your materials and set them on a clear table so everything is easy to reach.
Step 2
Turn the shoebox on its side so the open face becomes the front of your mini stage.
Step 3
Cover the inside back and sides with construction paper or paint to create a sky water and sandy floor background.
Step 4
Spread glue on the floor area and sprinkle sand or press pebbles to make a textured ground or seabed.
Step 5
Pick two or three animals or sea creatures from your reference pictures to feature in your Zooquarium.
Step 6
Look carefully at one reference picture and name the big shapes you see like circles ovals and rectangles.
Step 7
Hold a pencil at arm's length to measure and compare parts of the animal and mark those proportions lightly on your drawing paper.
Step 8
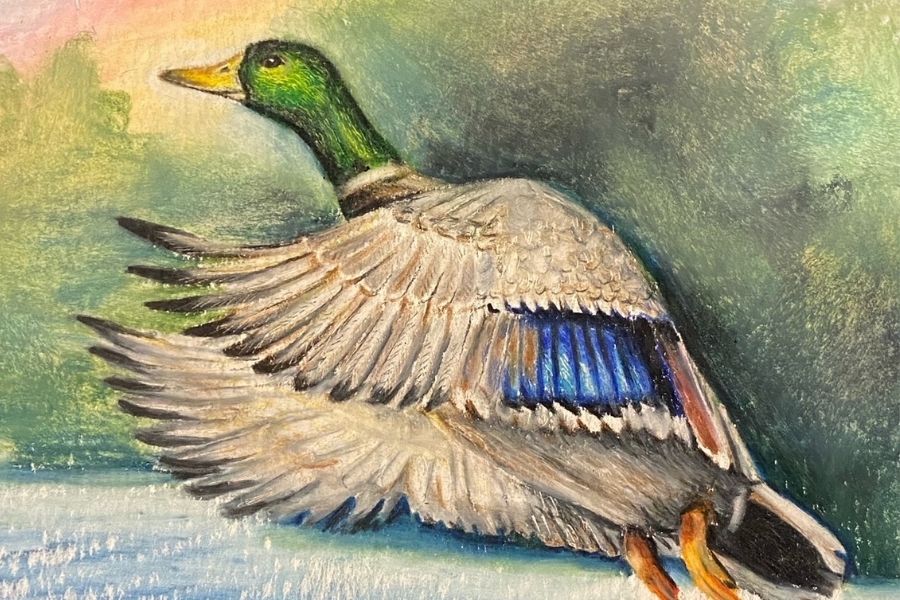
Lightly sketch the animal using the simple shapes you marked to get the correct size and pose.
Step 9
Erase extra lines and carefully refine the animal outline to match the reference features like eyes fins or paws.
Step 10
Decide where the light comes from and add shadows and texture with softer pencil strokes using hatching and blending.
Step 11
Add color or paint using subtle tones and gentle blending to make the animal look realistic.
Step 12
Carefully cut out your finished drawings and glue or tape them into the diorama where they look natural.
Step 13
Add final props like paper seaweed cotton clouds or extra pebbles to complete the scene.
Step 14
Share a photo of your finished Star Zooquarium diorama and realistic drawings on DIY.org for others to see.
Help!?
What can we use if we don't have a shoebox, construction paper, or sand?
Turn a clean cereal box or shallow drawer on its side instead of a shoebox, cover the inside back with torn colored paper or painted printer paper in place of construction paper, and sprinkle salt, coffee grounds, or rice on the glued floor area if you don't have sand or pebbles.
My glued sand/pebbles keep falling off and my drawing looks out of proportion — what should I do?
Press sand or pebbles firmly into wet glue and let the shoebox dry flat for several hours or seal with a thin coat of clear-drying glue, and use the 'hold a pencil at arm's length' measuring step to mark proportions lightly before sketching so your outline matches the reference.
How can I make this activity easier or harder depending on my child's age?
For younger children simplify steps 6–9 by providing pre-drawn shape templates to trace and crayons instead of detailed hatching, while older kids can use the pencil-at-arm's-length measuring, refine outlines carefully, practice hatching and blending for shadows, and add subtle paint tones for realism.
How can we extend or personalize our Star Zooquarium diorama after finishing the basic steps?
Add final props like battery tea lights behind the background for depth, attach moving animals with paper brads, label each creature and write a short story to include when you share the photo on DIY.org to personalize and enhance your Zooquarium.
Watch videos on how to Draw Realistically with DIY Star Zooquarium
Perfect shape Paper Star in ONE CUT! Easy paper star - DIY
4 Videos
Perfect shape Paper Star in ONE CUT! Easy paper star - DIY
How To Cut a Perfect Star | Make a Perfect Star with Just One Cut
Perfect Shape 3D Star NO RULER! / Easy Paper Star / Paper Craft
How to Make 3D Star / DIY Paper Star / Star With Paper / Paper Craft
Facts about observational drawing and diorama making
🎨 Artists use subtle shifts in light and dark (values) to make flat shapes look three-dimensional.
🐠 The Georgia Aquarium is famous for housing whale sharks and is one of the largest public aquariums in the world.
🦁 Schönbrunn Zoo in Vienna, opened in 1752, is the oldest continuously operating zoo — great inspiration for realistic animal displays.
🔍 Many illustrators measure proportions with a pencil or thumb-to-eye method to get animal shapes accurate before adding shading.
🧩 Dioramas became museum favorites in the 19th century to create lifelike scenes showing habitats and animal behavior.
How do I build a DIY Star Zooquarium diorama and use it to practice realistic drawing?
What materials do I need for a DIY Star Zooquarium and realistic drawing practice?
What ages is the Star Zooquarium drawing activity suitable for?
What are the benefits of building a Star Zooquarium and practicing realistic drawing?
