Draw any object using light and shadows
Use a flashlight or lamp to cast an object's shadow, trace its outline on paper, and shade to create a light-and-shadow drawing.

Drawing Apps
Step-by-step guide to create a light-and-shadow drawing
Step 1
Gather all the materials on a table so they are easy to reach.
Step 2
Pick one small object you want to turn into a cool shadow shape.
Step 3
Place the white paper flat on the table.
Step 4
Tape the paper to the table so it does not move.
Step 5
Put the object on the paper where you want its shadow to appear.
Step 6
Point the flashlight or lamp at the object so its shadow falls clearly on the paper.
Step 7
Turn off or dim the room lights so the shadow looks dark and crisp.
Step 8
Move the light closer or farther until the shadow size and shape look just right.
Step 9
Carefully trace the outline of the shadow with your pencil.
Step 10
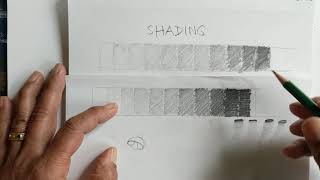
Shade the shadowed areas with your pencil by pressing harder where it is darkest and lighter where the light hits.
Step 11
Add colors or extra details with your colouring materials to make your drawing pop.
Step 12
Share your finished light-and-shadow drawing on DIY.org.
Help!?
What can we use if we don't have one of the listed materials like a flashlight, white paper, or tape?
Use a smartphone flashlight or desk lamp for the light, plain notebook paper or light-coloured cardboard instead of white paper, and painter's tape, masking tape, or a small stack of books to hold the paper in place while you trace.
My shadow is fuzzy or keeps moving—what should I check?
Turn off room lights, secure the paper with tape so it doesn't shift, and adjust the light's distance and angle (moving the flashlight closer makes a bigger, softer shadow and moving it farther can sharpen the outline) before you trace.
How can I change this activity for younger or older kids?
For younger kids use bigger, simple objects and a marker for tracing with an adult holding the light, while older kids can layer several objects, practice the pencil shading steps for depth, and try coloured lights or textures for extra detail.
How can we make the finished drawing more creative or longer-lasting?
Combine multiple objects to build a shadow scene, add detailed pencil shading and colouring from your colouring materials, then laminate or mount the paper and share a photo on DIY.org as the last instruction suggests.
Watch videos on how to create a light-and-shadow drawing
Light and Shadows for Kids | Science Video for Kids | Kids Academy
4 Videos
Light and Shadows for Kids | Science Video for Kids | Kids Academy
Shading Techniques Art Lesson for Kids
How to Shade with Drawing for Beginners | Light & Shadow
Pencil Shading Lesson for Beginners and Kids- Step by Step Studio-kids
Facts about light and shadow in art
🔦 A small, point-like light (like a flashlight) makes very sharp, high-contrast shadows — great for crisp outlines.
🎨 "Chiaroscuro" literally means "light-dark" in Italian and artists like Caravaggio used it to make scenes look three-dimensional.
🌞 Shadows are longest at sunrise and sunset and shortest at midday, so the same object can make very different drawings during the day.
✂️ In the 18th and 19th centuries people made silhouette portraits by tracing an object's shadow as a quick, affordable likeness.
🖌️ Big or diffused light sources (lamps with shades) create softer shadows that blend smoothly — perfect for gentle shading.
How do I make a light-and-shadow drawing using a flashlight?
What materials do I need to draw with light and shadows?
What ages is this light-and-shadow tracing activity suitable for?
What are the benefits of doing light-and-shadow drawings with kids?
