Draw An Indoor Scene
Draw an indoor scene with furniture, toys, a window view, and a pet; practice perspective, shading, and storytelling using colors and details.


Drawing Apps
Step-by-step guide to draw an indoor scene
Step 1
Gather all your materials and find a flat table or floor to work on.
Step 2
Pick which room you want to draw and choose a pet to include in the scene.
Step 3
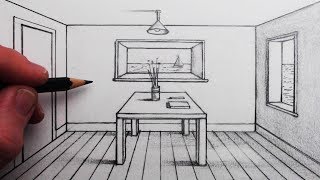
Lightly draw a horizon line and mark one vanishing point on the paper to set the perspective.
Step 4
Use the ruler to draw the back wall and floor lines so they all meet at the vanishing point.
Step 5
Sketch big pieces of furniture as simple boxes that follow the perspective lines.
Step 6
Add smaller toys and objects and make closer items larger and farther items smaller to show depth.
Step 7
Draw a window on one wall where you want the outside view to be.
Step 8
Sketch the view through the window using simple shapes like a tree house clouds or buildings.
Step 9
Draw your pet inside the room in a clear pose that shows what it is doing or feeling.
Step 10
Choose where the light comes from and draw a small sun or lamp symbol to show it.
Step 11
Shade the sides of objects opposite the light with soft pencil strokes to make them look three dimensional.
Step 12
Add textures like wood grain fur or rug lines to give details to each item.
Step 13
Color the whole scene using darker tones where you shaded and brighter tones near the light.
Step 14
Trace the important lines with a darker pencil or marker to make your drawing pop.
Step 15
Share your finished indoor scene on DIY.org.
Help!?
What can we use if we don't have a ruler, marker, or colored pencils?
If you don't have a ruler use a straight-edged book or piece of cardboard to draw the back wall and floor lines, substitute a dark pencil or crayon for the marker when tracing, and replace colored pencils with watercolor paints or magazine cutouts to color the scene.
My perspective lines won't meet at the vanishing point and the room looks off — what should I do?
If your lines don't meet at the vanishing point or the room looks distorted, lightly erase and redraw the back wall and floor lines using your ruler (or book) so they all converge on the marked vanishing point and use the horizon line as an alignment guide for furniture boxes.
How can I change the activity for different age groups?
For younger children (4–6) simplify the activity by drawing big pre-made box shapes for furniture and using crayons or stickers, for 7–10 follow the ruler and vanishing point steps with light shading, and for older kids (11+) add detailed textures, darker tracing with marker, and experiment with two-point perspective.
How can we extend or personalize our indoor scene after finishing the basic drawing?
To extend or personalize the scene, add patterned wallpaper or fabric scraps for a rug, give your pet a small story caption, try changing the light source between lamp and window to practice shading, or turn the drawing into a mixed-media collage before sharing on DIY.org.
Watch videos on how to draw an indoor scene
Easy Scenery Drawing for Kids-Step by Step
4 Videos

Easy Scenery Drawing for Kids-Step by Step
EASY DRAWING GARDEN SCENE , STEP BY STEP INSTRUCTIONS FOR TEACHING KIDS

How To Draw A House Step By Step | House Drawing For Kids | Super Easy Drawing Tutorials
How to Draw a Room in 1-Point Perspective for Beginners
Facts about drawing and composition
🎨 Linear perspective was formalized during the Renaissance (1400s) — artists like Brunelleschi helped make rooms and streets look realistically deep.
✏️ Shading tricks such as hatching, cross-hatching, and smooth blending turn flat shapes into believable 3D forms.
🪟 A painted window view creates a 'picture within a picture' that adds depth and a mini-story to your indoor scene.
🐶 Pets often appear in portrait and interior paintings — dogs usually symbolize loyalty, while cats can hint at independence.
🧸 Small objects and toys in a room are called attributes; artists use them to give clues about the people who live there.
How do I help my child draw an indoor scene with furniture, toys, a window view, and a pet?
What materials do I need to draw an indoor scene?
What ages is drawing an indoor scene suitable for?
What are the benefits of drawing indoor scenes for kids?
