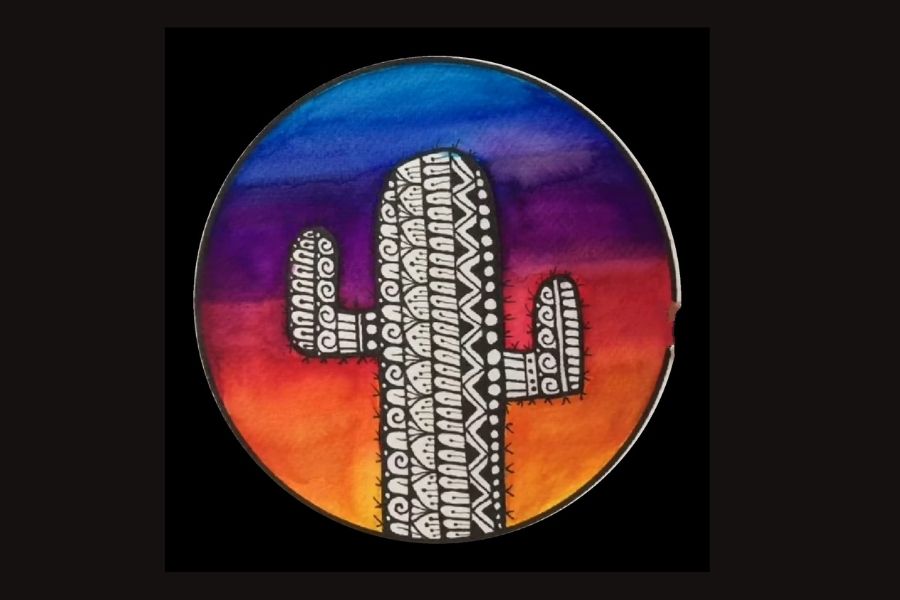
Doodle a Cactus
Draw and decorate a colorful cactus using simple shapes, patterns, and colors; learn about symmetry, texture, and basic sketching techniques.


Step-by-step guide to doodle a cactus
Step 1
Set up your paper pencil eraser ruler and colouring materials on a flat table so everything is easy to reach.
Step 2
Lightly draw a vertical center line down the middle of the paper to help keep your cactus symmetrical.
Step 3
Sketch the main cactus body as a tall rounded oval centered on the center line.
Step 4
Draw two smaller rounded arms on either side of the main body at different heights.
Step 5
Erase and reshape any lines so the left and right sides look balanced and symmetrical.
Step 6
Add curved vertical ribs on the cactus body using simple evenly spaced curved lines.
Step 7
Draw small V shapes evenly across the ribs to make cactus spines for texture.
Step 8
Sketch a simple pot under the cactus using a trapezoid or rounded rectangle shape.
Step 9
Add decorative patterns like stripes dots or zigzags to the pot to make it colorful.
Step 10
Trace your best pencil lines with a black marker to make bold clean outlines.
Step 11
Colour the cactus and pot with bright cheerful colours using your colouring materials.
Step 12
Add darker colour along one side of each cactus section to create simple shading and depth.
Step 13
Draw a small flower on top or on an arm and colour it with a bright contrasting colour.
Step 14
Add quick background touches like a little sun clouds or pebbles around the pot if you like.
Step 15
Take a photo of your finished cactus drawing and share it on DIY.org
Help!?
What can we use instead of the black marker, ruler, or specific colouring materials if we don't have them?
If you don't have a black marker use a dark pencil or fineliner to 'Trace your best pencil lines', swap the ruler for a straight edge like a book when drawing the 'vertical center line', and use crayons or watercolour paints in place of other 'colouring materials'.
My cactus looks lopsided or the ink smudged after tracing — how can I fix that?
Keep the 'vertical center line' very light, 'Erase and reshape any lines' to balance left and right before you 'Trace your best pencil lines with a black marker', and let ink dry fully or use a scrap paper under your hand to avoid smudges.
How can I adapt this activity for younger or older kids?
For younger children, simplify by drawing one large oval, skipping the ribs and spines and using crayons or stickers for the 'decorative patterns', while older kids can add many 'curved vertical ribs', detailed pot patterns, 'darker colour' shading and finer marker outlines.
What are some ways to enhance or personalize the cactus after finishing the basic drawing?
Personalize the piece by adding extra 'background touches' like pebbles or a sun, gluing real pebbles or sand around the pot, experimenting with different pot patterns from 'Add decorative patterns', or creating a series of cacti and then 'Take a photo of your finished cactus drawing and share it on DIY.org'.
Watch videos on how to doodle a cactus
How to Draw a Cactus Step by Step Easy For Kids
4 Videos

How to Draw a Cactus Step by Step Easy For Kids
How to draw a CACTUS 🌵🎨 | Drawing for kids | CRAFTS by Lingokids
How to Draw Cactus For Kids and Coloring Step by Step | Cactus Plant Drawing #cactus #plants #art
How to Draw a Cute Cactus 🌵 | Easy Step by Step Drawing Tutorial for Beginners #drawing #art
Facts about drawing and sketching for kids
🌵 Cacti are native mostly to the Americas — from Patagonia all the way up into parts of western Canada!
🎨 Doodling isn't just fun: studies show it can help people focus and remember information better.
🔁 Many cactus flowers display radial symmetry, a pattern that helps attract pollinators like bees and hummingbirds.
✏️ Artists often begin with light construction lines so they can erase and refine shapes without smudging.
⏳ Some cacti live for decades or even centuries — the saguaro can reach ages of 150–200 years.
How do you doodle a cactus?
What materials do I need to doodle a cactus?
What ages is doodling a cactus suitable for?
What are the benefits and safety tips for cactus doodling?
