Design A DIY Mini-Chandelier
Build a safe mini chandelier using cardboard, beads, string, and a battery LED; design, decorate, and learn about balance, symmetry, and light.


Step-by-step guide to design a DIY mini-chandelier
DIY Chandelier from Cardboard & Broken LED Bulbs | Easy Upcycled Home Decor Project | Recycling
Step 1
Gather all your materials and clear a flat workspace where you can work safely.
Step 2
Use a pencil and a round object to draw a large circle for the chandelier base and a smaller circle for the canopy on the cardboard.
Step 3
Carefully cut out the two cardboard circles with scissors.
Step 4
Mark six evenly spaced dots around the edge of the base circle and one dot in the center using the pencil and ruler.
Step 5
Make a small hole at each dot using a hole punch or the tip of the scissors (ask an adult for help if needed).
Step 6
Cut six equal short pieces of string about 20 cm each and one longer piece about 30 cm for the hanging loop.
Step 7
Thread beads onto each short piece of string until you like the look of each strand.
Step 8
Tie a knot at the bottom end of each beaded string so the beads cannot slide off.
Step 9
Feed the knotted ends of each beaded string up through the edge holes and tie a secure knot underneath the base to hold each strand in place.
Step 10
Pull the loose ends of the strings up through the center hole and then through the hole in the canopy so the canopy sits above the base.
Step 11
Tie the strings together above the canopy to make a hanging loop and trim any extra string close to the knot.
Step 12
Turn on the battery LED then push the LED bulb into the center hole with the light pointing down and tape the battery pack to the top of the base to keep it secure.
Step 13
Decorate your chandelier base and canopy with coloring materials and stickers to make it sparkle.
Step 14
Share a photo of your finished mini-chandelier and tell what you learned about balance symmetry and light on DIY.org.
Help!?
What can we use if we don't have a hole punch, beads, or a battery LED?
For the holes (step 6) use the tip of scissors or a clean sewing needle with adult help, substitute beads (step 8) with dried pasta shapes or rolled paper beads, and replace the battery LED (steps 14–15) with a small LED tealight or a tiny battery string-light taped into the center hole.
The cardboard tore around the holes and some strands keep slipping — how do I fix that?
Reinforce each punched hole with a small piece of tape or a glued-on paper washer before threading (step 6), double-knot each beaded strand and add a drop of glue to the knot to stop beads sliding (step 10), and make sure the six edge holes are evenly spaced and the strings are pulled snug so the canopy sits balanced (steps 4, 12).
How can I change this activity for younger or older kids?
For preschoolers (ages 3–5) pre-cut the cardboard circles and use jumbo beads and adult help for punching and tying (steps 2–6, 8–11), for elementary kids (6–10) let them measure, punch holes, thread and tie independently (steps 4–11), and for teens add precision by creating extra tiers, using fine paints, or swapping in a brighter LED assembly and teaching symmetry with alternating bead patterns (steps 4, 13, 16).
What are some ways to extend or personalize the mini-chandelier after finishing it?
Turn the single base into a tiered chandelier by adding extra smaller cardboard circles above or below and threading more beaded strands (steps 2–12), decorate with metallic paint, sequins, or small mirror tiles to catch the LED light (steps 16–17), and create symmetrical bead patterns to practice balance before sharing the photo on DIY.org (step 17).
Watch videos on how to design a DIY mini-chandelier
Easy DIY Chandelier Anyone Can Make!
4 Videos

Easy DIY Chandelier Anyone Can Make!

Mini Chandelier made with earrings. working no wiring needed
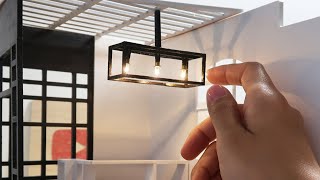
DIY Miniature -Working Modern Chandelier

How to Make a DIY Embroidery Hoop Mini-Chandelier | HGTV Handmade
Facts about children's STEM crafts and simple circuits
💡 Light-emitting diodes (LEDs) can use up to about 90% less energy than incandescent bulbs and often last tens of thousands of hours.
🕯️ The word “chandelier” comes from the French for candle holder — the earliest chandeliers held candles, not electric lights.
⚖️ The center of mass is the point that determines how your mini-chandelier will hang and whether it tilts or stays level.
🎨 Symmetry helps chandeliers look balanced and makes it easier to distribute weight so they hang straight.
♻️ Cardboard is lightweight, surprisingly strong for models, easy to decorate, and a great material to recycle into crafts.
How do I build a DIY mini chandelier with cardboard, beads, string, and a battery LED?
What materials do I need to design and decorate a DIY mini chandelier?
What ages is this DIY mini chandelier suitable for?
What are the benefits and safety tips for making a mini chandelier?
