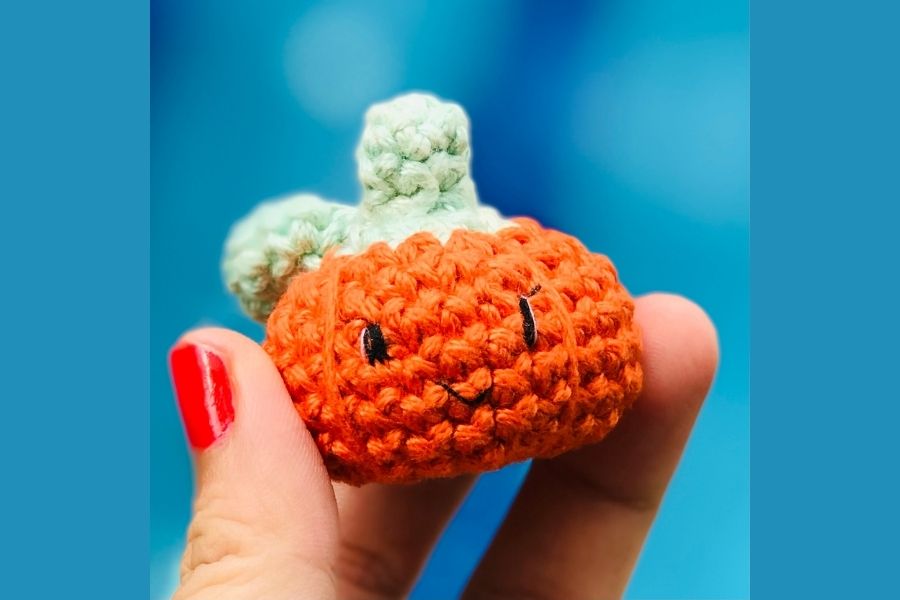
Crochet a kawaii pumpkin
Crochet a kawaii pumpkin using chunky yarn and basic stitches, add safety eyes with adult help, then stuff and shape a cute autumn toy.


Step-by-step guide to crochet a kawaii pumpkin
Step 1
Gather all your materials and sit in a comfy well-lit spot with an adult nearby.
Step 2
Make a magic ring with your chunky yarn.
Step 3
Crochet 6 single crochets into the magic ring and pull the ring tight.
Step 4
Work three increase rounds to make a flat circle: Round 1 do 6 increases (2 single crochets in each stitch) to get 12 stitches; Round 2 do (1 single crochet then increase) repeated 6 times to get 18 stitches; Round 3 do (2 single crochets then increase) repeated 6 times to get 24 stitches.
Step 5
Crochet 3 rounds of one single crochet in each stitch (24 stitches each round) to build the pumpkin’s height.
Step 6
Place stitch markers or scrap yarn where you want the pumpkin’s eyes to be about 6 stitches apart.
Step 7
With an adult’s help attach the safety eyes at the marked spots and secure the backs.
Step 8
Work three decrease rounds to close the top: Round A do (2 single crochets then single crochet two together) repeated 6 times to get 18 stitches; Round B do (1 single crochet then single crochet two together) repeated 6 times to get 12 stitches; Round C do single crochet two together around (6 decreases) to get 6 stitches.
Step 9
Stuff the pumpkin firmly and evenly with polyfill so it looks plump and cute.
Step 10
Make a short stem by joining a stem-colored yarn, chaining 6, and slip-stitching back across the chain to form a little tube.
Step 11
Use the yarn needle to sew the stem securely to the top center of the pumpkin.
Step 12
Weave in any loose yarn ends with the yarn needle and trim extra threads with scissors.
Step 13
Create pumpkin ridges by stitching 4 to 6 evenly spaced vertical lines from top to bottom with the yarn needle to shape the segments.
Step 14
Share a photo of your finished kawaii pumpkin on DIY.org.
Help!?
What can we use instead of chunky yarn or safety eyes if they’re hard to find?
If chunky yarn or safety eyes are hard to find, hold two strands of worsted-weight yarn together for the magic ring and pumpkin body and substitute embroidered or glued felt circles for the safety eyes so you can skip securing safety-eye backs.
My pumpkin looks lopsided or has holes when I do the decrease rounds—what should I check?
If your pumpkin gets holes or becomes lopsided during the decrease rounds (Rounds A–C), recount stitches after each round, redistribute or add more polyfill before finishing Round C, and tighten your single crochet two together stitches or add an extra decrease round to close gaps.
How can we adapt this activity for different ages?
For younger children, have an adult handle the magic ring, safety-eye attachment, and needle sewing while they help stuff the polyfill and place stitch markers, and for older kids let them make the stem (chain 6), sew on ridges, and experiment with extra rounds for different sizes.
How can we personalize or extend the kawaii pumpkin project?
To personalize the pumpkin, stitch 4–6 vertical ridges in contrasting yarn for texture, crochet and sew a small leaf to the stem before weaving in ends, or vary the number of increase rounds to make a set of different-sized pumpkins and share a photo on DIY.org.
Watch videos on how to crochet a kawaii pumpkin
Tiny HALLOWEEN CROCHET Pumpkin 🎃 (So EASY & Cute!)
4 Videos

Tiny HALLOWEEN CROCHET Pumpkin 🎃 (So EASY & Cute!)
Crochet Mini Halloween Pumpkins 🎃 (fast & cute)
DIY Crochet Mini Pumpkins | Easy, Quick and Fun Halloween Fall Crochet Project | For Beginners
Adorable FREE Crochet Pumpkin Pattern Tutorial - Step-by-Step for Halloween & Fall Decor! by Feklina
Facts about crochet for kids
🎃 Pumpkins come in many colors (orange, white, green, even blue) and the heaviest grown has tipped the scales at over 2,600 pounds!
🧶 Chunky yarn makes big, cozy stitches so projects like a kawaii pumpkin grow super fast — great for impatient crafters!
🪝 The word "crochet" comes from French for "small hook" — crochet uses one hook to loop yarn into shapes.
🧸 Amigurumi is the Japanese art of crocheting cute stuffed toys — "kawaii" means "cute", so a kawaii pumpkin fits perfectly!
👀 Safety eyes have a locking washer to help keep them secure, but they should always be installed with adult help for little kids.
How do I crochet a kawaii pumpkin using chunky yarn?
What materials do I need to crochet a kawaii pumpkin?
What ages is crocheting a kawaii pumpkin suitable for?
How can I keep this crochet pumpkin safe for little kids and what are simple variations?
