Create your own amphibian
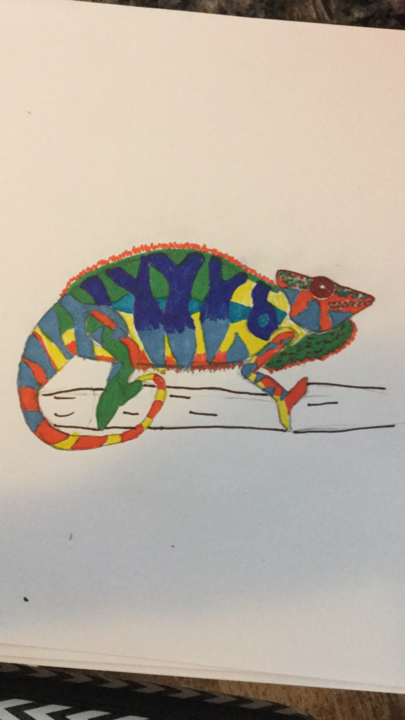
Design and build your own amphibian model using clay, paper, and recycled materials; learn about life cycles, habitats, and adaptations through hands-on observation.


Step-by-step guide to create your own amphibian
All About Amphibians
Step 1
Gather all your materials and set them on a clear workspace.
Step 2
Choose one real amphibian to inspire your design.
Step 3
Write down three facts about that amphibian such as where it lives one life cycle stage and one adaptation.
Step 4
Decide which life cycle stages you will show like egg tadpole and adult.
Step 5
Sketch your amphibian on paper showing the body shape colors and special features you want to include.
Step 6
Shape the main body of your amphibian using modeling clay.
Step 7
Make legs feet and a tail using clay or attach recycled pieces for those parts.
Step 8
Create life-cycle pieces such as eggs and a tadpole from clay or paper.
Step 9
Build and decorate a habitat base using cardboard or a tray and glue recycled items to make water and land areas.
Step 10
Place your amphibian and life-cycle pieces into the habitat and adjust their positions.
Step 11
Label at least three adaptations or body parts with small paper flags or notes.
Step 12
Share your finished amphibian and habitat on DIY.org
Help!?
What can we use if we don't have modeling clay or certain recycled pieces?
Use air-dry clay, play‑dough, or crumpled tin foil wrapped in masking tape for the main body and swap recycled pieces with bottle caps, yogurt cups, or felt when making legs, feet, tail, and habitat elements.
My amphibian's legs keep falling off; how do we fix that?
Push short toothpicks or cocktail sticks into the clay body before attaching legs and feet, or use a strong craft glue to secure recycled leg pieces to the cardboard habitat and let them dry fully.
How can we adapt this activity for different ages?
For preschoolers limit the project to sketching and shaping an adult with adult help for cutting and gluing, for elementary have them include eggs and a tadpole and label three adaptations, and for older kids add realistic textures, a detailed habitat base, and research the amphibian's scientific name and life‑cycle stages.
How can we enhance or personalize our amphibian and habitat?
Make the life‑cycle pieces removable to create a matching game, add texture with real sand or moss on the cardboard or tray habitat, include a short narrated video about the three facts, and share the finished amphibian and habitat on DIY.org.
Watch videos on how to create your own amphibian
All About Amphibians 🐸 - 5 Interesting Facts - Animals for Kids - Educational Video
4 Videos
All About Amphibians 🐸 - 5 Interesting Facts - Animals for Kids - Educational Video
The Life Cycle of a Frog | Four Stages of Development | How a Tadpole Becomes a Frog
Amphibians for Kids | What is an amphibian? Learn the characteristics of amphibians
Vertebrate Diversity: Amphibians
Facts about amphibian life cycles and habitats
🐸 Some frog species can lay hundreds to thousands of eggs in a single breeding season!
🔁 Salamanders (and axolotls) can regrow whole limbs and even parts of their heart and eyes.
🌊 Tadpoles breathe through gills at first, then grow lungs as they transform into adult amphibians.
🌍 Because their skin absorbs water and chemicals, amphibians are often early indicators of environmental problems.
♻️ Paper-mâché uses recycled paper to make lightweight, strong shapes—perfect for building model bodies!
How do I design and build an amphibian model using clay, paper, and recycled materials?
What materials and tools do I need to create a 'Create your own amphibian' project?
What ages is the 'Create your own amphibian' activity suitable for?
What are the benefits of making an amphibian model with my child and how can it be varied?
