Create some merch for an animation
Design and make animation-themed merch: stickers, badges, and paper T-shirts. Practice drawing characters, cutting shapes, and arranging colors and layouts safely.


Step-by-step guide to design and make animation-themed merch
Grocery Shopping Adventure! Fun Video for Kids
Step 1
Pick one animation character or a fun theme to put on your merch.
Step 2
Decide how many stickers badges and paper T-shirts you want to make.
Step 3
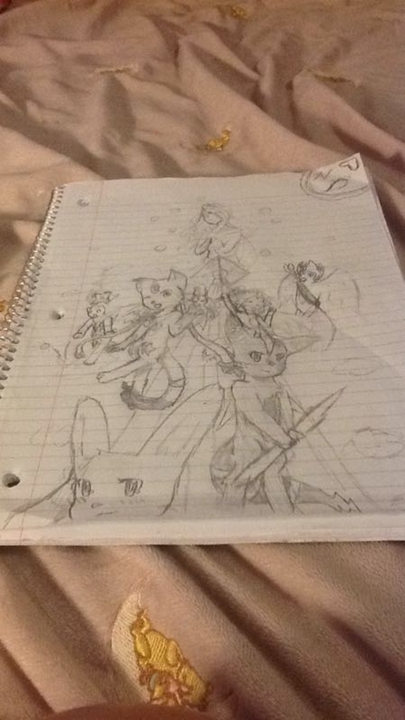
Lightly sketch your chosen characters directly onto card stock with your pencil.
Step 4
Color your sketches using your coloring materials.
Step 5
Cut out each colored character shape carefully with scissors.
Step 6
Make a sticker by placing a piece of clear tape over a cut design and trimming the tape close to the edge.
Step 7
Draw circle shapes for badges on card stock with your pencil.
Step 8
Cut out each circle badge shape with scissors.
Step 9
Glue a cutout character onto the front of each badge circle using the glue stick.
Step 10
Attach a safety pin or badge back to the back of each badge using tape or glue.
Step 11
Fold a sheet of plain paper in half neatly.
Step 12
Draw a T-shirt outline across the folded edge with your pencil.
Step 13
Cut along the T-shirt outline and then unfold the paper T-shirt.
Step 14
Decorate the paper T-shirt by drawing coloring or gluing a character on the front.
Step 15
Share your finished stickers badges and paper T-shirts on DIY.org
Help!?
If I don't have card stock, safety pins, or a glue stick, what can I use instead?
Use sturdy cereal-box cardboard or a manila folder instead of card stock, clear packing tape or contact paper in place of the small clear tape when making stickers, white school glue or a glue roller for attaching cutouts to badge circles, and a paperclip bent into a loop or a small stapled paper loop reinforced with tape if you don't have safety pins or badge backs.
My tape stickers keep peeling or getting bubbles when I place the clear tape over the cut design—how can I fix that?
Lay the cut design flat on a clean surface and smooth the clear tape from one edge to the other using a ruler or folded card to press out bubbles while making the sticker, trim close to the edge with sharp scissors, or switch to clear contact paper or printable sticker paper to avoid peeling and bubbling.
How can I adapt this activity for younger kids (ages 3–5) and older kids (ages 10+)?
For ages 3–5 pre-sketch character outlines on heavy card stock and pre-cut shapes, provide thick crayons and supervise gluing and attaching pins, while ages 10+ can freehand detailed sketches, use fine markers, cut intricate shapes with craft knives under supervision, and make layered badges with personalized text before sharing on DIY.org.
What are some fun ways to upgrade or personalize the stickers, badges, and paper T-shirts after finishing the basic steps?
Upgrade stickers by laminating with contact paper or extra clear tape for durability, add glitter glue or fabric markers to decorate paper T-shirts, attach ribbon loops or extra card stock layers to badges to make mini medals, and scan your finished set to create printed iron-on transfers or a digital portfolio to post on DIY.org.
Watch videos on how to design and make animation-themed merch
Making a TED-Ed Lesson: Animation
4 Videos
Making a TED-Ed Lesson: Animation
DIY TOYS FOR KIDS || WINTER HOLIDAY CRAFTS FOR LITTLE PEOPLEⓇ TOYS BY FISHER-PRICEⓇ
Turning Kids Drawings Into Real Toys
Easy and Fun Crafts for Kids | Handmade Picture Frame | Simple Handmade Gifts
Facts about character design and crafts for kids
🎞️ Devices like the phenakistoscope (1832) and the zoetrope (1834) were early animation toys that made pictures appear to move.
🏷️ The first pressure-sensitive self-adhesive labels were invented in 1935 by R. Stanton Avery, paving the way for modern stickers.
📌 Pin-back buttons were mass-produced for political campaigns and advertising starting in the late 19th and early 20th centuries.
👕 T-shirts became everyday casual wear worldwide after World War II and are now a popular way to show fandom and designs.
🎨 Using bold shapes, a limited color palette, and clear outlines helps small merch like stickers and badges stay readable from a distance.
How do you design and make animation-themed merch like stickers, badges, and paper T-shirts?
What materials do I need to make animation-themed stickers, badges, and paper T-shirts?
What ages is this animation-themed merch activity suitable for?
What safety tips should I follow when making merch with children?
