Create LEGO® pixel art
Design and build LEGO pixel art mosaics on baseplates by planning a color grid, counting studs, and assembling bricks to recreate simple images.


Step-by-step guide to create LEGO pixel art mosaics
LEGO Pixel Art - Educator Moment
Step 1
Pick a simple picture to recreate such as a heart a smiley a star or an animal face.
Step 2
Count the studs across and down on your baseplate to determine the grid size.
Step 3
Draw a matching grid on your graph paper using the stud numbers you counted.
Step 4
Lay your picture next to the grid and shade the squares on the grid to show where each color will go.
Step 5
Make a color key on the side of your grid listing each color tile and how many squares use that color.
Step 6
Sort your LEGO tiles into small bowls or trays by color so you can grab them easily.
Step 7
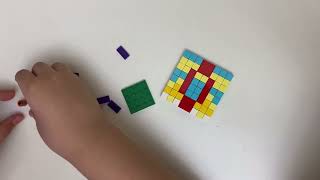
Place your baseplate on the table and start building at one corner following your shaded grid.
Step 8
Place tiles row by row matching each shaded square to the correct color from your color key.
Step 9
Stop after each few rows and compare the mosaic to your grid to catch any mistakes.
Step 10
Press gently across the finished mosaic to make sure all tiles are snug and even.
Step 11
Share your finished creation on DIY.org
Help!?
What can we use if we don't have a LEGO baseplate or plenty of tiles?
If you don't have a LEGO baseplate or tiles, use a piece of cardboard with a drawn stud grid and colored paper squares or stickers that match the squares on your graph-paper grid.
My picture looks wrong after a few rows — what should I do?
If your mosaic doesn't match the drawing because of miscounted studs or shifted rows, recount the studs on your baseplate, compare the built rows to your shaded graph paper grid, and swap tiles row by row before pressing gently to reset alignment.
How can I adapt this activity for different ages?
For younger children use a Duplo baseplate and larger tiles with a very simple heart or smiley and pre-sorted bowls, while older kids can increase the stud grid size, choose a more detailed picture, and make a precise color key with counts.
How can we make the finished LEGO pixel art more special or challenging?
To personalize and extend the activity, build a contrasting-tile frame, experiment with gradients in your color key, or connect several baseplates into a larger mural before pressing gently and sharing the finished creation on DIY.org.
Watch videos on how to design and build LEGO pixel art mosaics
LEGO Sprunki Phase 2 - Pixel Art!
3 Videos

LEGO Sprunki Phase 2 - Pixel Art!
How To Make Pixel Art, With LEGO

LEGO DOTS Mosaic Art! 🎨 Creating a Stunning Pixel Painting Step by Step
Facts about LEGO building and pixel art for kids
🧱 The modern LEGO brick design was patented in 1958, and bricks from back then still click together with new ones.
🎮 Pixel art grew from early video games where each on-screen block acted like a single “pixel”—just like one LEGO stud in a mosaic.
📏 A common LEGO baseplate size is 32×32 studs, which gives you a neat 1,024-stud grid for medium-resolution mosaics.
🎨 LEGO is made in dozens of official colors, so mixing shades helps make smoother-looking pixel images.
🧩 Mosaics are an ancient art form—tiny-tile pictures were popular in Roman and Byzantine times, long before LEGO existed.
How do I create LEGO pixel art mosaics step by step?
What materials do I need to make LEGO pixel art mosaics?
What ages is LEGO pixel art suitable for?
What are the benefits, safety tips, and variations for LEGO pixel art?
