Create Home Made Blubber!
Make a blubber glove using vegetable shortening in sealed bags and test insulation by comparing hand warmth in ice water with and without it.


Step-by-step guide to make a homemade blubber glove
Step 1
Gather all your materials and put them on a table where you can work safely.
Step 2
Fill two large bowls about three-quarters full with cold tap water.
Step 3
Add lots of ice cubes to both bowls until the water is very cold.
Step 4
Spoon about 2 tablespoons of vegetable shortening into one resealable plastic bag.
Step 5
Seal the shortening-filled bag tightly and press out extra air.
Step 6
Slide the sealed shortening bag into a second resealable bag.
Step 7
Seal the second bag tightly so the shortening bag stays inside and cannot leak.
Step 8
Make the control glove by placing two clean resealable bags one inside the other.
Step 9
Put your non-blubber hand into the nested empty bags to make the control glove.
Step 10
Submerge the control-gloved hand into the first icy bowl and count to 30 slowly.
Step 11
Remove the control hand from the water and dry it with the towel.
Step 12
Put your other hand into the blubber glove you made with the shortening bag inside.
Step 13
Submerge the blubber-gloved hand into the second icy bowl and count to 30 slowly.
Step 14
Remove the blubber-gloved hand and compare which hand felt warmer and why you think that happened.
Step 15
Share a photo and what you learned about your blubber glove experiment on DIY.org.
Final steps
You're almost there! Complete all the steps, bring your creation to life, post it, and conquer the challenge!

Help!?
If I don't have vegetable shortening, what can I use instead?
Use about 2 tablespoons of solid coconut oil in the sealed inner resealable bag as a substitute for vegetable shortening when making the blubber glove.
My shortening bag started leaking — what should I do?
If the inner shortening bag leaks, dry your hands, transfer the shortening into a fresh resealable bag pressing out extra air, slide it into a second bag, and make sure both seals are fully closed before repeating the submersion steps.
How can I adapt the activity for different ages?
For younger kids have an adult pre-fill the two ice bowls and prepare the blubber glove while shortening the submersion count to 10, and for older kids increase the 30-second counts and experiment with different shortening amounts to compare which hand felt warmer.
How can we extend or personalize the blubber experiment?
Try changing the amount of shortening (1–3 tablespoons), add a thin wool glove over the blubber bag as a comparison insulating layer, measure the bowl temperatures before and after each trial, and share your favorite photo and results on DIY.org.
Watch videos on how to make a homemade blubber glove
4 Amazing Science Experiments for a Day Inside | Compilation | SciShow Kids
4 Videos

4 Amazing Science Experiments for a Day Inside | Compilation | SciShow Kids
HOW TO MAKE GIANT SLIME GOO Easy Science Experiment for kids!
How to Make a Lava Lamp at Home with Baking Soda | Easy DIY Science Experiment

Making a Homemade Composter! | Full-Time Kid | PBS Parents
Facts about insulation and animal adaptations
⏱️ You can turn the activity into a mini science test: time how long each hand can tolerate ice water to compare insulation performance.
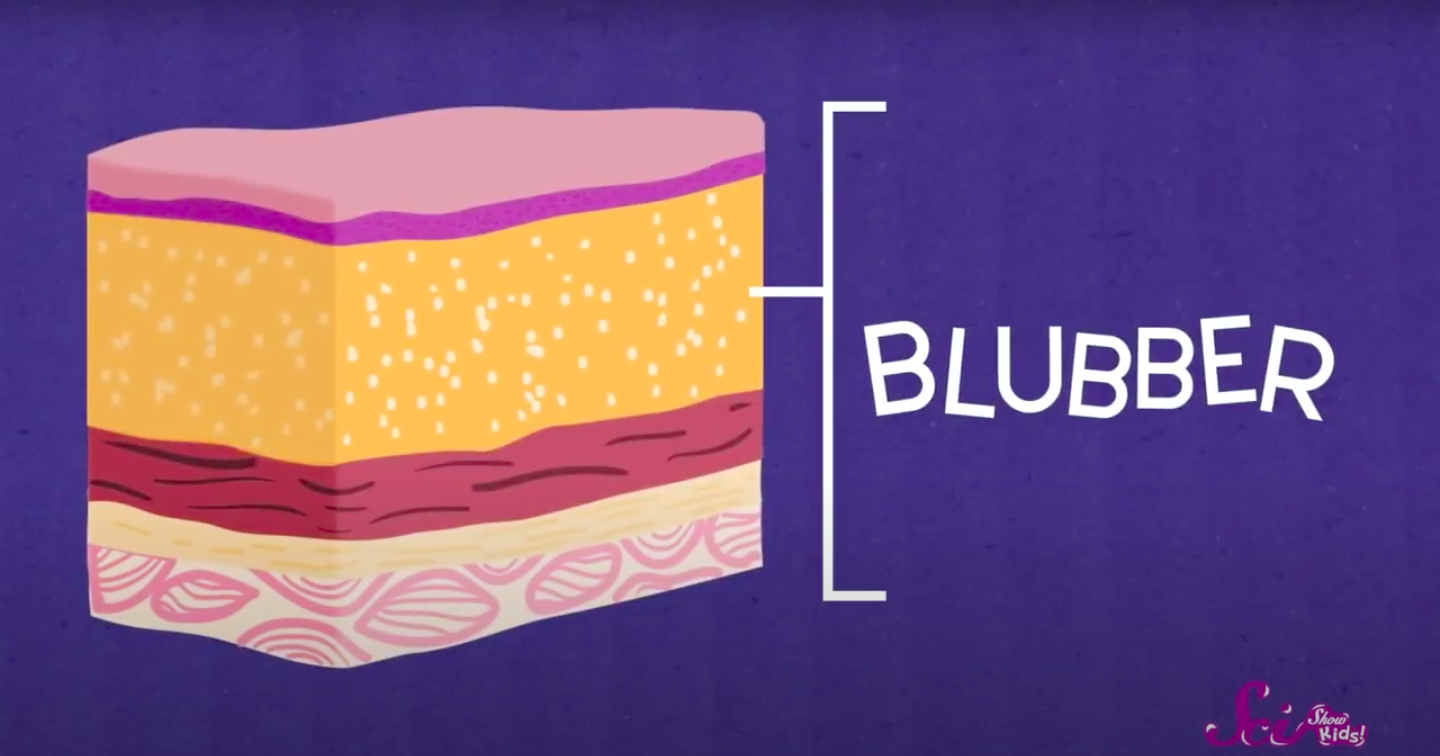
🐋 Blubber is a thick layer of fat found in whales and seals that helps them stay warm in icy water by trapping heat.
🧪 Blubber-glove experiments are a classic classroom demo of heat transfer — they show how insulation reduces conduction and keeps heat in.
🧈 Vegetable shortening is mostly fat, so it mimics blubber’s insulating properties and is a safe, hands-on material for the glove.
🧊 Water pulls heat away from your body much faster than air, which is why your hand feels so cold in ice water without insulation.
How do you make a homemade blubber glove and test it in ice water?
What materials do I need for the blubber glove experiment?
What ages is the blubber glove activity suitable for?
What are the benefits and safety tips for the blubber glove experiment?


One subscription, many ways to play and learn.
Only $6.99 after trial. No credit card required