Create and test an animal maze
Build a tabletop animal maze from cardboard and tape, then test it using toy animal figures to study navigation and problem solving.

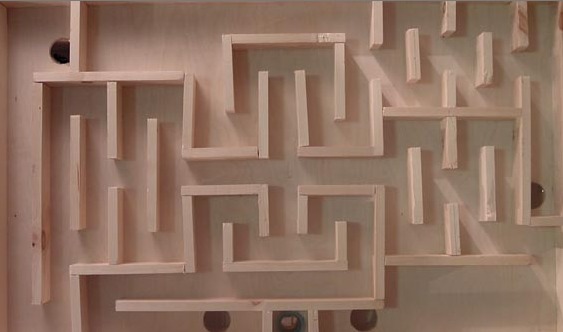

Step-by-step guide to create and test an animal maze
Cool Animal Lessons for Kids | Homeschool Pop
Step 1
Gather all materials in one place so you are ready to build.
Step 2
Find a sturdy flat piece of cardboard about the size of a placemat to be your maze base.
Step 3
Draw a big S for Start on one edge of the base with your pencil.
Step 4
Draw a big F for Finish on the opposite edge of the base with your pencil.
Step 5
Use your pencil and ruler to sketch a winding path between S and F on the base.
Step 6
Cut several long strips of cardboard about one inch tall to use as maze walls.
Step 7
Tape a long strip upright along each pencil line to make the corridor walls.
Step 8
Tape short wall pieces inside the corridors to create dead ends and branching paths.
Step 9
Decorate the maze with markers or stickers to make habitats and landmarks.
Step 10
Place one toy animal figure on the Start spot.
Step 11
Gently push the toy animal from Start to Finish one time and watch the route it takes.
Step 12
Run the toy animal two more times to see if it picks the same path each time.
Step 13
Change one wall or obstacle to make the route harder for the animal.
Step 14
Run the toy animal again to see how it solves the new challenge.
Step 15
Share your finished animal maze on DIY.org.
Help!?
What can we use if we don't have a sturdy flat piece of cardboard about the size of a placemat or extra cardboard for the wall strips?
Use a flattened cereal box, shoebox lid, poster board, or foam core as your maze base and make walls from craft sticks, folded construction paper strips, or upright LEGO bricks taped along your pencil lines.
Why do the taped wall strips keep falling over or the toy animal get stuck, and how can we fix it?
Reinforce the long strips by folding tabs at the bottom or using stronger tape or glue when taping each strip upright along the pencil line, and widen corridors if the toy animal gets stuck between taped walls.
How can we change the maze instructions to suit different ages?
For toddlers, adults should pre-cut and tape wide corridors and simplify the path from S to F, for elementary kids let them draw winding paths and add dead ends, and for older kids have them time runs, redesign branching paths, and change one wall to create a harder challenge.
How can we make the activity more creative or challenging after finishing the basic maze?
Decorate habitats with markers or stickers, add multiple toy animals to compare routes and times, photograph runs before and after you change one wall to study how the animal solves the new challenge, and then share the finished animal maze on DIY.org.
Watch videos on how to create and test an animal maze
Exploring the Jungle: Fun Animal Adventure for Kids! | Kindergarten | EYFS
4 Videos
Exploring the Jungle: Fun Animal Adventure for Kids! | Kindergarten | EYFS
Toddler Learning Video: Easy Science Experiments for Toddlers with Paw Patrol and Speedie DiDi
Drawing for kids step by step #5 - Drawing for kids animals - Drawing ideas easy for kids
Wild Animals | ESL Vocabulary Games for Kids
Facts about hands-on STEM and engineering for kids
🧭 The concept of mazes goes back thousands of years — one of the oldest famous mazes is the hedge maze at Hampton Court (17th century).
📦 Corrugated cardboard (often called cardboard) was invented in the 19th century and is lightweight, strong, and perfect for kid-friendly DIY builds.
🐾 Playing with toy animals helps kids build storytelling, empathy, and social-play skills while they experiment with scenarios.
🧠 Navigating mazes boosts spatial reasoning and planning — scientists use maze tasks to study how brains learn routes and solve problems.
🐀 Classic animal maze experiments (like those with rats) helped psychologists discover how animals form 'cognitive maps' of spaces.
How do I build and test a tabletop animal maze for kids?
What materials do I need to make a cardboard animal maze?
What ages is a cardboard animal maze activity suitable for?
What are the benefits of making and testing an animal maze with toy figures?
