Create a package design
Design and build a small cardboard package, measure and plan layout, create decorations and test closures to learn packaging and presentation skills.


Step-by-step guide to design and build a small cardboard package
🌈 EASY & FAST Rainbow Crafts! 🤩 Super Easy & SAFE for Kids! DIY & Crafts 🌟 Imagine Playworld
Step 1
Gather the Materials Needed.
Step 2
Decide how big you want your box to be.
Step 3
Write the length width and height you chose on the scrap paper.
Step 4
Use the ruler and pencil to draw a flat box template on the cardboard using the written dimensions.
Step 5
Cut out the cardboard template along the pencil lines with scissors.
Step 6
Lightly score the fold lines with a blunt edge or the back of the scissors to make folding easy.
Step 7
Fold the cardboard along each scored line so the box shape starts to form.
Step 8
Apply glue or tape to the tabs that will hold the box together.
Step 9
Press the glued or taped tabs together and hold until they stick firmly.
Step 10
Decorate the outside of your box with colouring materials stickers and decorative paper.
Step 11
Test at least two closure methods like a tuck-in flap tape or ribbon and choose the strongest one.
Step 12
Place a small item inside the box to check the fit and that the closure keeps it safe.
Step 13
Share your finished package design on DIY.org.
Help!?
What can I use instead of thick cardboard or a ruler if they're hard to find?
Use a cereal box or poster board for the cardboard, a measuring tape or a straightedge from a hardcover book instead of a ruler, and the back of a butter knife to lightly score fold lines as the blunt edge.
My box keeps tearing or won't hold the shape after I fold it — what should I check or fix?
Make sure you lightly score the fold lines with a blunt edge before folding, use stronger glue or wide packing tape on the tabs, and reinforce any torn areas with an extra strip of cardboard or tape along the seam.
How can I adapt this box-making activity for younger children or make it more challenging for older kids?
For younger children, pre-draw the flat box template on the cardboard and let them cut, fold, and decorate with crayons and stickers using tape to assemble, while older kids can precisely measure and draw dimensions on scrap paper, use exact scoring, test multiple closure methods like tuck-in flaps and ribbons, and add internal partitions.
What are easy ways to personalize or strengthen my finished package design?
Decorate the outside with decorative paper and stickers, add padding inside for the small item, try at least two closure methods (tuck-in flap, tape, ribbon) as instructed and choose the strongest, and label or add a clear window for display.
Watch videos on how to design and build a small cardboard package
DIY Color Mixing Craft for Toddlers — Learn Colors with Mom 🌈💕Easy & Mess Free!
4 Videos
DIY Color Mixing Craft for Toddlers — Learn Colors with Mom 🌈💕Easy & Mess Free!
🌈 Colorful ARTS & CRAFTS for Beginner Artists! 🎨 Fun DIY | Imagine PlayWorld
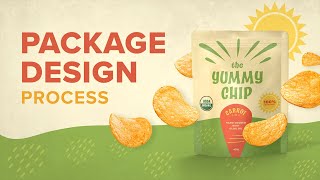
Package Design Process: How to Create an Attractive Packaging Design from Scratch
Colorful Creations: Learning Colors for Toddlers with Paint!
Facts about packaging design
📦 Cardboard is made from layers of paper with a fluted middle layer (corrugation) that gives boxes strength and cushioning.
✂️ Die-cutting lets flat sheets be precisely cut and scored so a box can fold into shape like magic.
📏 Packaging designers start with a dieline — a flat template that shows where to cut, fold, and glue.
🎨 Simple decorations — stamps, stencils, stickers, or washi tape — can make homemade packages look super professional.
🔒 Common small-box closures kids can test include tuck flaps, tab locks, and sleeve wraps to see which holds best.
How do you design and build a small cardboard package?
What materials do I need to design a small cardboard package?
What ages is this cardboard package design activity suitable for?
What are the benefits and safety tips for kids designing cardboard packages?
