Create a local plant guide
Make a local plant guidebook by identifying, sketching, photographing, and describing nearby plants, noting leaves, flowers, habitat, and safe handling practices.


Step-by-step guide to create a local plant guide
Parts of Plants for Kids | Learn all about plant parts and their functions
Step 1
Choose a safe nearby place to explore.
Step 2
Tell an adult where you will explore and ask permission.
Step 3
Gather your materials and bring them to your chosen place.
Step 4
Find one plant you want to study.
Step 5
Observe the plant and notice its leaf shape flower color and habitat.
Step 6
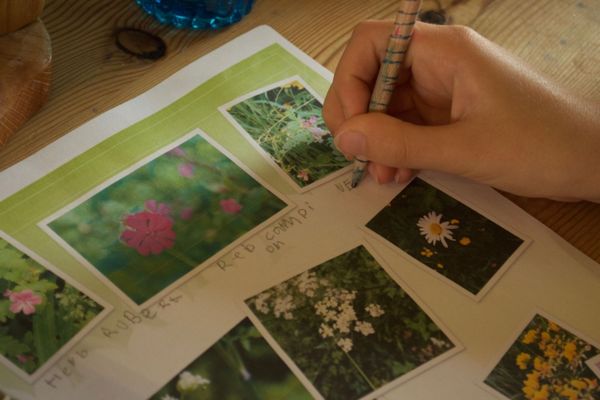
Take clear photos that show the leaves the flowers and the whole plant.
Step 7
Collect one small fallen leaf or flower and put it into your zip bag.
Step 8
Use the magnifying glass to look for fine details like veins or tiny hairs.
Step 9
Draw a pencil sketch of the plant in your notebook.
Step 10
Use the field guide or printed ID sheets to identify the plant and write its name.
Step 11
Write a short safety note about touching or eating this plant and to wash hands after handling.
Step 12
Glue or tape the photo or leaf sample into your guide page and add the date and location.
Step 13
Repeat Steps 4 to 12 for at least three different nearby plants.
Step 14
Make a cover page for your guide with a title and your name.
Step 15
Share your finished plant guide on DIY.org.
Help!?
What can we use instead of a magnifying glass, zip bag, or camera if we don't have them?
If you don't have a magnifying glass use a phone camera's zoom or reading glasses, replace the zip bag in Step 7 with a folded paper envelope or snack wrapper, and substitute a camera by making extra-detailed pencil sketches in your notebook (Step 9) or asking an adult to take photos for Step 6.
My photos (Step 6) are coming out blurry or the plant is hard to identify — what should I do?
For blurry photos in Step 6 work in bright natural light, rest your phone/camera on a rock or bag for steady close-ups of leaves and flowers, take multiple angles including the whole plant, and collect a small fallen sample (Step 7) to examine with the magnifying glass (Step 8) for Step 10 identification.
How can this activity be changed for younger children or older kids?
For younger children simplify Steps 4–12 to study just one plant with an adult helping with permission (Step 2), sample collection (Step 7), and gluing into the guide (Step 12), while older kids can add measurements, record GPS/location, look up Latin names in the field guide (Step 10), and create a polished cover page to share on DIY.org.
How can we personalize or extend our plant guide beyond the basic steps?
Personalize and extend your guide by pressing leaves between heavy books to glue into Step 12, adding leaf rubbings or watercolor sketches alongside your pencil drawings (Step 9), mapping each plant's habitat with dates and locations, and including extra photos or QR links when you share on DIY.org.
Watch videos on how to create a local plant guide
Step-by-step Planting Guide | Every Child a Seed Programme
4 Videos
Step-by-step Planting Guide | Every Child a Seed Programme

How Plants Grow for Kids | Learn about photosynthesis and what plants need to grow strong

What Plants Need To Grow | KS1 Science Year 2 STEM Summer Camp

Life Cycle of a Plant for Kids! | Learn Parts of a Plant 🌱 | Twinkl USA
Facts about plant identification and botany for kids
🌱 There are around 390,000 known plant species worldwide — plenty to discover right in your neighborhood!
📷 Field guides often include both photos and sketches because drawings can highlight ID details photos might miss.
🕸️ Many plants are connected by underground fungal networks (the "wood wide web") that help them share nutrients and signals.
🧾 Herbarium specimens in museums can be over 100 years old — pressed plants act like time-traveling nature records.
📊 Citizen scientists using apps like iNaturalist have contributed millions of plant observations that help scientists track where species live and when they bloom.
How do I create a local plant guidebook with my child?
What materials do we need to make a local plant guide?
What ages is making a local plant guide suitable for?
What are the benefits and safety tips for making a plant guide?
