Create a littlebits rube goldberg machine
Build a littleBits Rube Goldberg machine using electronic modules, ramps, dominoes, and everyday objects, then test to explore cause-and-effect and simple machines.


Step-by-step guide to create a littleBits Rube Goldberg machine
How To Build a Rube Goldberg Machine | STEM Lesson Plan
Step 1
Clear a flat workspace on a table or floor so you have lots of room to build your machine.
Step 2
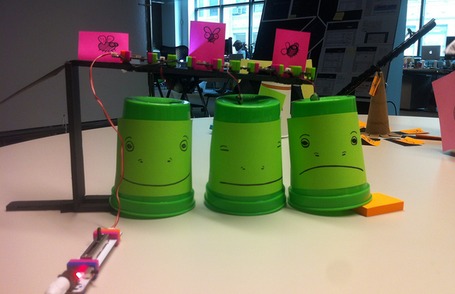
Pick a clear start trigger and a fun finish goal for your machine like lighting an LED or tipping a cup.
Step 3
Snap together the littleBits power module and an input module to make the start of your electronic chain.
Step 4
Add an output module such as a servo buzzer or motor to the chain so it can push or move something in your machine.
Step 5
Turn on the littleBits power briefly to test that the output moves or activates.
Step 6
Place a lightweight object or small toy directly in front of the output so the output can push it when activated.
Step 7
Build a ramp from cardboard or books and tape it in place so the pushed object will roll toward the next part of your chain.
Step 8
Arrange a line of dominoes or small blocks that the rolling object will hit and carry the action forward.
Step 9
Create a simple marble release by propping a cup or barrier that the falling dominoes will nudge to free a marble.
Step 10
Make a lever by balancing a ruler on a pencil and position it so the marble or ball will hit one end and lift or drop something else.
Step 11
Do a careful dry run by nudging the starting object by hand to watch the mechanical sequence and adjust any pieces that miss.
Step 12
Activate your littleBits start input to run the full Rube Goldberg machine and watch each step happen in order.
Step 13
Tweak positions tape or angles where needed and repeat tests until your machine works reliably.
Step 14
Share a photo and description of your finished Rube Goldberg machine on DIY.org so everyone can see your clever creation.
Help!?
What can I use if I don't have a littleBits power module or a servo/motor output?
If you can't find the littleBits power module or servo/buzzer/motor, use an AA battery pack or coin-cell holder for power and a small hobby motor, buzzer, or wind-up toy as the pushing output to nudge the lightweight object in step 5.
Why does my rolling object stop on the ramp or miss the domino line, and how can I fix it?
If the pushed object stalls on the ramp (step 7) or misses the dominoes (step 8), reduce its weight, increase the ramp angle or add side-tape guides, and retest the output motion from step 4 to ensure enough push.
How can I adapt this Rube Goldberg for different age groups?
For younger children, simplify by using large blocks instead of dominoes and having an adult snap together littleBits in steps 3–4, while older kids can add sensors, branching paths, or multiple motors and program microcontrollers to control timings in steps 11–13.
How can we make the machine more exciting or unique before sharing on DIY.org?
Make it more exciting by decorating ramps and the marble cup from steps 6–9, adding an LED finish or sound effect tied to the littleBits output, timing runs with a stopwatch, and photographing the setup to post per step 14.
Watch videos on how to build a littleBits Rube Goldberg machine
Easy Rube Goldberg Ideas: Easy Rube Goldberg Machine for Kids
4 Videos
Easy Rube Goldberg Ideas: Easy Rube Goldberg Machine for Kids
Simple Steps to Create a Rube Goldberg Machine | Kids Teaching Kids
Simple Rube Goldberg Machine setup for Science class
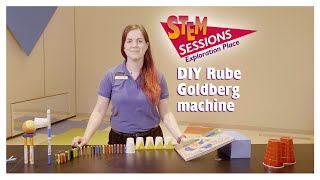
DIY Rube Goldberg machine | STEM Session
Facts about basic electronics and simple machines
🧩 littleBits modules snap together with magnets and are color-coded (power pink, input blue, wire orange, output green) so electronics are plug-and-play.
🤹 Rube Goldberg was an American cartoonist and engineer whose silly, overcomplicated machines inspired the name 'Rube Goldberg machine'.
🏗️ There are six classic simple machines (lever, wheel and axle, pulley, inclined plane, wedge, screw) that change force and direction.
🁢 A tiny push can start a big chain reaction—domino-style setups transfer energy object-to-object to topple many with one tap.
⚡ littleBits use low-voltage, kid-friendly modules so children can safely explore circuits, motors, lights, and sensors to learn cause-and-effect.
How do I build a littleBits Rube Goldberg machine step by step?
What materials do I need to make a littleBits Rube Goldberg machine?
What ages is this littleBits Rube Goldberg activity suitable for?
What are the benefits of making a littleBits Rube Goldberg machine?


