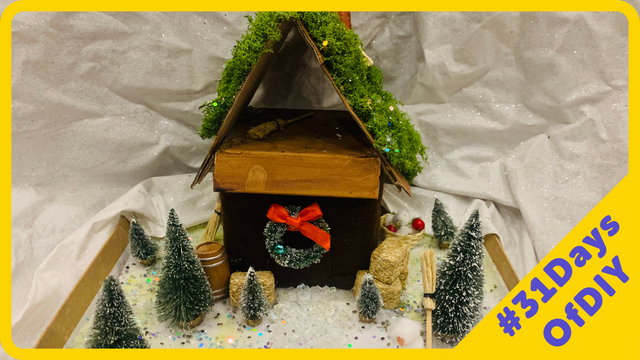
Create a Fairy Winter Cottage w/ Moki0102
Build a miniature fairy winter cottage with Moki0102 using recycled materials, paint, cotton snow, and safe LED lights while exploring creativity and simple design.


Step-by-step guide to create a fairy winter cottage with Moki0102
Step 1
Gather all Materials Needed and place them on a clear work surface.
Step 2
Place Moki0102 next to your workspace so they can help you imagine the cottage.
Step 3
Choose a small cardboard box or lid to be the base of your fairy winter cottage.
Step 4
Cut cardboard pieces to the right height to make the cottage walls.
Step 5
Attach the walls to the base using craft glue or double sided tape.
Step 6
Cut a roof shape from scrap cardboard that will sit on top of your walls.
Step 7
Attach the roof to the walls with craft glue or double sided tape.
Step 8
Cut out a door and one or two window shapes from scrap cardboard.
Step 9
Glue the door and window pieces onto the walls of your cottage.
Step 10
Paint the cottage exterior with water based paints and let your colors shine.
Step 11
Allow the paint to dry completely before you touch the cottage.
Step 12
Pull apart cotton balls to make fluffy snowy clumps.
Step 13
Glue the fluffy cotton snow and small recycled decorations onto the roof and around the base of the cottage.
Step 14
Place a battery LED tealight inside the cottage so it glows safely.
Step 15
Share your finished Fairy Winter Cottage with Moki0102 on DIY.org.
Help!?
What can I substitute if I don't have Moki0102 or a battery LED tealight?
Use a small stuffed animal or printed picture in place of Moki0102 for imagination and a small flashlight or a short string of battery-operated fairy lights tucked inside the cottage instead of the LED tealight.
My cardboard walls keep falling over or the roof won't stay on—how can I fix that?
Reinforce the cardboard walls by scoring and folding tabs to glue them to the base with extra craft glue or double-sided tape, hold or clip them until set, and trim the roof edges so it sits flush before attaching as instructed.
How can I adapt this Fairy Winter Cottage activity for different ages?
For younger children have an adult pre-cut the cardboard walls and roof and let them glue cotton snow and paint with water-based paints, while older kids can cut detailed doors/windows, add recycled decorations, and experiment with extra LED fairy lights inside the cottage.
How can we extend or personalize the cottage after following the basic steps?
Personalize by painting unique color schemes, adding a scrap-cardboard chimney or wreath, gluing cotton snow paths and tiny recycled decorations, and making a removable roof so the battery LED tealight can be turned on and off as you share the cottage on DIY.org.
Watch videos on how to create a fairy winter cottage with Moki0102
Minecraft Aesthetic Fairy Cottage | Cottagecore Tutorial
4 Videos
Minecraft Aesthetic Fairy Cottage | Cottagecore Tutorial
DIY Fairy Cottage House using natural materials

How to build a Fairy Cottage 🦋 | Minecraft Tutorial | NO Mods or CITs

Minecraft | How to build a Fairy Moon House ✨build tutorial✨
Facts about recycled crafts for kids
🧚 Fairy tales often feature tiny hidden homes — perfect inspiration for a cozy fairy cottage.
♻️ Upcycling turns trash into treasure; cardboard, bottle caps, and fabric are common materials for mini builds.
🏠 Dollhouses began in 17th-century Europe as elaborate 'baby houses' used to display household fashions.
💡 LEDs use very little energy and stay cool, making tiny battery LEDs safe for miniature lighting.
❄️ Pulled-apart cotton makes soft, fluffy 'snow' that looks great on roofs, paths, and trees.
How do I build a Fairy Winter Cottage with Moki0102?
What materials do I need to make a Fairy Winter Cottage with Moki0102?
What ages is building a Fairy Winter Cottage with Moki0102 suitable for?
What safety tips and fun variations can we try for the Fairy Winter Cottage project?
